×
- Hello
- Login or Register
- Quick Links
- Live Chat
- Track Order
- Parts Availability
- RMA
- Help Center
- Contact Us
- Shop for
- Mazda Parts
My Garage
My Account
Cart
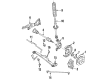
Genuine 1988 Mazda RX-7 Shock Absorber
Suspension Shock Absorber- Select Vehicle by Model
- Select Vehicle by VIN
Select Vehicle by Model
orMake
Model
Year
Select Vehicle by VIN
For the most accurate results, select vehicle by your VIN (Vehicle Identification Number).
3 Shock Absorbers found


1988 Mazda RX-7 Strut Part Number: FB44-34-900C
$135.53 MSRP: $180.74You Save: $45.21 (26%)Ships in 1-2 Business DaysProduct Specifications- Other Name: Damper Left, Front; Strut
- Position: Left
- Item Weight: 10.50 Pounds
- Condition: New
- Fitment Type: Direct Replacement
- SKU: FB44-34-900C
- Warranty: This genuine part is guaranteed by Mazda's factory warranty.
1988 Mazda RX-7 Strut Part Number: FB44-34-700C
Product Specifications- Other Name: Damper Right, Front; Strut
- Position: Right
- Item Weight: 10.50 Pounds
- Condition: New
- Fitment Type: Direct Replacement
- SKU: FB44-34-700C
- Warranty: This genuine part is guaranteed by Mazda's factory warranty.
1988 Mazda RX-7 Strut Part Number: FB44-28-700C
Product Specifications- Other Name: Damper, Rear; Strut
- Item Weight: 6.00 Pounds
- Condition: New
- Fitment Type: Direct Replacement
- SKU: FB44-28-700C
- Warranty: This genuine part is guaranteed by Mazda's factory warranty.
1988 Mazda RX-7 Shock Absorber Parts and Q&A
- Q: How to replace the shock absorber on 1988 Mazda RX-7?A: Lift the rear part of the car and hold it well with jack stands placed under the rear axle enclosures. To get at the top of the shock absorber in the luggage compartment, remove the side covers, which consist of four screws on the top of the trim panel, two of which are covered with plastic plugs which must be pried out with a screwdriver, and two screws at the bottom going into the floorboard below the carpet. After removing all the screws, pull off the trim panel in the car to expose the top of the shock absorber located in the top of the tower raised. When the shock damper is clamped by the top shock stud, loosen the lock nut and jam nut of the shock absorber shaft with the small wrench or vise grips and this would need two wrenches. Unscrew the big washer and rubber bushing on top of the shock absorber. When the vehicle is on the ground, unscrew the nut and the bolt at the lower end of the shock absorber, then remove the shock absorber and make it come out of the bottom area of the car, with the help of a screwdriver or a bar. Take the total length of the shock absorber to increase the chances of being easily reinstalled, examine it regarding noise, leakage of fluids, functionality, and wear of the bushing, and change it in case there are any problems. Few compress and extend the shock absorber to find out whether there is free movement, and change it in case there is any free movement. To re-fitting the shock absorber, put up one cup washer (with the cupped part upper) and one rubber bushing on the top of the shock absorber shaft. Install the shock absorber with the general length being similar to when it is out of the car but it may be hard to compress or lengthening it. Install a top end of the shock absorber by pushing the top of the shock absorber through the hole in the floor board and fitting the bolt and lock nut through the lower end and eye bolt of the shock absorber. On the shock absorber shaft, after making sure that the upper end of the shaft sticks out of the hole in the floorboard, screw the bottom lock nut to 47 to 59 ft-lb (6.5 to 8.2 m-kg). Place a rubber bushing and cup washer on the top of the shaft then wash the lock nut (larger of the two nuts) until 0.323 in (8.2 mm) of threaded shaft is showing on top of the lock nut and jamb nut and make sure that both nuts are fitted to have an accurate reading. Lastly, fit in the side trim panel in the luggage compartment and bring the vehicle down to the earth.
Related 1988 Mazda RX-7 Parts
 1988 Mazda RX-7 Automatic Transmission Seal
 1988 Mazda RX-7 Coolant Reservoir
 1988 Mazda RX-7 Door Lock
 1988 Mazda RX-7 Oxygen Sensor
 1988 Mazda RX-7 Ring And Pinion
 1988 Mazda RX-7 Steering Knuckle
 1988 Mazda RX-7 Wheel Hub