×
- Hello
- Login or Register
- Quick Links
- Live Chat
- Track Order
- Parts Availability
- RMA
- Help Center
- Contact Us
- Shop for
- Mazda Parts
My Garage
My Account
Cart
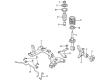
Genuine 2006 Mazda Tribute Control Arm
Suspension Arm- Select Vehicle by Model
- Select Vehicle by VIN
Select Vehicle by Model
orMake
Model
Year
Select Vehicle by VIN
For the most accurate results, select vehicle by your VIN (Vehicle Identification Number).
2 Control Arms found

2006 Mazda Tribute Lower Control Arm Part Number: ZZC1-34-310
$116.49 MSRP: $155.35You Save: $38.86 (26%)Product Specifications- Other Name: Arm(Right), Lower
- Position: Passenger Side
- Replaces: EF91-34-300
- Item Weight: 6.00 Pounds
- Condition: New
- Fitment Type: Direct Replacement
- SKU: ZZC1-34-310
- Warranty: This genuine part is guaranteed by Mazda's factory warranty.
2006 Mazda Tribute Lower Control Arm Part Number: ZZC1-34-320
$130.39 MSRP: $173.89You Save: $43.50 (26%)Product Specifications- Other Name: Arm(Left), Lower
- Position: Driver Side
- Replaces: EF91-34-350
- Item Weight: 6.00 Pounds
- Condition: New
- Fitment Type: Direct Replacement
- SKU: ZZC1-34-320
- Warranty: This genuine part is guaranteed by Mazda's factory warranty.
2006 Mazda Tribute Control Arm Parts and Q&A
- Q: How to remove and install a front control arm on 2006 Mazda Tribute?A: The easiest way to detach the control arm is to first loosen the lug nuts of the side that needs to be broken down, raise the front of the car, place it firmly on the jackstands and take off the wheel. The second step is to take out the pinch bolt connecting the balljoint and the control arm, and then use a prybar to separate the control arm and the steering knuckle. In models 2013 and beyond also remove the load path bar-to-bracket bolts and the bracket to subframe bolts. Then detach the control arm front pivot bolt and rear mounting bolts, and be sure to use the correct steps depending on the model 2012 and earlier or 2013 and later. When the control arm has been detached, examine it and make sure that the bushings are not worn out and change their parts, and never try to bend a bent control arm straight. Prior to screwing the pivot bolt and the rear bolt, elevate the outer end of the control arm using a floor jack to recreate normal ride height. Installation is the opposite of removal and all the fasteners are tightened to the required torque. Again lift the outer end of the control arm with a floor jack before tightening the front pivot bolt to mimic normal ride height. The last thing to do is to install the wheel and the lug nuts, then lower the vehicle and tighten the lug nuts to the recommended torque, and then it is time to check and adjust the front wheel alignment of the vehicle once the job is done.
Related 2006 Mazda Tribute Parts
 2006 Mazda Tribute Differential
 2006 Mazda Tribute ABS Control Module
 2006 Mazda Tribute ABS Reluctor Ring
 2006 Mazda Tribute Canister Purge Valves
 2006 Mazda Tribute Door Lock Cylinder
 2006 Mazda Tribute Heater Core
 2006 Mazda Tribute Power Seat Switch
 2006 Mazda Tribute Rod Bearing
 2006 Mazda Tribute Valve Stem Oil Seal
 2006 Mazda Tribute Wiper Linkage