×
- Hello
- Login or Register
- Quick Links
- Live Chat
- Track Order
- Parts Availability
- RMA
- Help Center
- Contact Us
- Shop for
- Mazda Parts
My Garage
My Account
Cart
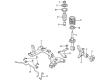
Genuine 2008 Mazda Tribute Control Arm
Suspension Arm- Select Vehicle by Model
- Select Vehicle by VIN
Select Vehicle by Model
orMake
Model
Year
Select Vehicle by VIN
For the most accurate results, select vehicle by your VIN (Vehicle Identification Number).
2 Control Arms found

2008 Mazda Tribute Lower Control Arm Part Number: ZZC1-34-310
$116.49 MSRP: $155.35You Save: $38.86 (26%)Product Specifications- Other Name: Arm(Right), Lower
- Position: Passenger Side
- Replaces: EF91-34-300
- Item Weight: 6.00 Pounds
- Condition: New
- Fitment Type: Direct Replacement
- SKU: ZZC1-34-310
- Warranty: This genuine part is guaranteed by Mazda's factory warranty.
2008 Mazda Tribute Lower Control Arm Part Number: ZZC1-34-320
$130.39 MSRP: $173.89You Save: $43.50 (26%)Product Specifications- Other Name: Arm(Left), Lower
- Position: Driver Side
- Replaces: EF91-34-350
- Item Weight: 6.00 Pounds
- Condition: New
- Fitment Type: Direct Replacement
- SKU: ZZC1-34-320
- Warranty: This genuine part is guaranteed by Mazda's factory warranty.
2008 Mazda Tribute Control Arm Parts and Q&A
- Q: How to remove and install the control arm and trailing arm on 2008 Mazda Tribute?A: Relax the lug nuts of the wheel, jack up the vehicle and place well on jackstands, blocking off the rear wheels to keep it or prevent it rolling over, and then take off the wheel. Take out the nut on the upper ballstud on the upper arm at the further end and release the arm and boss on the trailing arm, with a two-jaw puller or balljoint remover tool, should the ballstud not come free. The second step is to remove the pivot bolt at the inner end of the arm and then remove the arm of the vehicle with installation being the opposite of removal and fasteners being tightened to specified torque. Prior to tightening the inner pivot bolt, lift the rear suspension using a floor jack to make it look like it was under normal ride height. In the case of the lower arm, take out the nut of the lower ballstud at the outer end and part with the boss, with a balljoint remover tool where needed. Use a pivot bolt to remove the arm at the inner end, again to install and make sure the correct torque is applied. The same steps should be repeated with the trailing arm by detaching the coil spring, and then the brake shoe assembly or caliper and brake disc respectively. Unscrew the bracket of the brake hose, brake line, both the parking brake cable bracket of the trailing arm. Provided it is equipped, dismount the ABS wheel speed sensor and unbolt the bracket of the harness. In 4WD/AWD models, take off the drive-axle out of the hub. Label the connection of the toe adjusting cam to the trailing arm mounting bracket, disconnect the lower arm to the knuckle, undo the screw of the pivot bolt, and pull away the trailing arm out of the car. Check the bushing of a trailing arm pivot to determine whether it is worn out and change it in case of necessity at an auto machine shop. To install, position the matchmarks of the toe by positioning cam and the mounting bracket, lifting the rear end of the trailing arm with a floor jack before tightening the pivot bolt all the way and finally tightening all the fasteners to the recommended torque values. There will be no need to bleed the brakes, and have the rear wheel alignment examined and adjusted when necessary.
Related 2008 Mazda Tribute Parts
 2008 Mazda Tribute Differential
 2008 Mazda Tribute ABS Control Module
 2008 Mazda Tribute ABS Reluctor Ring
 2008 Mazda Tribute Canister Purge Valves
 2008 Mazda Tribute Door Lock Cylinder
 2008 Mazda Tribute Heater Core
 2008 Mazda Tribute Power Seat Switch
 2008 Mazda Tribute Rod Bearing
 2008 Mazda Tribute Valve Stem Oil Seal
 2008 Mazda Tribute Wiper Linkage