×
- Hello
- Login or Register
- Quick Links
- Live Chat
- Track Order
- Parts Availability
- RMA
- Help Center
- Contact Us
- Shop for
- Mazda Parts
My Garage
My Account
Cart
Genuine Mazda 323 Bumper
Bumper Fascia- Select Vehicle by Model
- Select Vehicle by VIN
Select Vehicle by Model
orMake
Model
Year
Select Vehicle by VIN
For the most accurate results, select vehicle by your VIN (Vehicle Identification Number).
Filter by Part Type
Filter by Part Type
4 Bumpers found

Mazda 323 Cover Part Number: B455-34-111B
$25.55 MSRP: $34.08You Save: $8.53 (26%)Ships in 1-2 Business Days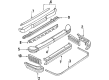
Mazda 323 Cover Part Number: BJ19-50-241
$117.05 MSRP: $156.10You Save: $39.05 (26%)Ships in 1-2 Business Days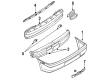
Mazda 323 Cover Part Number: BR93-50-221
$277.78 MSRP: $370.45You Save: $92.67 (26%)Ships in 1-2 Business Days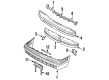
Mazda 323 Bumper Cover Part Number: BR71-50-031A
Mazda 323 Bumper
The Mazda 323 Bumper is the primary facet of defense in light crashes of the car that protects the sheet metal, lamps, or even engine parts against expensive damage. Early models on the compact line were like other models, reflecting trends in the industry; they began as bare chrome-plated steel bars attached to brackets jutting out of the body, more of a practical use than aesthetics. Towards the end of the seventies, the federal regulations on 5-mph compelled designers to adopt large-looking projections that were referred to as Armco that achieved the impact requirement at the cost of looks. The recent variations of the small Mazda 323 are designed in a way that they blend well with the body, and an outer mould is made of plastic, which covers an inner support beam supported by foam or honeycomb to absorb the energy, such that a small bump in parking hardly touches any body part that is crucial. Where style was concerned, there were increasingly more options available, with the option of either matching a factory paint or using powder-coated black or bright chrome, but the mounting points were kept exactly the same so that the owner could fit the vehicle precisely. The replacement is important when a front or rear Bumper is cracked or bent, since a damaged shell may allow subsequent hits to reach lights or cooling components and compromise crash protection. Authentic components that are specific to each Mazda have pre-drilled holes, which are easier to assemble with bolts, and most of the suppliers are covered with a one-year warranty as the collaborators are confident in their manufacturing. Mazda 323 owners thus have a mixture of impact absorption, perfect fit, and style versatility qualities that have formed the development of this modest but significant Bumper.
Looking for Bumper with proven quality? Choose OEM Bumper. Mazda designs and builds them to strict factory specs. Every piece goes through rigorous quality checks. You'll get parts that fit right and work like new. Shop our huge inventory of OEM Mazda 323 parts. Enjoy the highly competitive prices online. Our site is your one-stop shop. Each genuine 323 part includes a manufacturer's warranty. Buy with confidence. Our return policy is simple and hassle-free. In a rush? Choose expedited delivery at checkout. You'll love the streamlined experience from search to checkout to receiving your order.
Mazda 323 Bumper Parts and Q&A
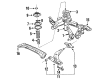
- Q: How to remove and install the bumper assembly on Mazda 323?A:The bumper assembly is heavy and somewhat awkward to remove and install, so it is important to support the bumper when the bolts are removed and have an assistant help during this procedure. To remove the front bumper, first apply the parking brake, raise the vehicle, and support it securely on jackstands. Remove the under cover splash shield and open the hood. Disconnect the cable from the negative battery terminal and any wiring that would interfere with bumper removal. For models from 1990 to 2000, remove the screws from the front turn signal/running lights and disconnect fog lights if equipped. For models from 1990 to 1998, remove the radiator grille and headlights, then the screws from the lower grille moldings. Remove the screw(s) attaching the bumper fascia to the fender at the wheel cutout area, and for models from 1990 to 1994, also remove screws at the grille area. For models from 1990 to 1994, remove the attaching screws at both angle brackets and then the front bumper reinforcement by removing the retention bolts. For models from 1995 and later, remove the attaching screws along the bottom of the bumper cover and the front bumper reinforcement nuts from the body attachment points in the grille area. Carefully remove the bumper while disconnecting the front turn signal light connectors, and lower it to the floor or padded wooden blocks. Remove the bumper cover bolts attaching the cover to the bumper reinforcement, push out the upper bumper cover tabs, and then remove the bumper cover and energy-absorbing foam. Installation is the reverse of removal. For the rear bumper, apply the parking brake, raise the vehicle, and support it securely on jackstands. Disconnect the cable from the negative battery terminal and any wiring that would interfere with bumper removal. Remove the rear stop/turn signal light, and for models from 1990 to 1994, remove the trunk end trim, while for models from 1995 and later, remove the trunk side trim panels. For models from 1990 to 1994, remove the two bumper bracket covers at the trunk end and the bumper reinforcement attachment nuts. Remove the rear side marker lights and, for hatchback models from 1990 to 1994, the rear license plate light. For models from 1990 to 1994, remove the rear bumper retainer bar, and for models from 1995 and later, remove the rear wheel cutout extensions, bolts under the bumper cover, and nuts inside the trunk. For models from 1990 to 1994, remove the screws attaching the bumper cover to the fender at the wheel cutout area, then working under the bumper, remove the rear bumper reinforcement by removing the retention bolts. Carefully lower the bumper part way, supporting it while removing the license plate wiring harness and holder, then lower it fully onto padded wooden blocks. Remove the bumper cover bolts attaching the cover to the bumper reinforcement, then remove the bumper cover and energy-absorbing foam. For models from 1995 and later, remove the bumper cover bolts and the cover from the bumper reinforcement and energy-absorbing foam, along with any side marker lights and other attached parts as required. For models from 1990 to 1994, remove both rear mud flaps as necessary. Installation is the reverse of the removal procedure.
Related Mazda 323 Parts
 Mazda 323 Wiper Motor
 Mazda 323 Ashtray
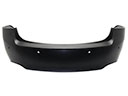 Mazda 323 Bumper Cover
 Mazda 323 Bumper Reflector
 Mazda 323 Fuel Door
 Mazda 323 Hood Latch
 Mazda 323 License Plate
 Mazda 323 Liftgate Lock Actuator
 Mazda 323 Rear Crossmember
 Mazda 323 Weather Strip
 Mazda 323 Windshield Washer Hose
 Mazda 323 Wiper Arm