×
- Hello
- Login or Register
- Quick Links
- Live Chat
- Track Order
- Parts Availability
- RMA
- Help Center
- Contact Us
- Shop for
- Mazda Parts
My Garage
My Account
Cart
Genuine Mazda 323 Ignition Lock Cylinder
Ignition Key Lock Cylinder- Select Vehicle by Model
- Select Vehicle by VIN
Select Vehicle by Model
orMake
Model
Year
Select Vehicle by VIN
For the most accurate results, select vehicle by your VIN (Vehicle Identification Number).
4 Ignition Lock Cylinders found

Mazda 323 Ignition Lock Cylinder Part Number: BR70-76-290F
$316.51 MSRP: $422.10You Save: $105.59 (26%)Ships in 1-2 Business Days
Mazda 323 Cylinder & Keys Part Number: BR7076250B32
Mazda 323 Cylinder & Keys Part Number: BJ13-76-290A
Mazda 323 Ignition Lock Cylinder Part Number: B458-76-290G
Mazda 323 Ignition Lock Cylinder
Looking for Ignition Lock Cylinder with proven quality? Choose OEM Ignition Lock Cylinder. Mazda designs and builds them to strict factory specs. Every piece goes through rigorous quality checks. You'll get parts that fit right and work like new. Shop our huge inventory of OEM Mazda 323 parts. Enjoy the highly competitive prices online. Our site is your one-stop shop. Each genuine 323 part includes a manufacturer's warranty. Buy with confidence. Our return policy is simple and hassle-free. In a rush? Choose expedited delivery at checkout. You'll love the streamlined experience from search to checkout to receiving your order.
Mazda 323 Ignition Lock Cylinder Parts and Q&A
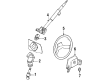
- Q: How to remove and install the door lock and ignition lock cylinder on Mazda 323?A:Remove the door trim panel and the plastic watershield. Reach inside the door and disconnect the control links from the latch. Mark the location of the door latch prior to removal and take out the latch retaining screws from the end of the door, noting that on 1997 and later models there is only one latch screw. Detach the door latch, and if equipped with power door locks, remove the door lock solenoid. For installation, align the door latch and securely tighten the door latch screws. Through the door inside access hole, remove the outside handle retention bolts or nuts, and on 1995 and later models, take out the lock cylinder electrical switch retainer and the switch. Remove the control rod from the lock cylinder, then use pliers or a screwdriver to pry the retaining clip upwards and off of the lock cylinder. Pull the outside handle and lock cylinder from the door. For installation, follow the reverse process. The door key cylinder electrical switch may be tested if necessary without removal; disconnect the electrical connector and check that the electrical continuity between the terminals is 0 ohms (no resistance) when in the unlocked position, and 1 K-ohm when in the locked position.
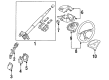
- Q: How to disconnect the ignition lock cylinder and ignition switch on Mazda 323?A:Disconnect the negative battery cable and on 1995 and later models, disable the airbag of the driver. Take off the steering column upper and lower covers, and then the lower dash panel. Follow wire that connects ignition switch to electrical connector and disconnect it, and test continuity in each of the mentioned positions. Unscrew the electrical connector of the switch, unscrew the screw, and then part the switch and assembly of steering lock. The opposite of removal is installation.

Related Mazda 323 Parts
 Mazda 323 Power Window Switch
 Mazda 323 Ignition Switch
 Mazda 323 Cruise Control Servo
 Mazda 323 Door Jamb Switch
 Mazda 323 Hazard Warning Switch
 Mazda 323 Headlight Switch
 Mazda 323 Spark Plug Wire
 Mazda 323 Turn Signal Switch
 Mazda 323 Washer Reservoir Cap
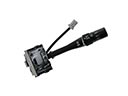 Mazda 323 Windshield Wiper Switch
 Mazda 323 Wiper Linkage
 Mazda 323 Wiper Pivot
Browse by Year
1994 Ignition Lock Cylinder
1993 Ignition Lock Cylinder
1992 Ignition Lock Cylinder
1991 Ignition Lock Cylinder
1990 Ignition Lock Cylinder
1989 Ignition Lock Cylinder 1988 Ignition Lock Cylinder