×
- Hello
- Login or Register
- Quick Links
- Live Chat
- Track Order
- Parts Availability
- RMA
- Help Center
- Contact Us
- Shop for
- Mazda Parts
My Garage
My Account
Cart
Genuine Mazda 929 Tie Rod End
Steering Rod End- Select Vehicle by Model
- Select Vehicle by VIN
Select Vehicle by Model
orMake
Model
Year
Select Vehicle by VIN
For the most accurate results, select vehicle by your VIN (Vehicle Identification Number).
7 Tie Rod Ends found

Mazda 929 Outer Tie Rod Part Number: H380-32-280
$16.83 MSRP: $125.38You Save: $108.55 (87%)Ships in 1-2 Business Days
Mazda 929 Tie Rod End Part Number: 8AH1-32-280
$48.75 MSRP: $65.01You Save: $16.26 (26%)Ships in 1-2 Business DaysMazda 929 Outer Tie Rod Part Number: 8AH4-32-280
$94.01 MSRP: $125.38You Save: $31.37 (26%)Ships in 1-2 Business Days
Mazda 929 Inner Tie Rod Part Number: H260-32-240A
$94.65 MSRP: $126.22You Save: $31.57 (26%)Ships in 1-2 Business Days
Mazda 929 Inner Tie Rod Part Number: H261-32-240A
$92.76 MSRP: $123.71You Save: $30.95 (26%)Ships in 1-2 Business Days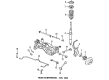
Mazda 929 Outer Tie Rod Part Number: 8AH2-32-280
$115.79 MSRP: $154.41You Save: $38.62 (26%)Ships in 1-2 Business Days

Mazda 929 Inner Tie Rod Part Number: HG30-32-240
Mazda 929 Tie Rod End
Looking for Tie Rod End with proven quality? Choose OEM Tie Rod End. Mazda designs and builds them to strict factory specs. Every piece goes through rigorous quality checks. You'll get parts that fit right and work like new. Shop our huge inventory of OEM Mazda 929 parts. Enjoy the highly competitive prices online. Our site is your one-stop shop. Each genuine 929 part includes a manufacturer's warranty. Buy with confidence. Our return policy is simple and hassle-free. In a rush? Choose expedited delivery at checkout. You'll love the streamlined experience from search to checkout to receiving your order.
Mazda 929 Tie Rod End Parts and Q&A
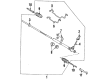
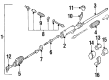
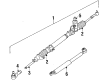
- Q: How to properly remove and install a tie rod end on Mazda 929?A:To remove and install a tie rod, first measure its length if an alignment machine is unavailable. Remove the cotter pin(s) and castellated nut(s) from one or both ends of the rod, marking the relationship between the flats of the tie rod end nut and the tie rod before loosening the nut. Use a wrench on the flat portion of the tie rod end to hold it stationary while loosening the locknut with a second wrench. Employ a tie rod end puller, such as the Mazda tool no. 49-0118-850C, to detach either or both ends from the steering knuckle or center link, then unscrew the end from the tie rod. For installation, loosen the tie rod locknuts, insert the rod ends through the holes in the steering knuckle or center link, and if only one end is being replaced, screw the end onto the tie rod and position the ballstud through the steering knuckle or center link. Install the castellated nut(s) and torque them to 22-33 ft. lbs. (30-45 Nm), followed by the installation of new cotter pin(s). If an alignment machine is available, adjust the toe-in and torque the tie rod locknuts to 51-58 ft. lbs. (69-79 Nm). If alignment must be done at a shop, ensure the tie rod length matches its original state before replacement, torque both locknuts, and have the toe-in checked promptly.


