×
- Hello
- Login or Register
- Quick Links
- Live Chat
- Track Order
- Parts Availability
- RMA
- Help Center
- Contact Us
- Shop for
- Mazda Parts
My Garage
My Account
Cart
Genuine Mazda GLC Ball Joint
Control Arm Joint- Select Vehicle by Model
- Select Vehicle by VIN
Select Vehicle by Model
orMake
Model
Year
Select Vehicle by VIN
For the most accurate results, select vehicle by your VIN (Vehicle Identification Number).
1 Ball Joint found

Mazda GLC Ball Joint Part Number: B092-34-550
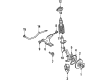
Mazda GLC Ball Joint
Looking for Ball Joint with proven quality? Choose OEM Ball Joint. Mazda designs and builds them to strict factory specs. Every piece goes through rigorous quality checks. You'll get parts that fit right and work like new. Shop our huge inventory of OEM Mazda GLC parts. Enjoy the highly competitive prices online. Our site is your one-stop shop. Each genuine GLC part includes a manufacturer's warranty. Buy with confidence. Our return policy is simple and hassle-free. In a rush? Choose expedited delivery at checkout. You'll love the streamlined experience from search to checkout to receiving your order.
Mazda GLC Ball Joint Parts and Q&A
- Q: How are ball joints inspected and replaced in lower control arms on Mazda GLC?A:The ball joints are fitted in the lower control arms and cannot be taken off separately, in case one of the ball joints is faulty, the lower control arm and ball joint assembly must be substituted altogether. In order to know whether a ball joint is defect, equal rotational torque should be measured with a special preload attachment and spring scale. Torn dust boots may be corrected by pulling off the lower control arm, scraping off the old boot, applying lithium grease to the inside of the new one and pushing it into the ball joint with the correct tool. Check the ball joint stud threads and ensure that they are damaged and repair them and check the preload taken by the ball joint and reassemble the lower control arm. To check, inspect the dust boot whether it is worn or has got a crack and replace when required. Lift the car so that the tire is not on the ground, and then hold the tire at the top and bottom, and pull alternately at yourself and away to the side to test end-play of the ball joint, a wear limit of 0.04 in. (1mm); replace the ball joint and control arm assembly. Installation of the ball joint nut: Torque 43-51 ft. lbs. (58-69 Nm) GLC, 46-69 ft. lbs. (62-93 Nm) 626. In the case of front wheel drive models, lift the vehicle, take off the front wheel, unbolt the ball joint of the lower arm and test the rotating torque on the spring scale, which must range between 6.3-10.9 lbs, otherwise, the ball joint will be changed. On 323, MX-6, 929, RX-7, and 1983-89 626, jack up and prop the car, then take the wheel off, and then follow certain instructions to examine the ball joint dust boot, and gauge the preload to ensure that the necessary pressure to rotate the ball stud fits within a range of values. During removal and installation of the ball joint, it is important to observe correct torque specification of the different models and verify and rectify front end alignment when required.
Related Mazda GLC Parts
 Mazda GLC Axle Beam Mount
 Mazda GLC Axle Support Bushings
 Mazda GLC Bump Stop
 Mazda GLC Coil Springs
 Mazda GLC Control Arm Bushing
 Mazda GLC Lateral Link
 Mazda GLC Spindle
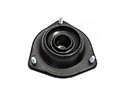 Mazda GLC Strut Mounts
 Mazda GLC Sway Bar Bushing
 Mazda GLC Sway Bar Link Bushing
 Mazda GLC Wheel Bearing
 Mazda GLC Wheel Seal