×
- Hello
- Login or Register
- Quick Links
- Live Chat
- Track Order
- Parts Availability
- RMA
- Help Center
- Contact Us
- Shop for
- Mazda Parts
My Garage
My Account
Cart
Genuine Mazda GLC Clutch Disc
Friction Disc- Select Vehicle by Model
- Select Vehicle by VIN
Select Vehicle by Model
orMake
Model
Year
Select Vehicle by VIN
For the most accurate results, select vehicle by your VIN (Vehicle Identification Number).
1 Clutch Disc found

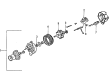
Mazda GLC Disc Part Number: B609-16-460B-9U
Mazda GLC Clutch Disc
Looking for Clutch Disc with proven quality? Choose OEM Clutch Disc. Mazda designs and builds them to strict factory specs. Every piece goes through rigorous quality checks. You'll get parts that fit right and work like new. Shop our huge inventory of OEM Mazda GLC parts. Enjoy the highly competitive prices online. Our site is your one-stop shop. Each genuine GLC part includes a manufacturer's warranty. Buy with confidence. Our return policy is simple and hassle-free. In a rush? Choose expedited delivery at checkout. You'll love the streamlined experience from search to checkout to receiving your order.
Mazda GLC Clutch Disc Parts and Q&A
- Q: How to remove and install the Clutch Disc and Pressure Plate on Mazda GLC?A:Removal and installation To install or remove the clutch, first, remove the transmission or the transaxle. Add a braking device to the flywheel to avoid the movement of the flywheel during the removal of the clutch cover and installing the cover. Install an old input shaft, or similar, temporarily to prevent falling of the clutch cover to a clutch arbor. Otherwise, unscrew the bolts holding the clutch cover and the pressure plate in that order, but do not detach the springs of the clutch, but instead release the tension in all of them simultaneously. Make sure to take off the clutch disc and arbor carefully without leaving grease or oil on the surface of the clutch disc. Unscrew the return spring off the throwout bearing and remove bearing. Release fork Unhook the retaining spring of the release fork of the ball stud, and withdraw the fork. To install, clean the surfaces of flywheel and pressure plate using fine emery paper and make sure that the surface is clean without any oil or grease. Install an arbor to position a clutch disc to center the hub on the long end or utilise an old input shaft in its place should an arbor not be available. Position the O-mark on the flywheel with that of the clutch cover. Install the bolts that clamp the clutch cover in a crisscross manner up to 13-20 ft. lbs. Once the arbor and the braking device are removed, grease the pivot pin, and then insert the release fork with its boot, so that the retaining spring touches the pivot pin. Lightly lubricate the face of the bearing of the throwout, and the retainer of the throwout housing bearing, then fit the throwout bearing and throwout spring and ensure the workings of the release fork and throwout bearing are smooth, and then finally fit the transmission or transaxle.
Related Mazda GLC Parts
 Mazda GLC Automatic Transmission Filter
 Mazda GLC Clutch Cable
 Mazda GLC Clutch Fork
 Mazda GLC Pilot Bearing