×
- Hello
- Login or Register
- Quick Links
- Live Chat
- Track Order
- Parts Availability
- RMA
- Help Center
- Contact Us
- Shop for
- Mazda Parts
My Garage
My Account
Cart
Genuine Mazda MX-5 Miata Alternator
Generator- Select Vehicle by Model
- Select Vehicle by VIN
Select Vehicle by Model
orMake
Model
Year
Select Vehicle by VIN
For the most accurate results, select vehicle by your VIN (Vehicle Identification Number).
4 Alternators found


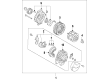
Mazda MX-5 Miata Alternator Part Number: L3P9-18-300D
$468.76 MSRP: $630.18You Save: $161.42 (26%)Ships in 1-2 Business Days
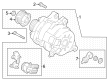
Mazda MX-5 Miata Alternator Part Number: P31H-18-300R-00
$289.74 MSRP: $386.40You Save: $96.66 (26%)Ships in 1-2 Business Days
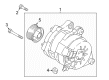
Mazda MX-5 Miata Alternator Part Number: PAC3-18-300
$374.05 MSRP: $502.85You Save: $128.80 (26%)Ships in 1-2 Business Days


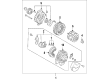
Mazda MX-5 Miata Alternator Part Number: LF9H-18-300R-0A
Mazda MX-5 Miata Alternator
Looking for Alternator with proven quality? Choose OEM Alternator. Mazda designs and builds them to strict factory specs. Every piece goes through rigorous quality checks. You'll get parts that fit right and work like new. Shop our huge inventory of OEM Mazda MX-5 Miata parts. Enjoy the highly competitive prices online. Our site is your one-stop shop. Each genuine MX-5 Miata part includes a manufacturer's warranty. Buy with confidence. Our return policy is simple and hassle-free. In a rush? Choose expedited delivery at checkout. You'll love the streamlined experience from search to checkout to receiving your order.
Mazda MX-5 Miata Alternator Parts and Q&A
- Q: How to remove and install the alternator on Mazda MX-5 Miata?A:In order to take out the alternator of 2005 and up to date models, the first thing is to disconnect the cable of the negative terminal of the battery, then remove an electrical connector of the alternator. To loosen the alternator adjustment and pivot bolts in order to remove the drivebelt, remove the pivot bolt and bolt holding the bracket to the engine and separate the alternator and the bracket to the engine. To do it on 2006 and later models, first of all take out the battery and the battery tray and then unclip the power steering hose out of the support bracket. The serpentine drivebelt and the alternator harness bracket bolt are then removed. Place the front of the car safely on jackstands and lift the under-covers on the engine compartment as well as disconnecting the electrical connectors on the alternator. The alternator is then removed by removing the upper alternator mounting bolt followed by the lower mounting bolts removing the alternator, remembering to remove the lower rear mounting bolt which is used to position a small bracket to support a harness which must be reattached during installation. The alternator has a plastic scoop with two parts to accomplish cooling, the front part is removable by removing one bolt, and the rear part is removable by removing the alternator. Installation New or rebuilt alternator should be identical to the old one in terms of connections and markings, and the store policy on the installation of the pulley should also be considered because most new units do not include the pulley. Last, reassemble the new alternator in reverse of the order of removal and regulate the drivebelt tension on 2005 and earlier models and verify the charging voltage by making sure the positive and negative terminals of the AC voltage source are connected.

Related Mazda MX-5 Miata Parts
 Mazda MX-5 Miata Alternator Bearing
 Mazda MX-5 Miata Alternator Brush
 Mazda MX-5 Miata Alternator Pulley
 Mazda MX-5 Miata Armature
 Mazda MX-5 Miata Battery Cable
 Mazda MX-5 Miata Battery Hold Downs
 Mazda MX-5 Miata Ground Cables
 Mazda MX-5 Miata Starter
 Mazda MX-5 Miata Starter Brush
 Mazda MX-5 Miata Starter Drive Gear
 Mazda MX-5 Miata Starter Solenoid
 Mazda MX-5 Miata Voltage Regulator
Browse by Year
2025 Alternator 2024 Alternator 2023 Alternator 2022 Alternator 2021 Alternator 2020 Alternator 2019 Alternator 2018 Alternator 2017 Alternator 2016 Alternator 2015 Alternator 2014 Alternator 2013 Alternator 2012 Alternator 2011 Alternator 2010 Alternator 2009 Alternator 2008 Alternator 2007 Alternator 2006 Alternator