×
- Hello
- Login or Register
- Quick Links
- Live Chat
- Track Order
- Parts Availability
- RMA
- Help Center
- Contact Us
- Shop for
- Mazda Parts
My Garage
My Account
Cart
Genuine 1988 Mazda RX-7 Alternator
Generator- Select Vehicle by Model
- Select Vehicle by VIN
Select Vehicle by Model
orMake
Model
Year
Select Vehicle by VIN
For the most accurate results, select vehicle by your VIN (Vehicle Identification Number).
1 Alternator found

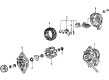
1988 Mazda RX-7 Alternator Part Number: N320-18-300R-00
Product Specifications- Other Name: Reman, Alternator
- Item Weight: 13.00 Pounds
- Condition: Remanufactured
- Fitment Type: Direct Replacement
- SKU: N320-18-300R-00
- Warranty: This genuine part is guaranteed by Mazda's factory warranty.
1988 Mazda RX-7 Alternator Parts and Q&A
- Q: Should you replace the alternator with a new or rebuilt one if a failure occurs, and what steps are involved in disassembly and rebuilding on 1988 Mazda RX-7?A: In case there is a failure in the form of the alternator, it might be a wise idea to change the alternator with a new or rebuilt one, though disassembly and rebuilding can be made in case of the availability of the replacement parts. The process of overhaul demands the knowledge of the tools and components that should be changed probably, 1980 models should have an in-built voltage regulator and the fundamentals are not very different. The first step would be to take off the radio noise suppressing condenser on the outside of the alternator, and the next step will be to take off the through bolts that hold the sections of the alternator. Unscrew the front housing assembly in the specified spots with a screwdriver and take out the lock nut and insulator on the B terminal at the back. Install the front housing and rotor assembly in a vise, with wood blocks to avoid damaging it, and remove the nut and washer. Removed all the pulley, fan, spacer, and front slinger of the shaft and observe their positions. Next, the front housing and rear slinger may then be removed. The rectifier is attached by a Phillips head screw on the inside of the rear housing and can be removed with two screws which hold the brush holder. Once these screws have been removed, the stator, rectifier and the brush holder (taken as a unit) should be carefully lifted up. Unsolder the rectifier and brush holder stator leads speedily without forming a defect. Should the bearings of the rotor shaft seem hard or dry, it can be replaced using bearing puller in the rear and press in the front after loosening the retainer. Checking the stator: To check the stator, an ohmmeter should be used to check the continuity between the stator core and every coil lead; replace if there is continuity. In the case of open-circuit testing, continuity across the coil leads. An ohmmeter should also be used to test the rotor in the ground and open-circuit conditions. The rectifier is provided with positive and negative sides that are checked individually by continuity the absence of continuity is a sign of replacement. When one-third the original length of the brush is worn off, this can be marked by a wear limit line and the brush should be replaced. Wipe all parts before reassembling them without immersion in liquid. In case the bearings require replacement, press them into place on the shaft and front housing because they are pre-lubed and sealed. Install the brush holders and rectifier units in the stator using solder leads to ensure the stator is not damaged. The stator, rectifier and brush holder assembly, place in the rear housing and screw in place. In fitting the rotor assembly, fix the brushes using stiff wire. Last of all, put in the front housing, rear slinger, front slinger, spacer, fan, pulley, attach all of the parts with the correct nuts and bolts, and re-connect the radio suppression condenser then install the alternator.


