×
- Hello
- Login or Register
- Quick Links
- Live Chat
- Track Order
- Parts Availability
- RMA
- Help Center
- Contact Us
- Shop for
- Mazda Parts
My Garage
My Account
Cart
Genuine 2014 Mazda MX-5 Miata Sway Bar
Sway Bar Kit- Select Vehicle by Model
- Select Vehicle by VIN
Select Vehicle by Model
orMake
Model
Year
Select Vehicle by VIN
For the most accurate results, select vehicle by your VIN (Vehicle Identification Number).
4 Sway Bars found

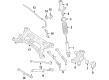
2014 Mazda MX-5 Miata Stabilizer Bar Part Number: NE51-28-151A
$81.08 MSRP: $108.13You Save: $27.05 (26%)Ships in 1-2 Business DaysProduct Specifications- Other Name: Stabilizer, Rear
- Replaces: NE51-28-151
- Item Weight: 8.60 Pounds
- Condition: New
- Fitment Type: Direct Replacement
- SKU: NE51-28-151A
- Warranty: This genuine part is guaranteed by Mazda's factory warranty.
2014 Mazda MX-5 Miata Stabilizer Bar Part Number: NF53-28-151C
$84.34 MSRP: $112.48You Save: $28.14 (26%)Ships in 1-2 Business DaysProduct Specifications- Other Name: Stabilizer, Rear
- Replaces: NF53-28-151B
- Item Weight: 8.60 Pounds
- Condition: New
- Fitment Type: Direct Replacement
- SKU: NF53-28-151C
- Warranty: This genuine part is guaranteed by Mazda's factory warranty.

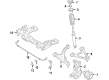
2014 Mazda MX-5 Miata Stabilizer Bar Part Number: NG20-34-151A
$135.14 MSRP: $180.22You Save: $45.08 (26%)Ships in 1-2 Business DaysProduct Specifications- Other Name: Stabilizer, Front
- Replaces: NG20-34-151
- Item Weight: 8.60 Pounds
- Condition: New
- Fitment Type: Direct Replacement
- SKU: NG20-34-151A
- Warranty: This genuine part is guaranteed by Mazda's factory warranty.
2014 Mazda MX-5 Miata Stabilizer Bar Part Number: NE51-34-151A
$135.16 MSRP: $180.26You Save: $45.10 (26%)Ships in 1-2 Business DaysProduct Specifications- Other Name: Stabilizer, Front
- Replaces: NE51-34-151
- Item Weight: 8.50 Pounds
- Condition: New
- Fitment Type: Direct Replacement
- SKU: NE51-34-151A
- Warranty: This genuine part is guaranteed by Mazda's factory warranty.
2014 Mazda MX-5 Miata Sway Bar Parts and Q&A
- Q: How to replace the rear sway bar and bushings on 2014 Mazda MX-5 Miata?A: To release the lug nuts on the rear wheel, first start with 2005 and older models by loosening the lug nuts on the rear wheel, and elevating the rear of the car on jackstands and then removing the rear wheels. Unscrew the stabilizer bar attachments of the upper part of the links by taking out the nuts and bolts. Then loosen the stabilizer bar bushing clamps of the body to unattach the rear stabilizer bar, which can then be removed out of the car; loosen the bushings with rocking motion. Unscrew the lower attachment of the stabilizer link on either side and take off the links. Inspect the bushings of wear, hardness, distortion, cracking, etc., and replace where necessary and likewise with the stabilizer bar link bushings. Wipe the bar areas the bushings are riding on with a wire brush, and apply a lubricant made of rubber to the bushings, but not based on petroleum or a brake fluid. Install the bushings at the stabilizer bar brackets with a flat bottom/split facing crossmember and making sure that it is installed correctly per the painted lines on the stabilizer bar. Install the lug and wheel nuts and screw bolts so that they fit the recommended torque, and replace the wheel and lug nuts, bringing the car down till the lug nuts fit the appropriate torque. In the case of 2006 and subsequent models, you need to start by loosening the wheel lug nuts of the rear wheels, raising the vehicle on jackstands and removing the rear wheels. Unscrew the ABS wheel speed sensor of the rear knuckle and ensure that it is suspended in a way that does not cause any kind of damage to it during the process. Take off the stabilizer bar nuts and remove the stabilizer bar, taking off the stabilizer bar bracket bolts and the stabilizer bar brackets. Check the bracket bushings of the stabilizer bar and look through the cracks, tears, or other signs of a wear and tear, and replace it when it is needed. Lastly, replace all the items in the reverse order and make sure that all attachments are tightened to the recommended torque.
Related 2014 Mazda MX-5 Miata Parts
 2014 Mazda MX-5 Miata Crankshaft Position Sensor
 2014 Mazda MX-5 Miata Door Hinge
 2014 Mazda MX-5 Miata Oil Pump
 2014 Mazda MX-5 Miata Rack and Pinion Boot
 2014 Mazda MX-5 Miata Vapor Canister Purge Solenoid
 2014 Mazda MX-5 Miata Voltage Regulators
 2014 Mazda MX-5 Miata Window Channel
 2014 Mazda MX-5 Miata Window Switch