×
- Hello
- Login or Register
- Quick Links
- Live Chat
- Track Order
- Parts Availability
- RMA
- Help Center
- Contact Us
- Shop for
- Mazda Parts
My Garage
My Account
Cart
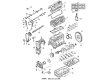
Genuine Mazda 626 Piston Ring
Piston Ring Set- Select Vehicle by Model
- Select Vehicle by VIN
Select Vehicle by Model
orMake
Model
Year
Select Vehicle by VIN
For the most accurate results, select vehicle by your VIN (Vehicle Identification Number).
3 Piston Rings found

Mazda 626 Piston Ring Set Part Number: F2Y1-11-SC0
$47.03 MSRP: $61.73You Save: $14.70 (24%)Ships in 1-2 Business Days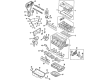
Mazda 626 Piston Ring Set Part Number: FSY2-11-SC0A

Mazda 626 Piston Ring Set Part Number: KLY2-11-SC0A
Mazda 626 Piston Ring
Looking for Piston Ring with proven quality? Choose OEM Piston Ring. Mazda designs and builds them to strict factory specs. Every piece goes through rigorous quality checks. You'll get parts that fit right and work like new. Shop our huge inventory of OEM Mazda 626 parts. Enjoy the highly competitive prices online. Our site is your one-stop shop. Each genuine 626 part includes a manufacturer's warranty. Buy with confidence. Our return policy is simple and hassle-free. In a rush? Choose expedited delivery at checkout. You'll love the streamlined experience from search to checkout to receiving your order.
Mazda 626 Piston Ring Parts and Q&A
- Q: How should the end gaps of piston rings be checked and corrected before installation on Mazda 626?A:The ring end clearance should be inspected before the new Piston rings are installed, assuming that the clearance at the piston ring has been determined to be correct. Prepare the piston/ connecting rod assemblies and new ring sets by aligning the new ring sets to the same piston/ cylinder as the ring sets during the end gap check and engine assembly. Plug the upper ring in the first cylinder, and align it with the walls of the cylinder, by pressing it in on the top of the piston, so that the ring is guided in the bottom part of the cylinder at the low limit of ring travel. In order to test the end gap, insert a feeler gauge between the ends of the ring and compare the result with the specification. In case the gap is bigger or smaller than stated, recheck in order to be precise that the correct rings are being used. When the gap is too narrow, it should be widened to avoid contacting of the ends of the rings when the engine is running and severe damage may result. An increase of end gap may be done by filing off the ends of the rings by using a fine file, but again only on the outside only, as excess end gap is not critical until it reaches 0.040-inch (1 mm), and it is essential to check the rings against the engine. Repeat the steps with each ring in the first cylinder and the second, third, and fourth cylinders where the rings, pistons and cylinders should be identical. When the gaps on the ends of the rings are verified and fixed, the rings are then attached to the pistons with the oil control ring being the first to be installed and this ring is made of three parts. Install the lower side rail without the use of a piston ring installation tool, slide the spacer/expander into the groove and install. Rather stick one end of the side rail into the groove and roll a finger around the piston as the rail is pushed into the groove and then install the upper side rail in the same way. Once the three oil ring parts are installed, ensure that the upper and lower side rails will rotate freely in the ring groove. Then install the middle ring that has an R mark facing the top of the piston, and should not be confused with the top ring, which has a different cross section. Installation is installed with a piston ring tool by sliding the middle ring at the groove with the identification mark on the top and then the top ring is installed with the same tool and should not be mixed with the other ring.
Related Mazda 626 Parts
 Mazda 626 Mass Air Flow Sensor
 Mazda 626 Axle Bearing Lock Rings
 Mazda 626 Camber and Alignment Kit
 Mazda 626 Exhaust Heat Shield
 Mazda 626 Power Steering Cylinder Boot Kit
 Mazda 626 Sway Bar
 Mazda 626 Valve Stem Oil Seal
 Mazda 626 Washer Reservoir Cap
Browse by Year
2002 Piston Ring 2001 Piston Ring 2000 Piston Ring 1999 Piston Ring 1998 Piston Ring 1997 Piston Ring 1996 Piston Ring 1995 Piston Ring 1994 Piston Ring 1993 Piston Ring 1992 Piston Ring 1991 Piston Ring 1990 Piston Ring 1989 Piston Ring 1988 Piston Ring 1987 Piston Ring 1986 Piston Ring 1985 Piston Ring 1984 Piston Ring