×
- Hello
- Login or Register
- Quick Links
- Live Chat
- Track Order
- Parts Availability
- RMA
- Help Center
- Contact Us
- Shop for
- Mazda Parts
My Garage
My Account
Cart
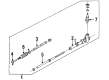
Genuine Mazda 626 Tie Rod End
Steering Rod End- Select Vehicle by Model
- Select Vehicle by VIN
Select Vehicle by Model
orMake
Model
Year
Select Vehicle by VIN
For the most accurate results, select vehicle by your VIN (Vehicle Identification Number).
7 Tie Rod Ends found

Mazda 626 Tie Rod End Part Number: 8AH1-32-280
$48.75 MSRP: $65.01You Save: $16.26 (26%)Ships in 1-2 Business Days
Mazda 626 Outer Tie Rod Part Number: 8AG4-32-280
$76.63 MSRP: $102.19You Save: $25.56 (26%)Ships in 1-2 Business Days
Mazda 626 Inner Tie Rod Part Number: G116-32-250
$87.96 MSRP: $117.31You Save: $29.35 (26%)Ships in 1-2 Business Days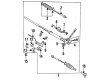
Mazda 626 Inner Tie Rod Part Number: GA2A-32-240A
$110.58 MSRP: $147.47You Save: $36.89 (26%)Ships in 1-2 Business Days
Mazda 626 Inner Tie Rod Part Number: GN81-32-24X
Mazda 626 Joint Part Number: G037-32-250C
Mazda 626 Joint Part Number: G03032240A
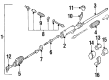
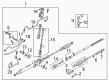
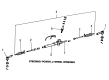
Mazda 626 Tie Rod End
Looking for Tie Rod End with proven quality? Choose OEM Tie Rod End. Mazda designs and builds them to strict factory specs. Every piece goes through rigorous quality checks. You'll get parts that fit right and work like new. Shop our huge inventory of OEM Mazda 626 parts. Enjoy the highly competitive prices online. Our site is your one-stop shop. Each genuine 626 part includes a manufacturer's warranty. Buy with confidence. Our return policy is simple and hassle-free. In a rush? Choose expedited delivery at checkout. You'll love the streamlined experience from search to checkout to receiving your order.
Mazda 626 Tie Rod End Parts and Q&A
- Q: How to replace the tie rod end and boot on Mazda 626?A:Lift the body of the vehicle and hold it on jackstands and then take off the front wheel. Then loosen the tie rod nut by which the outer tie rod is held by the Steering Knuckle and with an appropriate tool (such as a pickle fork) loosen the tie rod from the steering knuckle. Find the position of the jam nut relative to the inner tie rod threads to ensure that there is the same alignment of the front end when the jam nut gets installed, undo the jam nut relative to the outer tie rod and unscrew the tie rod end relative to the tie rod. Check the tie rod end boot to see that it has no tears or grease leakage; to change the boot put the rod end in a vise, tap around the outer circumference carefully with a chisel and hammer, taking care not to mar the sealing surface. Install a small dab of lithium base chassis grease in the new boot and place it on the end of the tie rod and clamp it firmly in place with a vise and a fitting size socket or press with Mazda tool 491243785. To install, screw the outer tie rod into the inner tie rod until it clamps the jam nut at the mark of the threads. Install tie rod in steering knuckle and install tie rod nut and tighten it to the recommended torque with installing a new cotter pin. Install the jam nut to the required torque, install the front wheel and lower the vehicle. Before driving the car over a distance, it is recommended that the front end alignment be checked.

Related Mazda 626 Parts
 Mazda 626 Power Steering Pump
 Mazda 626 Ignition Lock Assembly
 Mazda 626 Power Steering Cylinder Boot Kit
 Mazda 626 Power Steering Gear Seal
 Mazda 626 Power Steering Hose
 Mazda 626 Power Steering Pump Pulley
 Mazda 626 Power Steering Pump Seal
 Mazda 626 Power Steering Reservoir
 Mazda 626 Rack And Pinion
 Mazda 626 Rack and Pinion Boot
 Mazda 626 Steering Shaft
 Mazda 626 Tie Rod
Browse by Year
2002 Tie Rod End 2001 Tie Rod End 2000 Tie Rod End 1999 Tie Rod End 1998 Tie Rod End 1997 Tie Rod End 1996 Tie Rod End 1995 Tie Rod End 1994 Tie Rod End 1993 Tie Rod End 1992 Tie Rod End 1991 Tie Rod End 1990 Tie Rod End 1989 Tie Rod End 1988 Tie Rod End 1987 Tie Rod End 1986 Tie Rod End 1985 Tie Rod End 1984 Tie Rod End