×
- Hello
- Login or Register
- Quick Links
- Live Chat
- Track Order
- Parts Availability
- RMA
- Help Center
- Contact Us
- Shop for
- Mazda Parts
My Garage
My Account
Cart
Genuine Mazda B2200 Ball Joint
Control Arm Joint- Select Vehicle by Model
- Select Vehicle by VIN
Select Vehicle by Model
orMake
Model
Year
Select Vehicle by VIN
For the most accurate results, select vehicle by your VIN (Vehicle Identification Number).
3 Ball Joints found


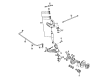
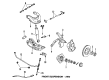
Mazda B2200 Lower Ball Joint Part Number: UC86-34-510A
$112.70 MSRP: $150.30You Save: $37.60 (26%)Ships in 1-2 Business Days
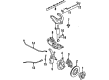
Mazda B2200 Ball Joint Part Number: 8AU1-34-540
$83.06 MSRP: $110.77You Save: $27.71 (26%)Ships in 1-2 Business Days
Mazda B2200 Ball Joint Part Number: 8AU2-34-510
$89.36 MSRP: $119.18You Save: $29.82 (26%)Ships in 1-2 Business Days
Mazda B2200 Ball Joint
Looking for Ball Joint with proven quality? Choose OEM Ball Joint. Mazda designs and builds them to strict factory specs. Every piece goes through rigorous quality checks. You'll get parts that fit right and work like new. Shop our huge inventory of OEM Mazda B2200 parts. Enjoy the highly competitive prices online. Our site is your one-stop shop. Each genuine B2200 part includes a manufacturer's warranty. Buy with confidence. Our return policy is simple and hassle-free. In a rush? Choose expedited delivery at checkout. You'll love the streamlined experience from search to checkout to receiving your order.
Mazda B2200 Ball Joint Parts and Q&A
- Q: How to inspect and replace the lower ball joint on Mazda B2200?A:In order to check the pickup, lift and secure the car, and then cease the wheel and tire set. Place a jack to support the lower Control Arm, pick up the cotter pin and the nut in the lower ball joint stud and disconnect the ball joint and the knuckle with the help of the appropriate tool. Install another tool to the pull scale to the ball joint stud. Once the ball joint stud has been rocked forward and backward a couple of times, record the reading of the pull scale once the stud is rotating, and make sure that it is within the desired range. Otherwise, change the lower ball joint. In the case with the MPV, detach the lower control arm and examine it regarding any damage with the ball joint. Test the ball joint stud by shaking several times followed by the measurement of the rotational torque and pull scale reading and replacing the lower ball joint or the control arm assembly in case of out of specification reading. In the case of the 2WD Navajo, one should lift the vehicle up, inspect front wheel bearings, and have someone to push the wheel assembly in and out, watching the lower spindle arm and axle jaw move, indicative of the need of replacement of the ball joints. To remove and fit, lift the vehicle, place the support on the lower arm of control and take out the required parts such as cotter pin and nut of the lower ball joint stud. Once the ball joint has been removed, replace it with the new one with the correct torque specification and make sure the front end is aligned. When it comes to the case of the MPV, when the ball joints are faulty then the whole lower arm of control needs to be substituted. In case of 4WD models, repeat the procedure and remove the ball joint and measure the pull scale reading. In the case of the 2WD Navajo, once the vehicle is raised and the wheel assembly has been taken off, the brake caliper among other parts are disconnected after which the lower ball joint is removed off the spindle without breaking the seal. Install the new ball joint attentively with all the components having proper alignment and torques.

Related Mazda B2200 Parts
 Mazda B2200 Axle Beam Mount
 Mazda B2200 Axle Pivot Bushing
 Mazda B2200 Axle Shaft
 Mazda B2200 Control Arm Bushing
 Mazda B2200 Shock Absorber
 Mazda B2200 Strut Housing
 Mazda B2200 Suspension Strut Rod
 Mazda B2200 Sway Bar Bracket
 Mazda B2200 Sway Bar Link Bushing
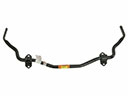 Mazda B2200 Sway Bars
 Mazda B2200 Wheel Bearing
 Mazda B2200 Wheel Seal