×
- Hello
- Login or Register
- Quick Links
- Live Chat
- Track Order
- Parts Availability
- RMA
- Help Center
- Contact Us
- Shop for
- Mazda Parts
My Garage
My Account
Cart
Genuine Mazda Millenia Alternator
Generator- Select Vehicle by Model
- Select Vehicle by VIN
Select Vehicle by Model
orMake
Model
Year
Select Vehicle by VIN
For the most accurate results, select vehicle by your VIN (Vehicle Identification Number).
2 Alternators found

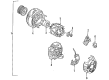
Mazda Millenia Alternator Part Number: KLK1-18-300R-00
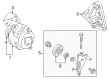
Mazda Millenia Alternator Part Number: KL47-18-300R-00
Mazda Millenia Alternator
The Mazda Millenia Alternator will revive the electrical system of the luxury sedan, converting engine rotation into a continuous stream of current to charge the battery. This Alternator is housed in two lightweight aluminum halves, which house a stator of copper windings about a shaft-mounted rotor, with a front pulley attached to the crankshaft belt to rotate the rotor, and a fan attached to the front to pull in cooling air. The Alternator's magnetic field of the rotor passes through the stator, and an alternating current is produced, which is fed back via the diode rectifiers and heat sinks that convert the alternating current into direct current that can be applied to the battery and lights. An internal or PCM-controlled voltage regulator in the Alternator adjusts field current to allow the output to remain within safe limits, and the Mazda housing design locates all important components in areas accessible to cooling air to enhance reliability. The early Mazda models were based on an internally controlled unit that operated separately, but subsequent Millenia models incorporated regulation into the powertrain control module, and the computer then adjusted the rate of charge to engine load and part demand, also a subtle yet significant development. Both styles, regardless of version, have strong dual bearings that uphold the shaft front and back, and brush assemblies at the rear housing that supply power to the rotating field coils. This reliable hardware is combined with modern Mazda charging logic to provide a reliable supply of 12 volts each time the driver turns the key, so the battery is not required to do all the work.
Looking for Alternator with proven quality? Choose OEM Alternator. Mazda designs and builds them to strict factory specs. Every piece goes through rigorous quality checks. You'll get parts that fit right and work like new. Shop our huge inventory of OEM Mazda Millenia parts. Enjoy the highly competitive prices online. Our site is your one-stop shop. Each genuine Millenia part includes a manufacturer's warranty. Buy with confidence. Our return policy is simple and hassle-free. In a rush? Choose expedited delivery at checkout. You'll love the streamlined experience from search to checkout to receiving your order.
Mazda Millenia Alternator Parts and Q&A
- Q: What precautions should be observed with alternator equipped vehicles to avoid damage on Mazda Millenia?A:There are a number of precautionary measures that should be taken with vehicles that have alternator to prevent damage to the unit. Removal of battery at any time should be followed by ensuring that this time it is reconnected in same polarity, otherwise the reversals of battery connections can destroy the one way rectifiers. When connecting a booster battery as an initial aid, it is always important to ensure that the positive of the booster battery should be connected to the positive terminals, and the negative of the booster battery should be connected to good engine ground of the vehicle being started. One of the things that should not be done is to use a fast charger as a booster to start the vehicles and battery cables should not be connected when charging the battery using a fast charger. The alternator should not be polarized and test lights greater than 12 volts should not be applied in checking diode continuity. One should avoid short circuiting or grounding any of the alternator terminals and care should be taken that the polarity of the battery, alternator, and regulator are compatible and before any electrical connection is made in the system. One should not disconnect the alternator at any time on an open circuit and all connections within the circuit should be clean and tight. The battery ground connection must be removed when any work is done to any of the electrical components and the battery must be removed whenever the arc welding is required to be done on the car.
- Q: How to remove and install an alternator on Mazda Millenia?A:To dismantle the alternator, begin by un-hooking a negative battery cable. In certain models, remove the vacuum hose and the solenoid bracket (unless it is fitted) and in 1995-98 1.8L engines, remove the pressure pipe bracket and EGR solenoid valve bracket. Unplug and unconnect the electrical connectors of the alternator and remove the alternator drive belt. On engines of 1995-98 1.8L, remove the alternator bracket, then the pivot and adjusting bar bolts to take out the alternator. In order to install, screw the alternator on the through-bolt, re-screw the alternator bracket on 1995-98 1.8L engines, hooking the electrical connectors, and fastening the drive belt and upper mounting bolt, adjusting the tension of the belt. Connect the lower through-bolt and upper mounting bolt to the required torque. In 4-cylinder models, disassemble the drive belt, upper mounting bolt, cross member and exhaust pipe, and so forth, supporting the catalytic converter. Unplug the electrical connectors and get rid of the through-bolt of the alternator lower. To install, reverse sequence, and see to the correct torque requirements of the exhaust parts and reconnect the negative battery cable. In 6 cylinder models disconnect negative battery cable, remove fresh air duct, radiator upper bracket, and disconnect condenser fan, as needed. Unscrew the electrical connectors, unscrew the tensioner and take off the drive belt. Prop the car, take away the splash shield and in case of necessity the A/C compressor. Take out the alternator through-bolt and the alternator and then place the new alternator with the through-bolt using the correct torque. Install the splash shield, drive belt, and re-attach the electrical connectors. With Millenia models, the procedure is the same, and the front charge air cooler should be removed, and the A/C compressor should be supported. Connections After installation, connect the negative battery cable. To test, make sure the battery is charged, the alternator drive belt is in good shape, that the electrical loads are off and that the alternator warning light works. Switch on the engine and ensure that the alternator is running smoothly, taking a reading of the voltage at the B + terminal to ensure that the voltage is between 13.0-15.0 volts. In case of incorrect readings then inspect the wiring harness and change the alternator where necessary.

Related Mazda Millenia Parts
 Mazda Millenia Starter
 Mazda Millenia Alternator Bearing
 Mazda Millenia Alternator Bracket
 Mazda Millenia Alternator Pulley
 Mazda Millenia Battery Cable
 Mazda Millenia Battery Hold Downs
 Mazda Millenia Battery Tray
 Mazda Millenia Ground Cables
 Mazda Millenia Starter Brush
 Mazda Millenia Starter Drive Gear
 Mazda Millenia Starter Solenoid