×
- Hello
- Login or Register
- Quick Links
- Live Chat
- Track Order
- Parts Availability
- RMA
- Help Center
- Contact Us
- Shop for
- Mazda Parts
My Garage
My Account
Cart
Genuine Mazda Millenia Starter
Starter Ignition- Select Vehicle by Model
- Select Vehicle by VIN
Select Vehicle by Model
orMake
Model
Year
Select Vehicle by VIN
For the most accurate results, select vehicle by your VIN (Vehicle Identification Number).
2 Starters found

Mazda Millenia Starter Part Number: KL86-18-400R-00

Mazda Millenia Starter Part Number: KJ01-18-400R-00
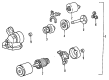
Mazda Millenia Starter
The Mazda Millenia Starter provides the mechanical push required to jump-start the V6 engine by flicking the key on, converting battery electricity into the engine torque required to turn the crankshaft until combustion assumes control. Within this Starter, a heavy-gauge cable transfers power to the solenoid, and the solenoid at the same time moves the motor and pushes the drive pinion into the flywheel ring gear, thus the process is completed in a very short time and precisely. Whenever electric current passes through an armature, a set of field coils or permanent magnets rotates the armature; the rotation of the armature is delivered to the motor via a set of brushes, a commutator, and ultimately a drive with an overrunning clutch, which the armature jerks back the moment the engine fires to prevent damage. The Millenia has also been produced in some model years based on a gearing reduction design wherein a small, fast armature passes through reduction gears in front of the flywheel and provides greater torque due to being lighter than the initial direct drive designs. Both styles depend upon the same safety-conscious control circuit which opens at the ignition switch, passes through a relay and which must be connected to a closed neutral or clutch switch such that the car cannot crank in a gear. Subsequent Mazda development has incorporated more powerful magnets and planetary gears; continued Mazda attention to detail has made the Starter a smaller, quieter, and longer-lasting device with the same electromagnetic principle that has been the key to the operation of every Mazda engine start.
Looking for Starter with proven quality? Choose OEM Starter. Mazda designs and builds them to strict factory specs. Every piece goes through rigorous quality checks. You'll get parts that fit right and work like new. Shop our huge inventory of OEM Mazda Millenia parts. Enjoy the highly competitive prices online. Our site is your one-stop shop. Each genuine Millenia part includes a manufacturer's warranty. Buy with confidence. Our return policy is simple and hassle-free. In a rush? Choose expedited delivery at checkout. You'll love the streamlined experience from search to checkout to receiving your order.
Mazda Millenia Starter Parts and Q&A
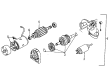
- Q: How to test and replace a starter on Mazda Millenia?A:To check the Starter, hook a voltmeter to the Starter posts and ground and verify that the battery is fully charged and check the Starter wire connections to see that there is no looseness or corrosion. Check the positive battery cable to ensure that the voltage is connected to the Starter, and when there is voltage, then go with the test, otherwise examine or replace the battery cable. In the case of manual transaxle, one should press the brake pedal, turn the ignition to START, and confirm that there is no voltage at the S terminal of the Starter. In case of voltage present it can be deduced that there is a fault in the relay, field coil, and armature, thereby changing them accordingly. The procedure to be followed in the event that no voltage is detected at the S terminal is to check the ignition switch, the wiring, and any other interlock switches that may be present. To be removed and installed on different models, disconnection of negative battery cable, removal of other components that might interfere with the installation and ensuring that the Starter is detached is done carefully and wiring labelled and disconnected where necessary. The installation process is to install the Starter, mounting bolts with a given torque, and reconnect all parts, such as the battery cable. To replace solenoid, take out the Starter, detach the lead off the solenoid and change the solenoid making sure to adjust pinion depth clearance with shims as required. Installing the solenoid, check the engagement of the solenoid and measure the pinion clearance, adjusting it when necessary and assemble the final assembly.
- Q: What types of starters does Mazda employ on Mazda Millenia?A:In their cars, Mazda uses three starters namely conventional, reduction and direct drive. Traditional starters have four single wound magnets which produce a powerful magnetic field which causes the armature to rotate against the field. Also, the magnetic field causes a lever to pivot the starter drive and teeth of the flywheel. Reduction starters are started by a high-speed electric motor to cause a gear-set to rotate, with some being planetary gear-set-driven, and others being driven by a large gear with a small gear. This gearing is relatively weak, such that a relatively weak electric motor can increase its output turning power and then reach the flywheel. Direct drive starters also utilize an electric motor but instead of sending their output speed and turning power to the flywheel they direct it to the flywheel. Every starter has an over-running gearbox to avoid damages in case there is an increase in engine speed beyond the starter speed.


Related Mazda Millenia Parts
 Mazda Millenia Alternator
 Mazda Millenia Alternator Bearing
 Mazda Millenia Alternator Bracket
 Mazda Millenia Alternator Pulley
 Mazda Millenia Battery Cable
 Mazda Millenia Battery Hold Downs
 Mazda Millenia Battery Tray
 Mazda Millenia Ground Cables
 Mazda Millenia Starter Brush
 Mazda Millenia Starter Drive Gear
 Mazda Millenia Starter Solenoid