×
- Hello
- Login or Register
- Quick Links
- Live Chat
- Track Order
- Parts Availability
- RMA
- Help Center
- Contact Us
- Shop for
- Mazda Parts
My Garage
My Account
Cart
Genuine Mazda Millenia Turn Signal Lights
Side Marker Light- Select Vehicle by Model
- Select Vehicle by VIN
Select Vehicle by Model
orMake
Model
Year
Select Vehicle by VIN
For the most accurate results, select vehicle by your VIN (Vehicle Identification Number).
7 Turn Signal Lights found

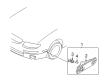
Mazda Millenia Side Marker Lamp Part Number: TA01-51-5F0B
$59.56 MSRP: $79.44You Save: $19.88 (26%)Ships in 1-2 Business DaysMazda Millenia Side Marker Lamp Part Number: TA01-51-5E0B
$59.56 MSRP: $79.44You Save: $19.88 (26%)Ships in 1-2 Business Days
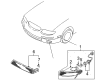
Mazda Millenia Signal Lamp Assembly Part Number: TC44-51-350A
$172.75 MSRP: $230.39You Save: $57.64 (26%)Ships in 1-2 Business Days
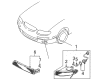
Mazda Millenia Signal Lamp Assembly Part Number: TA01-51-350B
$30.56 MSRP: $40.11You Save: $9.55 (24%)Ships in 1-2 Business Days

Mazda Millenia Signal Lamp Assembly Part Number: TC44-51-360A
Mazda Millenia Signal Lamp Assembly Part Number: TB94-51-360
Mazda Millenia Signal Lamp Assembly Part Number: TB94-51-350
Mazda Millenia Turn Signal Lights
Looking for Turn Signal Lights with proven quality? Choose OEM Turn Signal Lights. Mazda designs and builds them to strict factory specs. Every piece goes through rigorous quality checks. You'll get parts that fit right and work like new. Shop our huge inventory of OEM Mazda Millenia parts. Enjoy the highly competitive prices online. Our site is your one-stop shop. Each genuine Millenia part includes a manufacturer's warranty. Buy with confidence. Our return policy is simple and hassle-free. In a rush? Choose expedited delivery at checkout. You'll love the streamlined experience from search to checkout to receiving your order.
Mazda Millenia Turn Signal Lights Parts and Q&A
- Q: How to remove and install turn signal lights on Mazda Millenia?A:Removal and installation To install and remove front turn signal lights, parking lights, etc. (when the car has two-piece front headlight/signal lens) This is to remove the attaching screw(s) and partially remove the lens on the front parking light; to install, screw back in the lens on the front parking light and the rear turn signal lamp, in some cases also the rear headlight lamp, to install the bulb. Then, unscrew the bulb socket and gasket with your fingers in an anti-clockwise motion and remove the bulb by pushing it in to clear the socket slots and screw it out in an anti-clockwise movement. To install, reverse installation procedures. In the case of side marker lights, in case they are visible, unscrew the screws that are attaching the rear side of the query light, and partly unscrew the front side marker light lens; in case there are no screws, very carefully cut out the lens assembly of the car body. (Take off the bulb socket) turn the socket clockwise; then simply yank the bulb out. The process of installation is the opposite. To replace rear turn signal, brake, and parking lights, as required, open the trunk end trim panel once the plastic fasteners have been removed and pull out the panel after which the right side upper trunk side garnish is removed, and the far right side bulb is accessed. In case it is impossible to get access to it with the help of the trunk, then take out the rear lens assembly, which is usually attached to it by screws and clips. Delicately unzipe the socket wiring on which you wish, then twist the wiring counterclockwise to unscrew the socket then push the bulb into the socket slots and unscrew it counterclockwise and remove. Installation is the opposite of removing. In the case of the high mount brake light with external mount on the rear liftgate, take off the retaining screw covers and the lens attaching screws and then draw out the lens assembly to obtain access to the wire/ socket assembly. To remove the bulb/socket assembly, turn the socket anti-clockwise and then simply pull the bulb out. In case of internally mounted lights, where fitted, remove the lid containing the fasteners, take the lock tabs apart and slide the lid backwards. The socket can also be turned counterclockwise to eject the bulb/socket assembly and extract the bulb. Installation is the opposite of removing. To remove the lens of dome and the interior lights, unscrew the negative battery cable, hold the lens, and pull it downward. Gently remove the bulb in its socket, pushing it out of the socket, and inspect the socket of the bulb holder. Installation is done by pushing the bulb into its holder until it is stuck, place the lens into the holder, and push until it clips in place, and reconnect the negative battery cable. In case with license plate lights, loosen screws of the attaching lights on the light lens without fully removing the screws, and then remove the license plate lens assembly. When required to be cleared, remove the complete assembly of the body, then remove bulb by simply pulling it downwards and outwards out of the socket. The process of installation is the opposite.

Related Mazda Millenia Parts
 Mazda Millenia Back Up Light
 Mazda Millenia Car Bulbs
 Mazda Millenia Headlight
 Mazda Millenia Headlight Bulb
 Mazda Millenia Headlight Cover
 Mazda Millenia Instrument Panel Light Bulb
 Mazda Millenia License Plate Lights
 Mazda Millenia Light Socket
 Mazda Millenia Side Marker Light
 Mazda Millenia Tail Light
 Mazda Millenia Tail Light Lens
 Mazda Millenia Third Brake Light