×
- Hello
- Login or Register
- Quick Links
- Live Chat
- Track Order
- Parts Availability
- RMA
- Help Center
- Contact Us
- Shop for
- Mazda Parts
My Garage
My Account
Cart
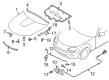
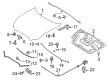
Genuine Mazda MX-5 Miata Hood
Engine Hood- Select Vehicle by Model
- Select Vehicle by VIN
Select Vehicle by Model
orMake
Model
Year
Select Vehicle by VIN
For the most accurate results, select vehicle by your VIN (Vehicle Identification Number).
2 Hoods found


Mazda MX-5 Miata Hood Part Number: NPY1-52-31X
$966.51 MSRP: $1320.63You Save: $354.12 (27%)Ships in 1-2 Business Days
Mazda MX-5 Miata Bonnet Part Number: NAY0-52-31XD
$706.95 MSRP: $965.98You Save: $259.03 (27%)Ships in 1-2 Business Days
Mazda MX-5 Miata Hood
Looking for Hood with proven quality? Choose OEM Hood. Mazda designs and builds them to strict factory specs. Every piece goes through rigorous quality checks. You'll get parts that fit right and work like new. Shop our huge inventory of OEM Mazda MX-5 Miata parts. Enjoy the highly competitive prices online. Our site is your one-stop shop. Each genuine MX-5 Miata part includes a manufacturer's warranty. Buy with confidence. Our return policy is simple and hassle-free. In a rush? Choose expedited delivery at checkout. You'll love the streamlined experience from search to checkout to receiving your order.
Mazda MX-5 Miata Hood Parts and Q&A
- Q: How to remove and install the hood while ensuring proper alignment and protection of the vehicle's body on Mazda MX-5 Miata?A:In order to remove and install the hood, one should initial first make marks around the hinges with a scribe or felt tip marker to be able to locate them correctly when installing. Get body and paint protection by covering the area of the cowl and fenders with blankets or pads. You have to disconnect the windshield washer tube at the hood, and then an assistant should aid you to hold the hood up as you loosen up the hinge-to-hood bolts and remove the hood. To have it installed, follow the steps of removal in reverse. To be adjusted, fore-and-aft, and side-to-side can be done when the hinge plate slot is moved after loosening the bolts. Mark around the hinge plate to measure movement, loosen the bolts or nuts and move the hood a little at a time and ensure the hinge bolts are tightened before rechecking. When necessary the complete Hood Latch assembly will be moved up and down and sideways on the radiator support allowing the hood to close completely and become even with the fenders. Locate the position of the hood latch and mark it before unscrewing the bolts and re-locate the latch assembly where needed and re-done the mounting bolts. Lubricate the hood latch assembly and hinges with white lithium-base grease periodically to stop attachment and friction.

Related Mazda MX-5 Miata Parts
 Mazda MX-5 Miata Convertible Top Motor
 Mazda MX-5 Miata Door Check
 Mazda MX-5 Miata Door Screws
 Mazda MX-5 Miata Hood Hinge
 Mazda MX-5 Miata Hood Latch
 Mazda MX-5 Miata Hood Release Cable
 Mazda MX-5 Miata Seat Cushion
 Mazda MX-5 Miata Seat Switch
 Mazda MX-5 Miata Shift Indicator
 Mazda MX-5 Miata Sunroof Motor
 Mazda MX-5 Miata Weather Strip
 Mazda MX-5 Miata Windshield Washer Hose