×
- Hello
- Login or Register
- Quick Links
- Live Chat
- Track Order
- Parts Availability
- RMA
- Help Center
- Contact Us
- Shop for
- Mazda Parts
My Garage
My Account
Cart
Genuine Mazda MX-5 Miata Hood Release Cable
Hood Cable- Select Vehicle by Model
- Select Vehicle by VIN
Select Vehicle by Model
orMake
Model
Year
Select Vehicle by VIN
For the most accurate results, select vehicle by your VIN (Vehicle Identification Number).
5 Hood Release Cables found


Mazda MX-5 Miata Release Cable Part Number: NE51-56-720
$42.78 MSRP: $57.05You Save: $14.27 (26%)Ships in 1-2 Business DaysMazda MX-5 Miata Release Cable Part Number: NP41-56-720
$36.30 MSRP: $48.40You Save: $12.10 (25%)Ships in 1-2 Business DaysMazda MX-5 Miata Release Cable Part Number: NP32-56-720
$38.06 MSRP: $50.76You Save: $12.70 (26%)Ships in 1-2 Business DaysMazda MX-5 Miata Release Cable Part Number: NE61-56-720
$44.19 MSRP: $58.92You Save: $14.73 (25%)Ships in 1-2 Business Days
Mazda MX-5 Miata Release Cable Part Number: NA1J-56-720A
$31.84 MSRP: $42.45You Save: $10.61 (25%)Ships in 1-2 Business Days
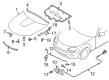
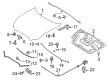
Mazda MX-5 Miata Hood Release Cable
Looking for Hood Release Cable with proven quality? Choose OEM Hood Release Cable. Mazda designs and builds them to strict factory specs. Every piece goes through rigorous quality checks. You'll get parts that fit right and work like new. Shop our huge inventory of OEM Mazda MX-5 Miata parts. Enjoy the highly competitive prices online. Our site is your one-stop shop. Each genuine MX-5 Miata part includes a manufacturer's warranty. Buy with confidence. Our return policy is simple and hassle-free. In a rush? Choose expedited delivery at checkout. You'll love the streamlined experience from search to checkout to receiving your order.
Mazda MX-5 Miata Hood Release Cable Parts and Q&A
- Q: How to replace the hood latch and hood release cable on Mazda MX-5 Miata?A:With 2005 models and earlier, the process requires first marking the location of the latch with a scribe or felt tip marker and then unscrewing the mounting bolts of the hood latch and the latch itself. Unhook the hood release cable, and take the retaining clip out and then disconnect the cable with the latch assembly. The last part is installation which is in the reverse order which entails adjusting the latch to allow the hood to fit in with slightly compressed bumpers. On models dating after 2006, unscrew the electrical lead of the latch, remove the hood release cable of its bracket and unscrew it off the latch mechanism. Take out the mounting belts and the latch. Installation is once more the opposite of removal. In order to work on the cable, looseness up all the retaining clips by detaching the cable off the latch and attaching a thin wire or string at the end of the cable. In models year 1997 and below, insert the hood release lever and eliminate the driver side kick panel. Removal of the lever at 1999-2005 models Removal of the lever at the knee bolster trim panel can be done by pulling it out straight down. To release the mounting tabs, with 2006 and subsequent models, simply pull the release lever with a screwdriver wrapped in a tape and inserted into the slot and then pull the lever assembly downward. Slide the cable and the grommet into the passenger area making sure that the new cable has a grommet placed on it and then insert the new cable through the old one. Installation of the wiring at the engine compartment will require pulling the wire or string in the same direction back through the firewall and then installing the cable grommet into the firewall inside the passenger compartment, reversing all the steps of installation.

Related Mazda MX-5 Miata Parts
 Mazda MX-5 Miata Car Mirror
 Mazda MX-5 Miata Door Screws
 Mazda MX-5 Miata Hood
 Mazda MX-5 Miata Hood Hinge
 Mazda MX-5 Miata Hood Latch
 Mazda MX-5 Miata Rear Door Striker
 Mazda MX-5 Miata Subwoofer
 Mazda MX-5 Miata Sunroof Motor
 Mazda MX-5 Miata Suspension Strut Rod
 Mazda MX-5 Miata Trunk Lid Latch
 Mazda MX-5 Miata Weather Strip
 Mazda MX-5 Miata Window Regulator
Browse by Year
2025 Hood Release Cable 2024 Hood Release Cable 2023 Hood Release Cable 2022 Hood Release Cable 2021 Hood Release Cable 2020 Hood Release Cable 2019 Hood Release Cable 2018 Hood Release Cable 2017 Hood Release Cable 2016 Hood Release Cable 2015 Hood Release Cable 2014 Hood Release Cable 2013 Hood Release Cable 2012 Hood Release Cable 2011 Hood Release Cable 2010 Hood Release Cable 2009 Hood Release Cable 2008 Hood Release Cable 2007 Hood Release Cable 2006 Hood Release Cable