×
- Hello
- Login or Register
- Quick Links
- Live Chat
- Track Order
- Parts Availability
- RMA
- Help Center
- Contact Us
- Shop for
- Mazda Parts
My Garage
My Account
Cart
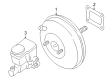
Genuine Mazda Protege Brake Master Cylinder
- Select Vehicle by Model
- Select Vehicle by VIN
Select Vehicle by Model
orMake
Model
Year
Select Vehicle by VIN
For the most accurate results, select vehicle by your VIN (Vehicle Identification Number).
10 Brake Master Cylinders found

Mazda Protege Master Cylinder Part Number: BJ0S-43-400R-00
$102.35 MSRP: $136.50You Save: $34.15 (26%)Ships in 1-2 Business Days
Mazda Protege Master Cylinder Part Number: BR70-43-400R-0D
$152.30 MSRP: $201.71You Save: $49.41 (25%)Ships in 1-2 Business DaysMazda Protege Master Cylinder Part Number: BJ4T-43-40ZR-00
Mazda Protege Master Cylinder Part Number: BJ3K-43-40ZR-00
Mazda Protege Master Cylinder Part Number: BJ0P-43-400
Mazda Protege Master Cylinder Part Number: BJ0E-43-400
Mazda Protege Master Cylinder Part Number: BG3K-43-40Z
Mazda Protege Master Cylinder Part Number: BG1S-43-40ZR-00
Mazda Protege Master Cylinder Part Number: BC5F-43-40Z
Mazda Protege Master Cylinder Part Number: BC2A-43-40ZR-0A
Mazda Protege Brake Master Cylinder
Looking for Brake Master Cylinder with proven quality? Choose OEM Brake Master Cylinder. Mazda designs and builds them to strict factory specs. Every piece goes through rigorous quality checks. You'll get parts that fit right and work like new. Shop our huge inventory of OEM Mazda Protege parts. Enjoy the highly competitive prices online. Our site is your one-stop shop. Each genuine Protege part includes a manufacturer's warranty. Buy with confidence. Our return policy is simple and hassle-free. In a rush? Choose expedited delivery at checkout. You'll love the streamlined experience from search to checkout to receiving your order.
Mazda Protege Brake Master Cylinder Parts and Q&A
- Q: What steps should be taken before overhauling the Brake Master Cylinder on Mazda Protege?A:Note the accessibility and prices of a new or factory rebuilt master cylinder, and a rebuild kit before making a decision to redesign that master cylinder. In case of rebuilding, examine the bore. When fitting a new or rebuilt master cylinder follow the instructions on setting the booster push rod-to-master cylinder clearance. In 1997 and subsequent models, a special factory tool is necessary and it is suggested that the procedure should be done at a dealership. Start by disconnecting the electrical connector of the fluid level warning switch and verifying continuity at the level sensor terminals no continuity should exist at the level sensor terminals when the fluid level is below the minimum. Cautiously take off the cap of the brake fluid reservoir and empty as much fluid as possible using a syringe, and continuity taken into consideration when the fluid line is below the minimum. Have rags beneath the fittings, and ready your caps or plastic bags to cover up the ends of the lines after they have been disconnected, but you must be careful not to spill your brake fluid, as this will take the paint off. Use a flare-nut wrench to loosen the fittings in the ends of the brake lines as they enter the master cylinder to avoid rounding off the flats. Pull the brake lines off the master cylinder and insert the ends so as to avoid contamination. In models with manual transaxle, detach and insert the fluid hose that connects the master cylinder reservoir and the clutch master cylinder. Take out the nuts and washers that hold the master cylinder to the power Brake Booster and then pull off the master cylinder, avoiding spillage of fluid on the studs that hold it. Taking the required rebuild kit of replacement parts and instructions before overhauling can be beneficial. Take out the screw reservoir retaining part, the reservoir and remove the grommets. Install the cylinder in a vise and either punch or Phillips screwdriver press the pistons until they fix to the other end of the master cylinder and then remove the stopper bolt. The snap-ring at the end of the master cylinder should be carefully removed, and then the inner parts should be removed by working out of the bore. Note the sequence in which the parts are reassembled, including the various springs. Look inside the bore where deep marks of a score or damage are found, and this means a new master cylinder is required. Install all the components that come with the rebuild kit and wash the re-used ones with a brake system cleaner. Install the assembled components into the bore bottoming them against the end of the master cylinder and fit the stopper bolt and new snap-ring. Install the reservoir grommets, reservoir and reservoir mounting screw. Bench bleed the master cylinder before installation into the system by setting the cylinder on a vise, plugging the threaded brake line out holes with threaded plugs before filling the reservoir with a specified brake fluid. Take out one of the plugs and force the piston mechanism into the bore to force out the air, and then leave the pressure to escape. Continue this process until all the brake fluid is emptied and then move to the other hole. Another technique is to seal the hole with a finger without substituting the plug, so that the air is not recaptured. To install, put the master cylinder on the power brake booster and place the washers and tighten the nuts with a new gasket finger-tight. Install the brake line fittings into the master cylinder taking care not to strip them and screw the master cylinder mounting nuts to the recommended torque. Seal the master cylinder reservoir with fluid, and bleed the system through the master cylinder and the brake system by making an assistant push the brake pedal and loosen the fitting to allow the fluid to expel air bubbles until it is clear. Before the vehicle is driven, check the functioning of the brake system.

Related Mazda Protege Parts
 Mazda Protege Brake Booster
 Mazda Protege Speed Sensor
 Mazda Protege ABS Control Module
 Mazda Protege ABS Sensor
 Mazda Protege Axle Shaft Seal
 Mazda Protege Brake Booster Vacuum Hose
 Mazda Protege Brake Drum
 Mazda Protege Brake Master Cylinder Repair Kit
 Mazda Protege Hydraulic Hose
 Mazda Protege Parking Brake Cable
 Mazda Protege Spindle Nut
 Mazda Protege Wheel Cylinder
Browse by Year
2003 Brake Master Cylinder 2002 Brake Master Cylinder 2001 Brake Master Cylinder 2000 Brake Master Cylinder 1999 Brake Master Cylinder 1998 Brake Master Cylinder 1996 Brake Master Cylinder 1995 Brake Master Cylinder 1994 Brake Master Cylinder 1993 Brake Master Cylinder 1992 Brake Master Cylinder 1991 Brake Master Cylinder 1990 Brake Master Cylinder