×
- Hello
- Login or Register
- Quick Links
- Live Chat
- Track Order
- Parts Availability
- RMA
- Help Center
- Contact Us
- Shop for
- Mazda Parts
My Garage
My Account
Cart
Genuine Mazda Protege Sway Bar
Sway Bar Kit- Select Vehicle by Model
- Select Vehicle by VIN
Select Vehicle by Model
orMake
Model
Year
Select Vehicle by VIN
For the most accurate results, select vehicle by your VIN (Vehicle Identification Number).
17 Sway Bars found


Mazda Protege Stabilizer Bar Part Number: BL2J-28-151
$107.54 MSRP: $143.41You Save: $35.87 (26%)Ships in 1-2 Business Days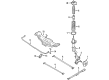
Mazda Protege Stabilizer Bar Part Number: B26R-28-151A
$111.85 MSRP: $149.16You Save: $37.31 (26%)Ships in 1-2 Business DaysMazda Protege Stabilizer Bar Part Number: C145-28-151A
$111.88 MSRP: $149.19You Save: $37.31 (26%)Ships in 1-2 Business Days
Mazda Protege Stabilizer Bar Part Number: B26R-34-151
$162.94 MSRP: $217.29You Save: $54.35 (26%)Ships in 1-2 Business DaysMazda Protege Stabilizer Bar Part Number: BL2J-34-151A
$196.35 MSRP: $261.85You Save: $65.50 (26%)Ships in 1-2 Business Days
Mazda Protege Stabilizer Bar Part Number: B459-34-151
$225.24 MSRP: $300.37You Save: $75.13 (26%)Ships in 1-2 Business Days
Mazda Protege Stabilizer Bar Part Number: B461-28-10X
$214.48 MSRP: $286.03You Save: $71.55 (26%)Ships in 1-2 Business DaysMazda Protege Stabilizer Bar Part Number: BP7H-28-151A
Mazda Protege Stabilizer Bar Part Number: B30H-28-151
Mazda Protege Stabilizer Bar Part Number: B30P-28-151A
Mazda Protege Stabilizer Bar Part Number: B30P-34-151A
Mazda Protege Stabilizer Bar Part Number: B455-28-10X
Mazda Protege Stabilizer Bar Part Number: B461-34-151B

Mazda Protege Stabilizer Bar Part Number: BC1D-28-151
Mazda Protege Stabilizer Bar Part Number: BC1F-34-15XA
Mazda Protege Stabilizer Bar Part Number: BL8P-34-151
Mazda Protege Stabilizer Bar Part Number: BN7H-34-151
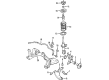
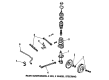
Mazda Protege Sway Bar
The Mazda Protege Sway Bar is an anti-corner lean device that connects the left and right wheels with a torsion spring that prevents body lean. This bar serves the purpose of stabilization, connecting opposite wheels with short lever arms, such that when the outside suspension compresses on a sharp turn, the bar twists instead of letting the body lean too far, increasing roll stiffness and providing a more stable grip for the driver when the vehicle goes over bumps or through quick lane changes. Early automobiles applied very stiff springs and could tolerate obvious leaning, meaning that not many of them applied such equipment prior to World War II, but since the 1950s most passenger cars have employed anti-roll systems, with the Protege being a beneficiary of that development. In Mazda models, as Mazda has continually focused on responsive handling, the device may be mounted either on the front or rear axle, but the operating principle remains the same, to work against side-to-side weight transfer. The Sway Bar may be mounted at the front, eliminating understeer, or a rear-mounted Sway Bar can be placed, which accelerates turn-in and can be retuned easily without harshness. Although the sources do not mention that multiple proprietary versions for different model years exist, the difference between a rear and a front bar is the primary type of variation. Since the bar is a hardened steel rod held only by bushings and connections, it provides a good low-maintenance method of sharpening handling without rendering the ride harsh, which perfectly fits Mazda tradition of balanced everyday performance.
Looking for Sway Bar with proven quality? Choose OEM Sway Bar. Mazda designs and builds them to strict factory specs. Every piece goes through rigorous quality checks. You'll get parts that fit right and work like new. Shop our huge inventory of OEM Mazda Protege parts. Enjoy the highly competitive prices online. Our site is your one-stop shop. Each genuine Protege part includes a manufacturer's warranty. Buy with confidence. Our return policy is simple and hassle-free. In a rush? Choose expedited delivery at checkout. You'll love the streamlined experience from search to checkout to receiving your order.
Mazda Protege Sway Bar Parts and Q&A
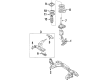
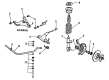
- Q: How to remove and reinstall the front sway bar and front sway bar bushing on Mazda Protege?A:To take out the front stabilizer bar, one should first loosen the nuts of the front wheels, lift the vehicle, and then sit it squarely on jackstands, with the parking brake on and back wheels blocked up. Take away the engine undercover and front wheels. When working with models between 1990 and 1994, loosen the link nut of the stabilizer bar, bolts, bushings, and washers and store them in the process of reattaching them back to the car. With 1995-1998 models, it is necessary to take out the stabilizer bar control link nut at the lower arm assembly, and with 1999 and beyond models, to separate the link that connects to a bracket on the front strut. Then take the nuts out of the steering gear and push it forward with the aid of a hoist and support the engine. Take out the support cross member beneath the engine, take off the Tie Rod Ends out of the Steering Knuckle, and the lower Ball Joints. Once the exhaust system is removed, the transaxle control rod is disconnected and the bolts holding the cross member are removed, you can then lower the cross member until you can reach the stabilizer bar brackets. Unscrew the stabilizer bar bracket and check the bracket bushings to be worn out and replace them, when needed. Wipe the stabilizer bar bushing off with a wire brush. To install, lubricate the bushings with rubber and fit them on the stabilizer bar with the flat bottom against the cross member and make sure it fits correctly. Install the cross member, and loosen the bolts. Replace the steering gear, replace the mounting bracket nuts and tighten. Install the lower ball joint and tie rod ends, cross member, and then the bolts then the exhaust system. Lastly, screw the stabilizer bar link bolt, bushings, washers, and nut in that order, screwing them using the required length of thread to show.
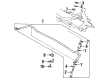
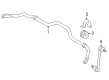
- Q: How to properly remove and install the rear sway bar and rear sway bar bushing on Mazda Protege?A:Unscrew the lug nuts on the rear wheel, raise the rear of the car and put it on jackstands and take out the rear wheels. To remove the stabilizer bar link nut and bushing nut from 1990-1994, remove the link nut of the stabilizer bar, the bushing nut, bushing, spacer, washers and bushing bolt in that order to properly reattach. On 1995 or later models, delete the stabilizer bar control link nut at the strut assembly, once more putting the parts back where they were mounted. To enhance the dismantling of the rear stabilizer bar, the stabilizer bar bushing clamps are unbolted and then the stabilizer bar removed by lifting the bushings by a rocking action. Check the bushings to determine any wear, hardness, distortion, cracking, etc. of the bushings, replacing them where necessary and do the same to the stabilizer bar link bushings. Wipe of the places the bushings will ride on the bar with a wire brush, and grease the bushings with rubber lubricant before fitting, but do not use any petroleum products, or brake fluid, which may ruin them. Install the bushings on the stabilizer bar brackets with the flat bottom/split towards the cross member with the bushings fitted in the correct position on the stabilizer bar. Lastly, screw the stabilizer bar bracket nuts to their designated torque, then the stabilizer bar end bushings, washers and nut respectively in the order that they were unscrewed, screwed in to their desired length of exposed thread.


Related Mazda Protege Parts
 Mazda Protege Crankshaft Position Sensor
 Mazda Protege Oil Pump
 Mazda Protege Timing Belt
 Mazda Protege Door Hinge
 Mazda Protege Rack and Pinion Boot
 Mazda Protege Vapor Canister Purge Solenoid
 Mazda Protege Voltage Regulators
 Mazda Protege Wheel Seal
 Mazda Protege Window Channel
 Mazda Protege Window Crank Handles
 Mazda Protege Window Switch