×
- Hello
- Login or Register
- Quick Links
- Live Chat
- Track Order
- Parts Availability
- RMA
- Help Center
- Contact Us
- Shop for
- Mazda Parts
My Garage
My Account
Cart
Genuine Mazda RX-7 Sway Bar
Sway Bar Kit- Select Vehicle by Model
- Select Vehicle by VIN
Select Vehicle by Model
orMake
Model
Year
Select Vehicle by VIN
For the most accurate results, select vehicle by your VIN (Vehicle Identification Number).
1 Sway Bar found

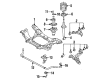
Mazda RX-7 Stabilizer Bar Part Number: FD01-34-151A
$372.79 MSRP: $497.15You Save: $124.36 (26%)Ships in 1-2 Business Days
Mazda RX-7 Sway Bar
Looking for Sway Bar with proven quality? Choose OEM Sway Bar. Mazda designs and builds them to strict factory specs. Every piece goes through rigorous quality checks. You'll get parts that fit right and work like new. Shop our huge inventory of OEM Mazda RX-7 parts. Enjoy the highly competitive prices online. Our site is your one-stop shop. Each genuine RX-7 part includes a manufacturer's warranty. Buy with confidence. Our return policy is simple and hassle-free. In a rush? Choose expedited delivery at checkout. You'll love the streamlined experience from search to checkout to receiving your order.
Mazda RX-7 Sway Bar Parts and Q&A
- Q: How to properly install and inspect a rear sway bar on Mazda RX-7?A:Lift the rear part of the car and prop it using jack stands that are placed on the front side of the lower link brackets. Detach the stabilizer bar on each end by loosening the lock nut on the bottom of the control link, and, when it is required, remove the mount bracket on the frame rail. Two support plates on the axle housing now keep the stabilizer bar in place, loosen the bolts that hold the plates onto the housing and remove the stabilizer bar and the support plates under the vehicle. Check the bar to ensure that it is free of cracks, deformations, and damages and remove it where needed. Inspect the control links and support plates rubber bushings and replace as needed, which may be cracked, worn out, or damaged. In case the support plate bushings were taken off or changed, make sure that the hollow is facing backward on the support plate and vehicle and the one where the mounting bolt fits is facing forward. Install the stabilizer bar with the support plates attached and loosely install the support plate mounting bolts but do not tighten. In case of removal, screw the mounting brackets onto the frame rails and tighten the nuts using a torque of 27 to 38 ft-lb (3.8 to 5.3 m-kg). Fit the control links and stabilizer bar ends with four rubber bushings on each side, screw the lock nut and jam nut onto the control link bolt and screw until 0.169 in (4.3 mm) of threaded rod sticks out of the tightened jam nut. Lastly, set the vehicle to the ground and apply, through the entire weight of the car, on the suspension, the torque through the support plate bolts 23 to 34 ft-lb (3.2 to 4.7 m-kg).
Related Mazda RX-7 Parts
 Mazda RX-7 Crankshaft Position Sensor
 Mazda RX-7 Door Hinge
 Mazda RX-7 Oil Pump
 Mazda RX-7 Rack and Pinion Boot
 Mazda RX-7 Wheel Seal
 Mazda RX-7 Window Channel
 Mazda RX-7 Window Switch