×
- Hello
- Login or Register
- Quick Links
- Live Chat
- Track Order
- Parts Availability
- RMA
- Help Center
- Contact Us
- Shop for
- Mazda Parts
My Garage
My Account
Cart
Genuine Mazda Tribute Alternator
Generator- Select Vehicle by Model
- Select Vehicle by VIN
Select Vehicle by Model
orMake
Model
Year
Select Vehicle by VIN
For the most accurate results, select vehicle by your VIN (Vehicle Identification Number).
7 Alternators found


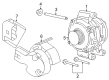
Mazda Tribute Alternator Part Number: YF20-18-300R-0D
$324.43 MSRP: $432.65You Save: $108.22 (26%)Ships in 1-2 Business Days
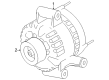
Mazda Tribute Alternator Part Number: ZZC7-18-300R-00
$481.76 MSRP: $647.67You Save: $165.91 (26%)


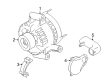
Mazda Tribute Alternator Part Number: AJ03-18-300R-0E

Mazda Tribute Alternator Part Number: ZZC8-18-300
Mazda Tribute Alternator Part Number: ZZC6-18-300C

Mazda Tribute Alternator Part Number: ZZC5-18-300B
Mazda Tribute Alternator Part Number: ZZC1-18-300D
Mazda Tribute Alternator
The Mazda Tribute Alternator is applied as the in-car generator in the SUV, which converts engine movement into electricity that powers the battery and all the lights. Within its small two-piece aluminum case, there are a stationary stator and a rotor that is mounted on the shaft, and the rotation of the rotor creates a magnetic field which causes the windings to produce voltage. Built-in diodes instantly transform the generated alternating current into constant DC to make the electrical system receive the appropriate type of energy. The shaft is supported by a fan at the front to remove heat, bearings at the front and the back to support the shaft, a special housing at the back contains the brushes, a rectifier and the highly important part, the voltage regulator, which prevents undercharging as well as overcharging. The first versions of the SUV have utilized either an internal or an external regulator, but more recent model years transfer that control responsibility to the powertrain control module, which reduces the number of components and increases the accuracy of the output. Irrespective of the year, the objective of the Alternator unit is the same, which is to provide reliable amperage each time the engine is started to ensure that the Alternator powering the car doesn't drain the battery as the headlights are switched on or the infotainment display is applied in Mazda vehicles. Although all of the Alternators installed on Mazda of this generation operate on the same principles, the transition to PCM control is the crucial difference between the first generation of the Tribute and subsequent ones as Mazda slowly moved towards more intelligent electronic control.
Looking for Alternator with proven quality? Choose OEM Alternator. Mazda designs and builds them to strict factory specs. Every piece goes through rigorous quality checks. You'll get parts that fit right and work like new. Shop our huge inventory of OEM Mazda Tribute parts. Enjoy the highly competitive prices online. Our site is your one-stop shop. Each genuine Tribute part includes a manufacturer's warranty. Buy with confidence. Our return policy is simple and hassle-free. In a rush? Choose expedited delivery at checkout. You'll love the streamlined experience from search to checkout to receiving your order.
Mazda Tribute Alternator Parts and Q&A
- Q: How to remove and install the alternator on Mazda Tribute?A:In the case of 2007 and earlier, begin by unhooking the cable by the negative battery terminal, then proceed to disconnect the alternator drivebelt. Unscrew the electrical connections on the alternator, put the jackstands on the front of the automobile, and take out the lower bolts of the alternator. Unscrew the upper alternator bolt, and then wiggle the alternator to the rear, then hoist it in the air and lift it out of the engine compartment. Installation of the new alternator Before fitting the new alternator, fit the upper alternator bolt into its mounting boss hole. Installation is the opposite of uninstallation and once the battery is connected again, Powertrain Control Module has to learn anew its idle and fuel trim strategy. V6 models should follow these steps, which include loosening the driveaxle hub nut, disassembly of the right driveaxle, and the wiring harness clips, and then the alternator is removed. In the 2008 models, remove the negative battery terminal, lift the vehicle and take away the right lower splash shield and drivebelt. In four-cylinder models, delete air duct (lower), wiring harness guides, and alternator shield and delete alternator. In V6 models, unscrew the electrical connectors and unbolt the air conditioning compressor then take out the alternator. In 2009 to 2012 models, it is a similar process, but there are some steps to follow when handling four-cylinder engines and V6 engines. In 2013 and above models, lift the vehicle, loosen the negative battery cable and follow the required steps, 1.5L, 1.6L, 2.0L, and 2.5L engine, be sure to support the engine and extract the components needed before lifting the alternator out. Once the battery is reconnected, the Powertrain Control Module has to re-learn the idle and fuel trim strategy so that it can work at its best.