×
- Hello
- Login or Register
- Quick Links
- Live Chat
- Track Order
- Parts Availability
- RMA
- Help Center
- Contact Us
- Shop for
- Mazda Parts
My Garage
My Account
Cart
Genuine Mazda Tribute Battery Trays
Battery Tray- Select Vehicle by Model
- Select Vehicle by VIN
Select Vehicle by Model
orMake
Model
Year
Select Vehicle by VIN
For the most accurate results, select vehicle by your VIN (Vehicle Identification Number).
3 Battery Trays found

Mazda Tribute Battery Tray Part Number: EC02-56-041C
$37.19 MSRP: $49.59You Save: $12.40 (26%)Ships in 1-2 Business Days
Mazda Tribute Battery Tray Part Number: ZZCA-56-041
$34.24 MSRP: $45.66You Save: $11.42 (26%)Ships in 1-2 Business DaysMazda Tribute Battery Tray Part Number: EC01-56-041C
Mazda Tribute Battery Trays
Looking for Battery Trays with proven quality? Choose OEM Battery Trays. Mazda designs and builds them to strict factory specs. Every piece goes through rigorous quality checks. You'll get parts that fit right and work like new. Shop our huge inventory of OEM Mazda Tribute parts. Enjoy the highly competitive prices online. Our site is your one-stop shop. Each genuine Tribute part includes a manufacturer's warranty. Buy with confidence. Our return policy is simple and hassle-free. In a rush? Choose expedited delivery at checkout. You'll love the streamlined experience from search to checkout to receiving your order.
Mazda Tribute Battery Trays Parts and Q&A
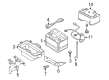
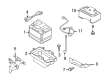
- Q: How to access the batteries and battery trays on Mazda Tribute?A:In 2013 and later models, the air filter housing components may be removed to reach the Batteries. All the models: remove the battery cover or the protective cover on the positive battery terminal. To remove the two hold-down nuts and bracket, first disconnect the negative cable, then the positive cable; first disconnect the negative battery cable, and then the positive battery cable, then remove the batteries out of the tray. On a 2013 model (and subsequent) disconnect the Battery Monitoring Sensor (BSM) connector and remove the wiring harness out of the Battery Junction Box (BJB) and attach the harness to the side. Unload the clips then push the BJB upwards to separate it with the battery box. Take out the hold-down nuts and bracket and take out the batteries. In models 2012 and earlier, when it is necessary to access the components below the battery tray, loosen the bolts connecting the tray, dismiss the connection between the tray and any component, and extract the tray. On 2013 models and newer, loosen the brake master cylinder remote fluid reservoir to the cowl panel and set it aside, loosen the transaxle fluid cooler control valve on the side of the battery tray, loosen the fasteners and lead the tray out underneath the cowl. The opposite of removal is installation. Once the procedure has been done on the 2012 and older models, the Powertrain Control Module (PCM) needs to reschedule its idle and fuel trim plan so that it can perform optimally. Calibration of the cluster display of 2008 to 2012 models To calibrate cluster display, after reconnecting batteries, switch the instrument panel dimmer to dome On and then rotate the dimmer switch to the lowest state. Provided that new batteries are fitted to 2013 and beyond models, it is advisable to undertake the BSM relearn procedure and in those models with One-Touch Open and Close power windows, initialize the power window system.


