×
- Hello
- Login or Register
- Quick Links
- Live Chat
- Track Order
- Parts Availability
- RMA
- Help Center
- Contact Us
- Shop for
- Mazda Parts
My Garage
My Account
Cart
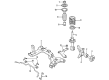
Genuine Mazda Tribute Sway Bar Bushing
Stabilizer Sway Bar Bushing- Select Vehicle by Model
- Select Vehicle by VIN
Select Vehicle by Model
orMake
Model
Year
Select Vehicle by VIN
For the most accurate results, select vehicle by your VIN (Vehicle Identification Number).
6 Sway Bar Bushings found

Mazda Tribute Insulator Part Number: ZZC0-34-156
$14.09 MSRP: $18.79You Save: $4.70 (26%)
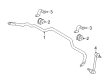
Mazda Tribute Stabilizer Bar Insulator Part Number: EF92-34-156
$19.31 MSRP: $25.75You Save: $6.44 (26%)Ships in 1-2 Business DaysMazda Tribute Insulator Part Number: ZZDA-34-156
$20.13 MSRP: $26.84You Save: $6.71 (25%)
Mazda Tribute Bushing Part Number: ZZD0-28-102
$21.56 MSRP: $28.76You Save: $7.20 (26%)Mazda Tribute Insulator Part Number: ZZC1-34-156
$19.06 MSRP: $25.41You Save: $6.35 (25%)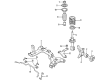
Mazda Tribute Bushings Part Number: EC01-34-156H
Mazda Tribute Sway Bar Bushing
Looking for Sway Bar Bushing with proven quality? Choose OEM Sway Bar Bushing. Mazda designs and builds them to strict factory specs. Every piece goes through rigorous quality checks. You'll get parts that fit right and work like new. Shop our huge inventory of OEM Mazda Tribute parts. Enjoy the highly competitive prices online. Our site is your one-stop shop. Each genuine Tribute part includes a manufacturer's warranty. Buy with confidence. Our return policy is simple and hassle-free. In a rush? Choose expedited delivery at checkout. You'll love the streamlined experience from search to checkout to receiving your order.
Mazda Tribute Sway Bar Bushing Parts and Q&A
- Q: How to replace the sway bar and sway bar bushing on Mazda Tribute?A:When changing the front stabilizer bar on a 2012 and earlier, the first step is to loosen lug nuts on the front wheel, lift up the car and place it firmly on jackstands. Use parking brake and block rear wheels to ensure that it does not roll, and then take out the front wheels. Loosen the stabilizer bar connections of the bar by removing the lower nut, when the ballstud rotates, clamp it with an Allen wrench. Unbolt stabilizer bar bushing clamps and loosen the bar out between the subframe and the body. Check retainer bushings to confirm that they are not cracked or worn out and replace them in case of necessity. Wipe the bushing area with a hard wire brush and apply vegetable oil to the new bushing, with the slits to the back of the car. Petroleum or mineral based lubricants should be avoided. The reverse order of reinstallation is done and the fasteners are tightened up to required torque values. In 2013 and beyond, remove the negative battery cable and lock the Steering Wheel. Unscrew the lug nuts of the front wheel, lift the vehicle and detach the wheels. Reduce the subframe using the correct procedures, unbolt the stabilizer bar brackets, and place the bar aside making sure that all the fasteners are tightened in their reinstitution. In the case of the rear stabilizer bar, one should loosen the lug nuts of the rear wheel, and raise the back of the car and obstruct the front wheels. Take off the rear splash shield (where necessary) and take off the rear wheels. Unscrew the bolts and remove the brackets of the stabilizer bar with a stabilizer bar link nut. Check the bushings and replace them in case of any damage, removing debris and rust on the mounting places. Change all the hardware screws with new ones and reassemble in the same order.

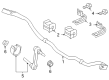
Related Mazda Tribute Parts
 Mazda Tribute Axle Pivot Bushing
 Mazda Tribute Axle Support Bushings
 Mazda Tribute Coil Spring Insulator
 Mazda Tribute Coil Springs
 Mazda Tribute Front Cross-Member
 Mazda Tribute Lateral Link
 Mazda Tribute Shock Absorber
 Mazda Tribute Shock and Strut Boot
 Mazda Tribute Strut Housing
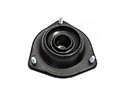 Mazda Tribute Strut Mounts
 Mazda Tribute Sway Bar Link
 Mazda Tribute Sway Bar Link Bushing