×
- Hello
- Login or Register
- Quick Links
- Live Chat
- Track Order
- Parts Availability
- RMA
- Help Center
- Contact Us
- Shop for
- Mazda Parts
My Garage
My Account
Cart
Genuine Mazda Tribute Center Console
Floor Console Assembly- Select Vehicle by Model
- Select Vehicle by VIN
Select Vehicle by Model
orMake
Model
Year
Select Vehicle by VIN
For the most accurate results, select vehicle by your VIN (Vehicle Identification Number).
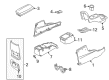
8 Center Consoles found

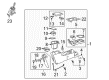
Mazda Tribute Front Console Part Number: ZZCA-64-310-09
$281.05 MSRP: $374.80You Save: $93.75 (26%)
Mazda Tribute Front Console Part Number: ZZCB-64-310-70
$35.43 MSRP: $46.51You Save: $11.08 (24%)Ships in 1-2 Business DaysMazda Tribute Front Console Part Number: ZZ1B-64-310-09
$45.22 MSRP: $59.36You Save: $14.14 (24%)Ships in 1-2 Business Days
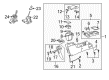
Mazda Tribute Console Assembly Part Number: EF9164420G35
$97.65 MSRP: $128.18You Save: $30.53 (24%)Ships in 1-2 Business Days
Mazda Tribute Console Assembly Part Number: ZZEA-64-410-25
$291.10 MSRP: $382.09You Save: $90.99 (24%)Ships in 1-2 Business DaysMazda Tribute Console Assembly Part Number: ZZEA-64-410-05
$291.10 MSRP: $382.09You Save: $90.99 (24%)Ships in 1-2 Business DaysMazda Tribute Console Assembly Part Number: ZZEA-64-410-03

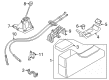
Mazda Tribute Console Body Part Number: EC0464241F24
Mazda Tribute Center Console
Looking for Center Console with proven quality? Choose OEM Center Console. Mazda designs and builds them to strict factory specs. Every piece goes through rigorous quality checks. You'll get parts that fit right and work like new. Shop our huge inventory of OEM Mazda Tribute parts. Enjoy the highly competitive prices online. Our site is your one-stop shop. Each genuine Tribute part includes a manufacturer's warranty. Buy with confidence. Our return policy is simple and hassle-free. In a rush? Choose expedited delivery at checkout. You'll love the streamlined experience from search to checkout to receiving your order.
Mazda Tribute Center Console Parts and Q&A
- Q: How to remove the center console on Mazda Tribute?A:With 2004 and earlier models, equipped with an automatic transaxle, the cable will be disconnected at the negative battery terminal, lift the emergency brake handle and leave the finish panel of the floor console, lifting the edges carefully out of the locking tabs. The next thing to do is to take the front and back bolts out of the center console and then remove the center console off the car afterwards replenishing in the same order and then re-connect the battery so that the Powertrain Control Module may re-learn its idle and fuel trim strategy. In the manual transaxle models, the shift knob and front and rear finish panels and bolts are removed and the center console is lifted out of the car, and then placed back in the same order. On models between 2005 and 2007, adjust the front seats all the way forward, loosen the bolts at the bottom rear of the console, detach the negative battery cable after moving the seats toward the rear, pull the handle on the parking brake and pry the bezel around the shift lever. Take off the console top panel and parking brake lever boot, the storage compartment tabs, where applicable, and the six mounting bolts, and install them back in the reverse order. On 2008-2012 models, select the parking brake, and put the shifter in Neutral, then repeat the process of removing the console, taking care of the plastic trim pieces. In 2013 and beyond models, be sure the negative battery cable is not connected unless, during the process of sliding power seats, to put on the parking brake and shifter into Neutral. After completing the step-by-step process of removing the center console, which involves a plastic trim tool used to peel off trim pieces, then reassemble in the same order.

Related Mazda Tribute Parts
 Mazda Tribute Hood
 Mazda Tribute Bumper Reflector
 Mazda Tribute Center Console Base
 Mazda Tribute Center Console Latch
 Mazda Tribute Cup Holder
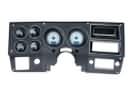 Mazda Tribute Dash Panel
 Mazda Tribute Front Door Striker
 Mazda Tribute Seat Switch
 Mazda Tribute Shift Knob
 Mazda Tribute Shift Linkage Boot
 Mazda Tribute Tailgate Handle
 Mazda Tribute Wiper Blade