×
- Hello
- Login or Register
- Quick Links
- Live Chat
- Track Order
- Parts Availability
- RMA
- Help Center
- Contact Us
- Shop for
- Mazda Parts
My Garage
My Account
Cart
Genuine Mazda Tribute Liftgates
- Select Vehicle by Model
- Select Vehicle by VIN
Select Vehicle by Model
orMake
Model
Year
Select Vehicle by VIN
For the most accurate results, select vehicle by your VIN (Vehicle Identification Number).
2 Liftgates found

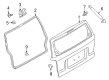
Mazda Tribute Lift Gate Part Number: ZZCB-62-010

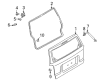
Mazda Tribute Lift Gate Part Number: EF20-62-020A
Mazda Tribute Liftgates
Looking for Liftgates with proven quality? Choose OEM Liftgates. Mazda designs and builds them to strict factory specs. Every piece goes through rigorous quality checks. You'll get parts that fit right and work like new. Shop our huge inventory of OEM Mazda Tribute parts. Enjoy the highly competitive prices online. Our site is your one-stop shop. Each genuine Tribute part includes a manufacturer's warranty. Buy with confidence. Our return policy is simple and hassle-free. In a rush? Choose expedited delivery at checkout. You'll love the streamlined experience from search to checkout to receiving your order.
Mazda Tribute Liftgates Parts and Q&A
- Q: How to remove and install liftgates, and how can proper alignment be achieved on Mazda Tribute?A:Liftgate is heavy and it is to some extent cumbersome to take out and put in thus at least two individuals are supposed to take part in this process. In the case of 2012 models and older, begin by taking off the rear pillar trim panels and the seat belt anchors farthest away from the liftgate. Have the liftgate open, then take out the three retainers of the rear of the headliner and fold it down. Disconnect the washer hose above the headliner, and plug it to avoid damage, and unhook the washer hose grommet. Disassemble the electrical connection and ground wire and harness retaining clips of the liftgate so that they can be easily reassembled. In removing the rubber conduit between the body and the liftgate, ensure that the wiring harness is pulled through the conduit hole. Take out the liftgate support struts by unclipsing the struts, and mark the liftgate hinges to make them fit. Installing the hinge-to-liftgate bolts, with help, remove the bolts, and lift the door off and vice versa. In 2013 and later models, liftgate trim paneling should be removed, and the electrical connectors should be disconnected and the wiring harness clips should be released, pushing the wiring through the holes. Once more, mark about the liftgate hinges to ensure that everything fits, make one assistant open the liftgate, and remove the support struts. Unscrew the hinge bolts and then roll off the liftgate making the same action to install it. It is important to lift the liftgate and the body correctly in line with each other; examine the hinge pins ensuring they do not have excessive movement and tighten the hinge bolts. Make sure that the liftgate is in parallel to the roof, even with the rear quarter panels and aligned with the lower sill panel. Body alignment shims should be used to ensure proper positioning in case of necessity. In order to set the liftgate-closed position turn a striker plate around the mark and check that the latch is fitting the middle part of the striker plate and adjust it as necessary.

Related Mazda Tribute Parts
 Mazda Tribute Door Hinge
 Mazda Tribute Door Latch Assembly
 Mazda Tribute Door Lock
 Mazda Tribute Door Lock Cylinder
 Mazda Tribute Door Screws
 Mazda Tribute Lift Support
 Mazda Tribute Liftgate Hinge
 Mazda Tribute Liftgate Lift Support
 Mazda Tribute Tailgate Handle
 Mazda Tribute Tailgate Lock
 Mazda Tribute Trunk Lock Cylinder
 Mazda Tribute Weather Strip