×
- Hello
- Login or Register
- Quick Links
- Live Chat
- Track Order
- Parts Availability
- RMA
- Help Center
- Contact Us
- Shop for
- Mazda Parts
My Garage
My Account
Cart
Genuine 1985 Mazda RX-7 Alternator
Generator- Select Vehicle by Model
- Select Vehicle by VIN
Select Vehicle by Model
orMake
Model
Year
Select Vehicle by VIN
For the most accurate results, select vehicle by your VIN (Vehicle Identification Number).
1 Alternator found

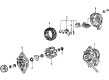
1985 Mazda RX-7 Alternator Part Number: N304-18-300R-00
Product Specifications- Other Name: Reman, Alternator
- Item Weight: 13.40 Pounds
- Condition: Remanufactured
- Fitment Type: Direct Replacement
- SKU: N304-18-300R-00
- Warranty: This genuine part is guaranteed by Mazda's factory warranty.
1985 Mazda RX-7 Alternator Parts and Q&A
- Q: How to disconnect and reinstall the alternator on 1985 Mazda RX-7?A: Disconnect the negative battery cable at the battery and remove the air cleaner assembly along with its various hoses. Disconnect the wire from the wiring harness leading to the terminal on the rear of the alternator marked 'B' by sliding back the rubber protective boot and holding the wire while removing the nut and lock washer. Pull out the multiple connectors from the rear of the alternator and remove the main engine wiring harness from its clips at the alternator pivot bolt and air cleaner mounting bracket, moving the harness aside. Loosen the alternator strap bolt that fits through the adjusting bracket and the long pivot bolt by holding the nut on the rear side, then push the alternator through the adjusting bracket to relieve tension on the drive belt and slip the belt off the alternator pulley. Completely remove the adjusting bolt and long pivot bolt, noting the positions of the spacer and adjusting shim for reassembly. Lift the alternator off the engine and to install, place it in position and install the long pivot bolt through the mounting flanges and the mounting bracket of the water housing, ensuring the metal spacer is installed. Before tightening the pivot bolt or installing the small adjustment strap bolt, measure the clearance between the alternator and bracket; if it exceeds 0.0059 in (0.15 mm), install adjusting shims as necessary to prevent pinching of the mounting flanges. Tighten the pivot bolt and adjusting strap bolt only finger-tight to allow for free movement of the alternator for belt tension adjustment. Pull the drive belt over the alternator pulley and force the alternator against the belt until the tension is approximately 0.59 in (16 mm) when pressed halfway between the alternator pulley and eccentric shaft pulley. Tighten the adjusting bolt and pivot bolt with the nut, place the wiring harness back into position in its retaining clips, and check that none of the couplers or connections, other than the alternator ones, have been accidentally disconnected. Plug the multiple connectors back into the alternator, ensuring they fit correctly, and connect the wire to the 'B' terminal on the rear of the alternator, tightening the nut with the lock washer and covering the connection with the rubber boot. Finally, install the air cleaner assembly, reconnect the negative battery cable, start the engine, and check for proper operation.

