×
- Hello
- Login or Register
- Quick Links
- Live Chat
- Track Order
- Parts Availability
- RMA
- Help Center
- Contact Us
- Shop for
- Mazda Parts
My Garage
My Account
Cart
Genuine 1987 Mazda B2000 Control Arm
Suspension Arm- Select Vehicle by Model
- Select Vehicle by VIN
Select Vehicle by Model
orMake
Model
Year
Select Vehicle by VIN
For the most accurate results, select vehicle by your VIN (Vehicle Identification Number).
6 Control Arms found

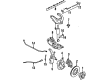
1987 Mazda B2000 Upper Control Arm Part Number: UB39-34-210A
$115.14 MSRP: $153.54You Save: $38.40 (26%)Ships in 1-2 Business DaysProduct Specifications- Other Name: Arm Right, Upper
- Position: Passenger Side
- Item Weight: 5.70 Pounds
- Condition: New
- Fitment Type: Direct Replacement
- SKU: UB39-34-210A
- Warranty: This genuine part is guaranteed by Mazda's factory warranty.
1987 Mazda B2000 Upper Control Arm Part Number: UC86-34-260
$140.93 MSRP: $187.93You Save: $47.00 (26%)Ships in 1-2 Business DaysProduct Specifications- Other Name: Arm Left, Upper
- Position: Driver Side
- Item Weight: 6.00 Pounds
- Condition: New
- Fitment Type: Direct Replacement
- SKU: UC86-34-260
- Warranty: This genuine part is guaranteed by Mazda's factory warranty.
1987 Mazda B2000 Upper Control Arm Part Number: UC86-34-210
Product Specifications- Other Name: Arm Right, Upper
- Position: Passenger Side
- Item Weight: 5.60 Pounds
- Condition: New
- Fitment Type: Direct Replacement
- SKU: UC86-34-210
- Warranty: This genuine part is guaranteed by Mazda's factory warranty.
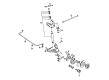
1987 Mazda B2000 Lower Control Arm Part Number: U009-34-300
Product Specifications- Other Name: Arm Right, Lower
- Position: Passenger Side
- Item Weight: 5.70 Pounds
- Condition: New
- Fitment Type: Direct Replacement
- SKU: U009-34-300
- Warranty: This genuine part is guaranteed by Mazda's factory warranty.
1987 Mazda B2000 Lower Control Arm Part Number: U009-34-350
Product Specifications- Other Name: Arm(Left), Lower
- Position: Driver Side
- Item Weight: 5.80 Pounds
- Condition: New
- Fitment Type: Direct Replacement
- SKU: U009-34-350
- Warranty: This genuine part is guaranteed by Mazda's factory warranty.
1987 Mazda B2000 Upper Control Arm Part Number: UB39-34-260A
Product Specifications- Other Name: Arm Left, Upper
- Position: Driver Side
- Item Weight: 5.90 Pounds
- Condition: New
- Fitment Type: Direct Replacement
- SKU: UB39-34-260A
- Warranty: This genuine part is guaranteed by Mazda's factory warranty.
1987 Mazda B2000 Control Arm Parts and Q&A
- Q: How to remove and install the components of the lower Control Arm for 4-wheel drive front suspension on 1987 Mazda B2000?A: In order to take out and install the components, one has to start by lifting the frame front end on the jackstands and take off the wheel. The next thing is removing the cotter pin and nut of the lower ball joint and then the lower shock absorber bolt. Before removing them, matchmark the anchor arm bolt and anchor swivel and matchmark the torsion bar with the anchor arm and torque plate. Take the anchor arm and the torsion bar off the torque plate and part them and then undo the bolts and remove the torque plate. Install the arm to frame bolt (with a bushing puller/installer) so that the double nut behind the tension rod bushing is not moved to prevent caster. Then unbolt the stabilizer bar with the stabilizer bar bolt, bushing, retainer and nut and remove the stabilizer bar. To take out the lower ball joint and the lower control arm, use a ball joint separator to remove the lower joint of the knuckle. Check wear or damaged parts, replace any suspect parts and measure the ball joint preload with a spring scale taking care that after shaking the ball joint stud the pull scale reads 39.6 lb or less. To install, the first step is to screw the lower arm into the frame bracket and use hand tightening to screw the nut in. Bore the lower ball joint to the joint, fasten the nut to 115 ft. lbs. and determine the cotter pin. Install the tighten the lower arm-to-frame nut to 115 ft. lbs., place the torque plate, and tighten the bolt to 68 ft. lbs. Rub the splines on the torsion bar with lithium-based wheel bearing grease, making sure that the ends are marked L-left and R-right and then make the matchmarks and install the torsion bar in the torque plate. Repeat greasing the torsion bar splines, matchmark and attach anchor arm. Install the anchor bolt and swivel and tighten till the matchmarks are aligned. Install the stabilizer bar, pushing the bolt to a tight until the thread sticks out past the locknut after which reconnect the shock absorber bolt and tighten it to 55-59 ft. lbs. Lastly, install the wheels once more, place the truck to the ground, retorque the low arm to frame bracket nut, measure the front tire pressure and rear tire pressure and then set them accordingly. Check the distance between the fender lip and the hub of the wheel to achieve the right ride height, moving the anchor bolt in this case accordingly. When the matchmarks are lost or when a new torsion bar is fitted, fit the anchor arm on the torsion bar with 30mm (1.18 in.) between the body bracket and the end of the anchor arm, fasten the anchor bolt, and lower the truck, and change the ride height.
Related 1987 Mazda B2000 Parts
 1987 Mazda B2000 Differential
 1987 Mazda B2000 Door Lock Cylinder
 1987 Mazda B2000 Heater Core
 1987 Mazda B2000 Rod Bearing
 1987 Mazda B2000 Valve Stem Oil Seal
 1987 Mazda B2000 Wiper Linkage