×
- Hello
- Login or Register
- Quick Links
- Live Chat
- Track Order
- Parts Availability
- RMA
- Help Center
- Contact Us
- Shop for
- Mazda Parts
My Garage
My Account
Cart
Genuine 1990 Mazda 323 Crankshaft Seal
- Select Vehicle by Model
- Select Vehicle by VIN
Select Vehicle by Model
orMake
Model
Year
Select Vehicle by VIN
For the most accurate results, select vehicle by your VIN (Vehicle Identification Number).
1 Crankshaft Seal found

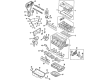
1990 Mazda 323 Rear Main Seal Part Number: BP05-11-312
$33.09 MSRP: $44.12You Save: $11.03 (25%)Ships in 1-2 Business DaysProduct Specifications- Other Name: Seal, Oil Crankshaft; Crankshaft Seal
- Position: Rear
- Replaces: B630-11-312
- Item Weight: 0.60 Pounds
- Condition: New
- Fitment Type: Direct Replacement
- SKU: BP05-11-312
- Warranty: This genuine part is guaranteed by Mazda's factory warranty.
1990 Mazda 323 Crankshaft Seal Parts and Q&A
- Q: How to replace the front crankshaft seal on 1990 Mazda 323?A: Take off the under cover splash shield and disconnect the negative battery cable. First of all, place jackstands under the front of the vehicle, then pull the front passenger side tire off to be able to reach the front cover. Remove crankshaft pulley, timing belt covers, timing belt and timing belt guide. Take out the crankshaft sprocket with the help of two prybars or screwdrivers, which you put behind the gear so that you can have the same pressure of sliding the sprocket off the crankshaft. Mark the position of the seal located on the bore and the position the oil seal lip is located using a razor knife, making sure that the oil seal is clear of the face of the oil pump body. Use a screwdriver covered in a rag to remove the front oil seal to cover the crankshaft surface and engine block. Wipe the bore in the engine block and the crankshaft surface and then lubricate the exterior of the new front oil seal with engine oil and put engine assembly lubricant or clean engine oil on the seal lip. The oil seal should be pressed in a little with the hand making sure the lip of the seal is placed in the same direction it was taken out. Once the new seal is in place, tap it with a hammer using a seal driver or the socket with an outside diameter slightly less than that of the oil seal so as to be completely seated on the face of the oil pump body, and thus fitted in place. Install the crankshaft timing belt sprocket and timing belt and install in the same order in which they were removed. Lastly, start the engine and test at oil seal in front.
Related 1990 Mazda 323 Parts
 1990 Mazda 323 EGR Valve
 1990 Mazda 323 A/C Hose
 1990 Mazda 323 Axle Beam Mount
 1990 Mazda 323 Axle Bearing Lock Rings
 1990 Mazda 323 Axle Shaft Seal
 1990 Mazda 323 Brake Pad Set
 1990 Mazda 323 Fuel Sending Unit
 1990 Mazda 323 Thermostat Gasket