×
- Hello
- Login or Register
- Quick Links
- Live Chat
- Track Order
- Parts Availability
- RMA
- Help Center
- Contact Us
- Shop for
- Mazda Parts
My Garage
My Account
Cart
Genuine 1990 Mazda B2200 Shock Absorber
Suspension Shock Absorber- Select Vehicle by Model
- Select Vehicle by VIN
Select Vehicle by Model
orMake
Model
Year
Select Vehicle by VIN
For the most accurate results, select vehicle by your VIN (Vehicle Identification Number).
1 Shock Absorber found

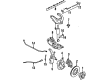
1990 Mazda B2200 Shock Absorber Part Number: UB39-34-700-9U
Product Specifications- Other Name: Damper, Front
- Item Weight: 5.80 Pounds
- Condition: New
- Fitment Type: Direct Replacement
- SKU: UB39-34-700-9U
- Warranty: This genuine part is guaranteed by Mazda's factory warranty.
1990 Mazda B2200 Shock Absorber Parts and Q&A
- Q: How to remove and install the front shock absorber on 1990 Mazda B2200?A: To replace and remove the shock absorber of a pickup, first of all, raise and secure the vehicle and then remove the wheel and tire assembly. The second step is to remove the upper shock absorber nuts, retainer, and the bushing then the lower shock absorber-to-lower control arm mounting bolt, nut, and washer. Loosen the shock absorber slightly as it can be pulled off of the vehicle and all the remaining retainers and bushing off the upper shock absorber stud. To install, re-insert the shock absorber and loosely screw the mounting bolts, nuts, washers and bushings. Install the wheel and tire assembly again and then lower the vehicle and tighten the upper shock absorber mounting nuts until the stud is 0.28 inch (7mm) above the upper nut and then tighten the lower mounting bolt and nut to 41-59 ft. lbs. (55-80Nm) and check the front end alignment. In the case of the Navajo rear wheel drive, it is important to make sure that gas shocks at the low pressure are filled using Nitrogen gas and avoid opening or puncturing them. Prior to attaching a new shock absorber, stand it, fully extended, upside down and squeeze and fully extend at least three times to de-air it. Lift the car up, loosen the bolt and nut that fastens the shock absorber to the lower bracket on the radius arm and remove the nut, washer and insulator of the shock absorber at the frame bracket. Place the washer and insulator over the shock absorber rod and connect it with the frame bracket and the attaching nut is loosely installed. The next step would be to install the shock absorber in the low bracket and loosely fit the attaching bolt and nut, ensuring the lower mounting nut is tightened to 39-53 ft.lbs. (53-72Nm) and the upper to 25-35 ft. lbs. (34-48Nm). In four-wheel drive, the same procedure, remove and install shock to follow the initial steps but remember to tighten the lower installing bolts to 39-53 ft. lbs and the upper installing bolts to 25-35 ft. lbs. and finally test the shock by pushing the corner of the vehicle without the cargo and checking its movement; it must move back in place rather fast without excessive pitch. Shock absorbers may get worn out, and each shock may be separately changed, but it is better to replace them together to achieve balanced performance.
Related 1990 Mazda B2200 Parts
 1990 Mazda B2200 Door Lock
 1990 Mazda B2200 Automatic Transmission Seal
 1990 Mazda B2200 Coolant Reservoir
 1990 Mazda B2200 Cruise Control Module
 1990 Mazda B2200 Leaf Spring Shackle
 1990 Mazda B2200 Oxygen Sensor
 1990 Mazda B2200 Ring And Pinion
 1990 Mazda B2200 Steering Knuckle
 1990 Mazda B2200 Wheel Hub