×
- Hello
- Login or Register
- Quick Links
- Live Chat
- Track Order
- Parts Availability
- RMA
- Help Center
- Contact Us
- Shop for
- Mazda Parts
My Garage
My Account
Cart
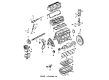
Genuine 1990 Mazda MX-6 Piston
Engine Pistons- Select Vehicle by Model
- Select Vehicle by VIN
Select Vehicle by Model
orMake
Model
Year
Select Vehicle by VIN
For the most accurate results, select vehicle by your VIN (Vehicle Identification Number).
1 Piston found

1990 Mazda MX-6 Piston Part Number: F220-11-SA0
$81.00 MSRP: $108.03You Save: $27.03 (26%)Ships in 1-2 Business DaysProduct Specifications- Other Name: Piston Set
- Item Weight: 1.40 Pounds
- Condition: New
- Fitment Type: Direct Replacement
- SKU: F220-11-SA0
- Warranty: This genuine part is guaranteed by Mazda's factory warranty.
1990 Mazda MX-6 Piston Parts and Q&A
- Q: What steps should be followed before installing the piston and connecting rod assemblies on 1990 Mazda MX-6?A: Prior to assembling the piston and connecting rod units, the walls of the cylinders should be clean, the top of each cylinder should be chamfered and the crankshaft fitted. Take the connecting rod cap out of the number one connecting rod, wipe the bearing surfaces with clean, lint free cloth and remove the old bearing inserts. Wipe the rear of the new upper bearing half and place it in the connecting rod so that the tab fits into the recess without hammering or nicking the bearing face and it should not be lubricated at this time. Wipe the reverse side of the other bearing insert and put it into the rod cap, taking precaution not to put on lubricant in the recess. Fit the gaps of the piston rings and place a piece of plastic or rubber hose around the connecting rod cap bolts. Coat the piston and rings with clean engine oil, add a piston ring compressor and leave the skirt poking out at the end of 1/4-inch as a guide to assist the piston into the cylinder. Turn the crankshaft until the number one connecting rod journal is at bottom dead center, and then put engine oil on the cylinder walls. When the notch on top of the piston is in the front of the engine carefully put the piston and connecting rod assembly into the number one cylinder bore making sure that the bottom of the ring compressor is in contact with the engine block and then tap the top of the ring compressor so that it comes into contact with the block. Tap the top of the piston carefully with a wooden hammer handle and at the same time insert the connecting rod into the crankshaft journal keeping the ring compressor down and ensure that the piston rings are not pushed out. When resistance is experienced, immediately discontinue to detect and solve the problem without coercing the piston. Once installed, make sure that the connecting rod has oil clearance before permanently attaching the rod cap by cutting a piece of Plastigage and placing it on the number one connecting rod journal. Clean the cap bearing face of the connecting rod, take off the protective hose and fit the rod cap, aligning the mating marks. Install the nuts to the required torque in three cycles without turning the crankshaft. Carefully take off the rod cap without disturbing the Plastigage, measure the crushed width against the scale on the container in order to get the oil clearance and match it against the specifications. Should there be a wrong clearance, re-check the bearing inserts and crankshaft journal diameter, making sure there was not any dirt or oil on the measuring device. Take off any Plastigage material taking care not to scrape the bearing, and coat both faces of the bearing with a uniform coating of the best available moly-base grease or engine assembly lube. Insert the piston in the cylinder exposing the face of the bearing insert, and slide the connecting rod back into position, then loosen the binding hoses off, twist the rod cap on, and tighten the nuts, in succession, to the required torque in three steps. Proceed with the rest of the piston and connecting rod assemblies, keeping the bearing inserts and the inside of the connecting rod parts clean, be sure the right piston is employed in each cylinder, and have the notch open towards the front of the engine. Install all assemblies and then turn the crankshaft by hand to verify that there is no binding, and lastly, verify that the connecting rod end play is appropriate as well.
Related 1990 Mazda MX-6 Parts
 1990 Mazda MX-6 Axle Shaft
 1990 Mazda MX-6 Clutch Master Cylinder
 1990 Mazda MX-6 Distributor Cap
 1990 Mazda MX-6 Fuel Pressure Regulator
 1990 Mazda MX-6 Timing Cover Gasket