×
- Hello
- Login or Register
- Quick Links
- Live Chat
- Track Order
- Parts Availability
- RMA
- Help Center
- Contact Us
- Shop for
- Mazda Parts
My Garage
My Account
Cart
Genuine Mazda MX-6 Piston
Engine Pistons- Select Vehicle by Model
- Select Vehicle by VIN
Select Vehicle by Model
orMake
Model
Year
Select Vehicle by VIN
For the most accurate results, select vehicle by your VIN (Vehicle Identification Number).
2 Pistons found

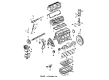
Mazda MX-6 Piston Part Number: F220-11-SA0
$81.00 MSRP: $108.03You Save: $27.03 (26%)Ships in 1-2 Business Days
Mazda MX-6 Piston Part Number: FSY3-11-SA0
Mazda MX-6 Piston
Looking for Piston with proven quality? Choose OEM Piston. Mazda designs and builds them to strict factory specs. Every piece goes through rigorous quality checks. You'll get parts that fit right and work like new. Shop our huge inventory of OEM Mazda MX-6 parts. Enjoy the highly competitive prices online. Our site is your one-stop shop. Each genuine MX-6 part includes a manufacturer's warranty. Buy with confidence. Our return policy is simple and hassle-free. In a rush? Choose expedited delivery at checkout. You'll love the streamlined experience from search to checkout to receiving your order.
Mazda MX-6 Piston Parts and Q&A
- Q: How to properly remove the ridge from the top of each cylinder and check the end play before taking out the piston and connecting rod assemblies on Mazda MX-6?A:With a ridging reamer, scrape the entire ridge of the top of each cylinder, as per the instructions of the tool. Failure to take out the ridge prior to making attempts to pull out the piston and connecting rod assemblies can result in the breakage of the pistons. Install the connecting rods and before attaching the connecting rod, test the end play by attaching a dial indicator with the stem along the crankshaft and touching the side of the number one connecting rod cap. Connecting rod should be pushed as far to the back as possible and the dial indicator should be set at zero and the connecting rod should be pushed to maximum distance to the front to verify the reading. A movement of the distance signifies the end play and when it is more than service limit, another connecting rod will be required. The other way is to insert feeler gauges in between connecting rod and crankshaft throw until the play has been removed, the end play being the same as the thickness of the gauge. Make sure that the connecting rods and caps are labeled; otherwise, make identification marks by piercing them with a small punch to designate the cylinders to which they belong. Relax each connecting rod cap nut half a turn, remove the number one connecting rod cap and bearing insert without dropping the bearing insert, and then cover the crankshaft journal and cylinder wall with a short piece of plastic or rubber hose over each cap bolt as the connecting rod/piston assembly is forced out through the top of the engine. Press on the upper bearing insert in the connecting rod with a wooden tool, till all material in the ridges is removed in case of resistance. Do the same with the other cylinders and then when removed, replace the connecting rod caps and bearing inserts on their respective rods and install the cap nuts finger tight to ensure they do not get damaged accidently on the bearing surfaces.
Related Mazda MX-6 Parts
 Mazda MX-6 Belt Tensioner
 Mazda MX-6 Camshaft Seal
 Mazda MX-6 Crankshaft Pulley
 Mazda MX-6 Crankshaft Timing Gear
 Mazda MX-6 Cylinder Head Gasket
 Mazda MX-6 Intake Valve
 Mazda MX-6 Oil Pump
 Mazda MX-6 Piston Ring Set
 Mazda MX-6 Timing Belt Idler Pulley
 Mazda MX-6 Timing Cover
 Mazda MX-6 Valve Spring
 Mazda MX-6 Valve Spring Retainer Keeper