×
- Hello
- Login or Register
- Quick Links
- Live Chat
- Track Order
- Parts Availability
- RMA
- Help Center
- Contact Us
- Shop for
- Mazda Parts
My Garage
My Account
Cart
Genuine 1991 Mazda B2200 Axle Shaft
Car Axle Shaft- Select Vehicle by Model
- Select Vehicle by VIN
Select Vehicle by Model
orMake
Model
Year
Select Vehicle by VIN
For the most accurate results, select vehicle by your VIN (Vehicle Identification Number).
2 Axle Shafts found

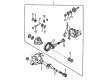
1991 Mazda B2200 Axle Shafts Part Number: M0A7-27-700A
Product Specifications- Other Name: Joint, Shaft; Axle Shaft
- Item Weight: 16.30 Pounds
- Condition: New
- Fitment Type: Direct Replacement
- SKU: M0A7-27-700A
- Warranty: This genuine part is guaranteed by Mazda's factory warranty.
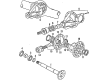
1991 Mazda B2200 Axle Shaft Part Number: UB39-26-115A
Product Specifications- Other Name: Shaft Left, Rear Axle
- Position: Driver Side
- Item Weight: 16.30 Pounds
- Condition: New
- Fitment Type: Direct Replacement
- SKU: UB39-26-115A
- Warranty: This genuine part is guaranteed by Mazda's factory warranty.
1991 Mazda B2200 Axle Shaft Parts and Q&A
- Q: How to remove and install the front axle shafts and CV joints on 1991 Mazda B2200?A: To change and fit the axle shafts on a Navajo, you should first loosen the lug nuts of the front wheel and then in a safe manner raise and support the car before removing the wheel and the tire assembly. The next step is to remove the disc brakes calipers, which have to be held up with the help of the vehicle frame rail, then the hub locks, the locknuts, the hub and the rotor are to be removed. Use a plastic or rawhide hammer to take the nuts out attaching the spindle to the steering knuckle to release the spindle. Take out the front disc brake rotor shield, but be careful because there is a possibility of fluid leaking out of the front carrier assembly unless the vehicle is level, so it is good practice to place a drip pan under it. Removal of the left hand axle shaft follows removal of the steering knuckle shaft by pulling it out of the carrier and through the steering knuckle hole. In the case of the right-hand axle shaft, remove the right front axle joint boot clamp and then remove the axle shaft out of the joint boot and stub shaft out of the steering knuckle. Check and repair the seals on the ends of the outer axle shafts when necessary, and remove the old seals with a hammer and clean the area and install new ones with a seal installer tool. Installation requires that the rubber boot is properly fitting on the carrier stub shaft and a new outer axle shaft boot clamp is installed. When assembling, make sure that the ears around the yoke are aligned, insert the right axle shaft through the steering knuckle into the rubber boot, and ensure that the splines are completely engaged. Place the rubber boot with the clamp on the outer axle shaft and crimp the clamp. Lastly, install the shaft of the left-hand axle by sliding through the steering knuckle and making sure that it is completely sealed and connected to the carrier splines and then reassemble all the other pieces in the opposite order.
Related 1991 Mazda B2200 Parts
 1991 Mazda B2200 Battery Hold Downs
 1991 Mazda B2200 Differential Bearing
 1991 Mazda B2200 Leaf Spring Bushing
 1991 Mazda B2200 Shock Absorber
 1991 Mazda B2200 Steering Knuckle
 1991 Mazda B2200 Wheel Seal