×
- Hello
- Login or Register
- Quick Links
- Live Chat
- Track Order
- Parts Availability
- RMA
- Help Center
- Contact Us
- Shop for
- Mazda Parts
My Garage
My Account
Cart
Genuine 1992 Mazda MPV Piston
Engine Pistons- Select Vehicle by Model
- Select Vehicle by VIN
Select Vehicle by Model
orMake
Model
Year
Select Vehicle by VIN
For the most accurate results, select vehicle by your VIN (Vehicle Identification Number).
1 Piston found

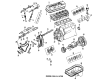
1992 Mazda MPV Piston Part Number: G602-11-SA0
Product Specifications- Other Name: Piston Set
- Item Weight: 1.40 Pounds
- Condition: New
- Fitment Type: Direct Replacement
- SKU: G602-11-SA0
- Warranty: This genuine part is guaranteed by Mazda's factory warranty.
1992 Mazda MPV Piston Parts and Q&A
- Q: What steps should be taken before installing the piston and connecting rod assemblies on 1992 Mazda MPV?A: Prior to the installation of the piston and connected rod assembly, the walls of the cylinder must be clean, the top edge of each cylinder chamfered and the crankshaft installed. Put off the number one connecting rod on which remove the cap, taking care to record the marks on its removal, clean the bearing surfaces with a lint-free cloth. One should not touch the new bearing inserts using fingers to avoid contamination. Clean the reverse side of the new bearing insert (upper) and put it in the connecting rod, taking great care to ensure that the tab fits in the recess with no hammering. Do the same with the lower bearing insert in the rod cap, but be sure that it is clean and without lubricant. Install the piston ring slits around the piston, run a hose over each connecting rod cap bolt, slick the piston and rings with clean engine oil, and lock a piston ring compressor on leaving the skirt jutting. Turn the crankshaft until the number one connecting rod journal is at bottom dead center and spray engine oil on the cylinder walls. Be sure to place the piston/connecting rod assembly into the cylinder bore with the mark located on the piston facing the front of the engine making certain that the ring compressor is in place. Tap the piston into the cylinder carefully, whilst directing the connecting rod to the crankshaft journal, but taking care not to meet a resistance. Checking with Plastigage, the clearance between the connecting rod and the bearers must not be over 1.0 mm and the bearing faces must be clean before applying a coating of grease and then replacing the rod cap and tightening the nuts in three steps. Proceed with the rest of the assemblies, preserving the bearing inserts and connecting rods clean, and making sure that the right assembly in each cylinder is made, and that the cylinder walls and bearing faces are lubricated. Once all the assemblies are in place, turn the crankshaft to ensure that there is no binding and also measure the connecting rod end play and make sure that it is within the specification. In case of adjustments, the rods can be resized at a machine shop of automotive.
Related 1992 Mazda MPV Parts
 1992 Mazda MPV Axle Shaft
 1992 Mazda MPV Blower Motor
 1992 Mazda MPV Distributor Cap
 1992 Mazda MPV Fuel Pressure Regulator
 1992 Mazda MPV Timing Cover Gasket