×
- Hello
- Login or Register
- Quick Links
- Live Chat
- Track Order
- Parts Availability
- RMA
- Help Center
- Contact Us
- Shop for
- Mazda Parts
My Garage
My Account
Cart
Genuine Mazda 323 A/C Evaporator Core
A/C Evaporators- Select Vehicle by Model
- Select Vehicle by VIN
Select Vehicle by Model
orMake
Model
Year
Select Vehicle by VIN
For the most accurate results, select vehicle by your VIN (Vehicle Identification Number).
1 A/C Evaporator Core found

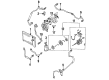
Mazda 323 Core Part Number: BR70-61-J10A
Mazda 323 A/C Evaporator Core
Looking for A/C Evaporator Core with proven quality? Choose OEM A/C Evaporator Core. Mazda designs and builds them to strict factory specs. Every piece goes through rigorous quality checks. You'll get parts that fit right and work like new. Shop our huge inventory of OEM Mazda 323 parts. Enjoy the highly competitive prices online. Our site is your one-stop shop. Each genuine 323 part includes a manufacturer's warranty. Buy with confidence. Our return policy is simple and hassle-free. In a rush? Choose expedited delivery at checkout. You'll love the streamlined experience from search to checkout to receiving your order.
Mazda 323 A/C Evaporator Core Parts and Q&A
- Q: How to properly remove and replace the A/C Evaporator Core and A/C Expansion Valve in an air conditioning system on Mazda 323?A:Start with the release and recovery of the refrigerant by a qualified repair facility. Disconnect the air conditioning lines at the firewall (with a backup wrench to avoid damaging the fittings) and cap the open fittings with a cap after dismantling to avoid air or dirt getting inside. Take out the glove box cover, side panel, and under dash panel on the passenger side. In the case of models between 1995 and 1998, delete the cooling unit duct and the wire connecting the blower unit and the air intake. Remove the electrical connector(s) of the A/C Evaporator Core and unlock the seal plates on each side of the A/C Evaporator Core. Loosen the mounting studs of the firewall with the nuts of the A/C Evaporator Core and then attach the A/C Evaporator Core. Disassemble the lower and upper cooling unit housings by taking out the clips of the cooling unit housing, then take out the A/C Evaporator Core. Unattachment of expansion valve fittings and taking out the expansion valve out of the A/C Evaporator Core is required, and the fittings of the expansion valve must be capped immediately to prevent the expansion valve from being exposed to moisture and contamination. To do this, where required, on models with air conditioning from 1990 to 1994, take out the air conditioning thermoswitch in the upper cooling unit housing; on models with air conditioning from 1995 or later, take out the thermoswitch in the A/C Evaporator Core and fit it in the same position. Inspect the A/C Evaporator Core and fittings by checking for cracking or damage, replacing the A/C Evaporator Core as required. Recover the expansion valve, with the gaskets and tightening the inlet and outlet fittings. Removal is the converse of the system installation, where it is always ensured to remove any O-rings and replace them with new ones depending on the type of refrigerant in your system, and lubricate them with refrigerant oil before fitting. Lastly, make sure the system gets emptied, refilled, and sealed by the shop it was emptied by, and in case of a new A/C Evaporator Core, add new refrigerant oil to the high-pressure side of the compressor, but only with oil that is compatible with your system.


