×
- Hello
- Login or Register
- Quick Links
- Live Chat
- Track Order
- Parts Availability
- RMA
- Help Center
- Contact Us
- Shop for
- Mazda Parts
My Garage
My Account
Cart
Genuine Mazda 323 Coolant Reservoir
Coolant Tank Reservoir- Select Vehicle by Model
- Select Vehicle by VIN
Select Vehicle by Model
orMake
Model
Year
Select Vehicle by VIN
For the most accurate results, select vehicle by your VIN (Vehicle Identification Number).
2 Coolant Reservoirs found

Mazda 323 Reservoir Part Number: E5D3-15-250B
Mazda 323 Reservoir Part Number: B366-15-350D
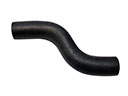
Mazda 323 Coolant Reservoir
Looking for Coolant Reservoir with proven quality? Choose OEM Coolant Reservoir. Mazda designs and builds them to strict factory specs. Every piece goes through rigorous quality checks. You'll get parts that fit right and work like new. Shop our huge inventory of OEM Mazda 323 parts. Enjoy the highly competitive prices online. Our site is your one-stop shop. Each genuine 323 part includes a manufacturer's warranty. Buy with confidence. Our return policy is simple and hassle-free. In a rush? Choose expedited delivery at checkout. You'll love the streamlined experience from search to checkout to receiving your order.
Mazda 323 Coolant Reservoir Parts and Q&A
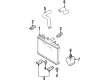
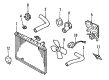
- Q: How to remove and install a Coolant Reservoir and Radiator on Mazda 323?A:The steps involved to replace the radiator are to first of all disconnect the negative battery cable and empty the engine coolant into a container. In models made 1990 to 1994, delete resonance chamber, then disconnect wiring connector at fan motor and, with two speed fans, disconnect wiring connector at fan thermoswitch. Disconnect the coolant reservoir hose of the radiator filler neck and remove the coolant reservoir. Relax the radiator hose clamps and remove the upper and lower radiator hose. Should the car be an automatic transaxle, remove the oil cooler hose off the radiator, then place a drip pan to hold on to any transmission oil leakages. Take out the fan retaining bolts and get out the fan assembly; in models since 1995, place the fan assembly aside, and remove the radiator. With caution, remove and pull off the radiator taking care not to forget the low mounts which should be reinstalled. In the case of models made in 1995 and up, the cooling fan can be taken off together with fan shroud when required. Check the radiator that has been removed to check the leaks, damages, and internal blockage and in case of any repairs, seek the services of professionals. Blow compressed air through the radiator using a soft brush and ensure that the cooling fins are not bent. The reversal is the process of installation, and the radiator is to be installed in the right order having taken it down, and making sure that the mounting bolts are firmly tightened. Once installed, fill in the cooling system with appropriate antifreeze and water mixture, start the engine to test leaks and take time to get the radiator to normal operating temperature, checking the radiator hoses. Lastly, with models having automatic transaxle, check and add automatic transmission fluid where necessary. In the case of the coolant reservoir, unbolt and remove it out of the engine compartment pouring the coolant to a container and inspecting the reservoir on cracks or chafing and replacing it in case of damage. Re-installation is in reverse sequence.