×
- Hello
- Login or Register
- Quick Links
- Live Chat
- Track Order
- Parts Availability
- RMA
- Help Center
- Contact Us
- Shop for
- Mazda Parts
My Garage
My Account
Cart
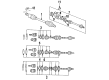
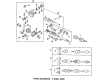
Genuine Mazda 626 CV Joint Boot
Constant-Velocity Joint Boot- Select Vehicle by Model
- Select Vehicle by VIN
Select Vehicle by Model
orMake
Model
Year
Select Vehicle by VIN
For the most accurate results, select vehicle by your VIN (Vehicle Identification Number).
11 CV Joint Boots found


Mazda 626 Boots Part Number: G567-22-530
$34.35 MSRP: $45.81You Save: $11.46 (26%)Ships in 1-2 Business Days
Mazda 626 Boots Part Number: G594-22-530
$7.07 MSRP: $9.29You Save: $2.22 (24%)Ships in 1-2 Business Days
Mazda 626 Boots Part Number: G043-22-540A
Mazda 626 Boots Part Number: G05322540
Mazda 626 Boots Part Number: G063-22-530A
Mazda 626 Boots Part Number: G592-22-530
Mazda 626 Boots Part Number: G592-22-540
Mazda 626 Boots Part Number: G594-22-540
Mazda 626 Boots Part Number: GA2K-V9-050-9U

Mazda 626 Boots Part Number: GS50-V9-050-9U

Mazda 626 Boots Part Number: GS70-V9-050-9U
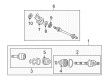
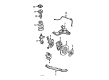
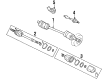
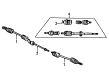
Mazda 626 CV Joint Boot
Looking for CV Joint Boot with proven quality? Choose OEM CV Joint Boot. Mazda designs and builds them to strict factory specs. Every piece goes through rigorous quality checks. You'll get parts that fit right and work like new. Shop our huge inventory of OEM Mazda 626 parts. Enjoy the highly competitive prices online. Our site is your one-stop shop. Each genuine 626 part includes a manufacturer's warranty. Buy with confidence. Our return policy is simple and hassle-free. In a rush? Choose expedited delivery at checkout. You'll love the streamlined experience from search to checkout to receiving your order.
Mazda 626 CV Joint Boot Parts and Q&A
- Q: Should the CV Joint Boot and Transfer Case Pinion Shaft Seals be inspected for leaks and damage at recommended intervals on Mazda 626?A:The transaxle output shaft seals and CV Joint Boots are to be checked at the prescribed intervals as to leaks and damages. Start with lifting the front of the car and placing it on jackstands. Inspect the seals of the transaxle output shaft at the point of the junction of the drive axles with the transaxle making sure to clean it first. In case any oil is leaking through the driveaxle/transaxle junctions the output shaft seals should be replaced. The CV Joint Boots will help keep the constant velocity (CV) joints clean of dirt, water, and other foreign substances; the boots must be checked on all four axleshafts. Washing the boots with water and soap is recommended because oil or grease may lead to early destruction. Damage or indications of lubricant release require replacement, and the tightness of boot clamps must be checked; in case they are loose and cannot be tightened, they require replacement.
- Q: How to properly replace a CV Joint Boot on Mazda 626?A:Prior to beginning work, obtain the proper boot kit from your dealer, as it contains the special moly-base lubricant required for use on Constant Velocity (CV) joints, and no other type should be used. Start by removing the CV joint and placing the CV joint assembly in a vise, using blocks of wood to protect the surface from damage. Cut the boot retaining bands and discard them, then pry back the boot and slide it down the shaft, away from the CV joint. Remove the joint outer ring retaining clip (if equipped) with a screwdriver and slide the ring off, followed by removing the snap ring and sliding the bearing assembly off the axleshaft splines. Slide the boot off the axle, and due to the work involved in CV joint removal and installation, it is advisable to replace both boots even if only one is damaged, unless the vehicle has covered very few miles. Clean the bearing assembly and shaft splines carefully, inspecting for wear, damage, and contamination by dirt and water, replacing any damaged components with new ones. Wrap tape around the shaft splines to avoid damaging the sealing surface of the new boot during installation, then lightly lubricate the inner diameter of the new boot and slide it onto the CV joint, ensuring that different boots used on the wheel and differential sides are not mixed up. Remove the tape, apply a light coat of grease to the splines, and install the bearing assembly and snap ring with the tapered edge facing the shaft. Pack the bearing cavity with the special moly base grease, install the outer ring, seat the boot in the grooves, and install the boot retaining bands so that the tightening tab folds in the opposite direction of driveshaft rotation when the vehicle is moving forward. Pull the band tight with pliers and lock it tightly in place by bending the tabs over and securing them with a blunt tool such as a large punch, then install the CV joint.


Related Mazda 626 Parts
 Mazda 626 Battery Trays
 Mazda 626 Camber and Alignment Kit
 Mazda 626 Control Arm Bushing
 Mazda 626 Crankshaft Seal
 Mazda 626 Differential Bearing
 Mazda 626 Door Check
 Mazda 626 Door Lock Cylinder
 Mazda 626 Engine Control Module
 Mazda 626 Piston
 Mazda 626 Trunk Lid Latch
Browse by Year
2002 CV Joint Boot 2001 CV Joint Boot 2000 CV Joint Boot 1999 CV Joint Boot 1998 CV Joint Boot 1997 CV Joint Boot 1996 CV Joint Boot 1995 CV Joint Boot 1994 CV Joint Boot 1993 CV Joint Boot 1992 CV Joint Boot 1991 CV Joint Boot 1990 CV Joint Boot 1989 CV Joint Boot 1988 CV Joint Boot 1987 CV Joint Boot 1986 CV Joint Boot 1985 CV Joint Boot 1984 CV Joint Boot