×
- Hello
- Login or Register
- Quick Links
- Live Chat
- Track Order
- Parts Availability
- RMA
- Help Center
- Contact Us
- Shop for
- Mazda Parts
My Garage
My Account
Cart
Genuine Mazda 929 Oil Pan
Oil Drain Pan- Select Vehicle by Model
- Select Vehicle by VIN
Select Vehicle by Model
orMake
Model
Year
Select Vehicle by VIN
For the most accurate results, select vehicle by your VIN (Vehicle Identification Number).
1 Oil Pan found

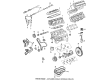
Mazda 929 Oil Pan Part Number: JE15-10-400A
Mazda 929 Oil Pan
Looking for Oil Pan with proven quality? Choose OEM Oil Pan. Mazda designs and builds them to strict factory specs. Every piece goes through rigorous quality checks. You'll get parts that fit right and work like new. Shop our huge inventory of OEM Mazda 929 parts. Enjoy the highly competitive prices online. Our site is your one-stop shop. Each genuine 929 part includes a manufacturer's warranty. Buy with confidence. Our return policy is simple and hassle-free. In a rush? Choose expedited delivery at checkout. You'll love the streamlined experience from search to checkout to receiving your order.
Mazda 929 Oil Pan Parts and Q&A
- Q: How to remove and install the oil pan for piston engine on Mazda 929?A:In order to remove and install the oil pan on different car models, the first point is to have the battery cable of the negative battery cable disconnected and the front of the car raised where it is well supported. Drain the engine oil and take off any under covers, engine splash shields or skid plates as required. In some models, just disconnect the slave cylinder of the clutch, without removing the hydraulic line, and loosen the bolts of the engine rear brace (and the left side, where present). Unplug any of the lines connected to the oil pan and unscrew the front motor mounts, lifting the engine in place as necessary. On a front-wheel drive car, unscrew the exhaust pipe off of the manifold and the engine torque brace, whereas on a rear-wheel drive car, any wooden support blocks must be removed, and then the engine can be lowered. Open the oil pan that contains bolts, and the oil pan would be removed and could rest on the crossmember (where necessary). Wipe off gasket mating surfaces, inspecting cracks, wear or tear, and apply sealant as needed and then install the oil pump pickup tube (removed earlier). In models that do not have a gasket, there is use of a gasket forming sealant, but the pan should be installed and the bolts torqued in a given period of time. In the case of those having a gasket put sealer on the joints, then install the gasket and the oil pan, and tighten the retaining bolts. Reassemble any that have been removed like engine torque brace, exhaust pipe and splash shields, lower the vehicle, refill the crankcase, and reconnect the battery cable and start the engine checking it to leak.
Related Mazda 929 Parts
 Mazda 929 Camshaft Seal
 Mazda 929 Crankshaft Pulley
 Mazda 929 Crankshaft Seal
 Mazda 929 Cylinder Head Gasket
 Mazda 929 Oil Pump
 Mazda 929 Rod Bearing
 Mazda 929 Timing Belt Tensioner
 Mazda 929 Timing Cover
 Mazda 929 Valve Cover Gasket
 Mazda 929 Valve Spring Retainer Keeper
 Mazda 929 Valve Stem Seal
 Mazda 929 Variable Timing Sprocket