×
- Hello
- Login or Register
- Quick Links
- Live Chat
- Track Order
- Parts Availability
- RMA
- Help Center
- Contact Us
- Shop for
- Mazda Parts
My Garage
My Account
Cart
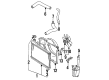
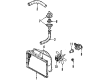
Genuine Mazda 929 Radiator Hose
Radiator Hose Tube- Select Vehicle by Model
- Select Vehicle by VIN
Select Vehicle by Model
orMake
Model
Year
Select Vehicle by VIN
For the most accurate results, select vehicle by your VIN (Vehicle Identification Number).
7 Radiator Hoses found


Mazda 929 Upper Hose Part Number: JE26-15-186
$16.20 MSRP: $21.60You Save: $5.40 (25%)Ships in 1-2 Business Days
Mazda 929 Lower Hose Part Number: JE48-15-185
$23.60 MSRP: $31.47You Save: $7.87 (26%)Ships in 1-2 Business DaysMazda 929 Lower Hose Part Number: JE26-15-185
$4.39 MSRP: $5.77You Save: $1.38 (24%)Ships in 1-2 Business Days
Mazda 929 By-Pass Hose Part Number: JE26-15-189
$3.07 MSRP: $24.16You Save: $21.09 (88%)Ships in 1-2 Business Days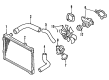
Mazda 929 By-Pass Hose Part Number: JF01-15-189
Mazda 929 By-Pass Hose Part Number: JEA6-15-189B
Mazda 929 Upper Hose Part Number: JE48-15-186A
Mazda 929 Radiator Hose
Looking for Radiator Hose with proven quality? Choose OEM Radiator Hose. Mazda designs and builds them to strict factory specs. Every piece goes through rigorous quality checks. You'll get parts that fit right and work like new. Shop our huge inventory of OEM Mazda 929 parts. Enjoy the highly competitive prices online. Our site is your one-stop shop. Each genuine 929 part includes a manufacturer's warranty. Buy with confidence. Our return policy is simple and hassle-free. In a rush? Choose expedited delivery at checkout. You'll love the streamlined experience from search to checkout to receiving your order.
Mazda 929 Radiator Hose Parts and Q&A
- Q: How to remove and install a radiator hose on Mazda 929?A:The procedure to remove and install hoses will require that you first remove the radiator cap and empty the radiator of its coolant either by opening the petcock or removing the lower radiator hose. Draining ethylene glycol antifreeze into a container with a cap is essential in order to avoid the risk of injuring pets since the compound is toxic. When changing bottom hose, empty all the coolant; when changing top hose, empty just enough to reduce the amount of fluid. Slide and loosen hose clamps towards the middle of the hose then disconnect, in case needed, in a twisting motion. The clamps should be placed approximately 2 inches on both ends and tight when installing a new hose so that it does not crush the metal on the radiator connections. Once the petcock is closed, add coolant, and briefly run the engine to verify the presence of leaks. In the RX-7 models, the coolant flows just like in normal engines and the upper hose must be partially drained whereas the lower hose must be fully drained. Never drain the engine when it is hot, and never upset the radiator cap. When removable the tower hose is undergoing removal, the splash panel should be removed first. Install the RX-7 the same way, but make sure the clamps are not tightened too tightly so as to break. Following any refitting of the panels, start the engine and make sure that there is no leakage and fill up the radiator accordingly. In a car, old hoses can be kept in a plastic bag to be accessed in time of need.
Related Mazda 929 Parts
 Mazda 929 Coolant Reservoir
 Mazda 929 Coolant Reservoir Cap
 Mazda 929 Coolant Reservoir Hose
 Mazda 929 Cooling Fan Assembly
 Mazda 929 Fan Clutch
 Mazda 929 Oil Cooler Hose
 Mazda 929 Radiator
 Mazda 929 Thermostat
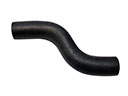 Mazda 929 Water Hose
 Mazda 929 Water Pump
 Mazda 929 Water Pump Gasket
 Mazda 929 Water Pump Pulley