×
- Hello
- Login or Register
- Quick Links
- Live Chat
- Track Order
- Parts Availability
- RMA
- Help Center
- Contact Us
- Shop for
- Mazda Parts
My Garage
My Account
Cart
Genuine Mazda B2200 Brake Shoe Set
Brake Shoe- Select Vehicle by Model
- Select Vehicle by VIN
Select Vehicle by Model
orMake
Model
Year
Select Vehicle by VIN
For the most accurate results, select vehicle by your VIN (Vehicle Identification Number).
1 Brake Shoe Set found

Mazda B2200 Shoes Part Number: UB39-26-38ZA
$56.50 MSRP: $75.34You Save: $18.84 (26%)Ships in 1-2 Business Days
Mazda B2200 Brake Shoe Set
Looking for Brake Shoe Set with proven quality? Choose OEM Brake Shoe Set. Mazda designs and builds them to strict factory specs. Every piece goes through rigorous quality checks. You'll get parts that fit right and work like new. Shop our huge inventory of OEM Mazda B2200 parts. Enjoy the highly competitive prices online. Our site is your one-stop shop. Each genuine B2200 part includes a manufacturer's warranty. Buy with confidence. Our return policy is simple and hassle-free. In a rush? Choose expedited delivery at checkout. You'll love the streamlined experience from search to checkout to receiving your order.
Mazda B2200 Brake Shoe Set Parts and Q&A
- Q: How to inspect and replace a Brake Shoe Set on Mazda B2200?A:Once the wheel and brake drum are removed, visually inspect the brake shoe lining (worn through) and replace the brake shoe set when the brake shoe lining is visible to be above the rivet head 1/32 inch(0.8mm) or the metal webbing of the shoes is worn out and complies with local inspection regulations. In 2-wheel drive pickups, jack up the rear end on jackstands, dismantle the drums, refracting and hold down springs, guide pins, parking brake connection, adjusting pawl, and spring, and remove the shoes with reference to the longer lining shoe location. Check that the shoes have no cracks, no heat checking or contamination, at least a 1.00mm (0.039 in.) minimum thickness of linings and also replace both sides where required. Clean the support plate and wipe the thread of the starwheel with grease and the pads of the brakeshoes. Installation requires one to take the parking brake lever and reversal of the dismantling operations and then to adjust the parking brake and the brake shoes by reversing the dismantling process again and by testing the brake pedal to ensure that it does not have sponginess. In the case of 4-wheel drive pickups and MPVs, the removal and installation procedures are the same as long as to check and clean the parts, lubricate where necessary, and to set the brakes. To the Navajos, lift and hold the car, take off the wheel and brakes drum, pull off the adjusting lever, and take off the springs and shoes, and observe the location of hold-down springs. Wipe the backing plate, lithium grease high temperature, and fix the new parts making sure that all the shoes are correctly placed and adjusted. Turn the brakes with a gauge or fingers and test that the rotation of the drum is free of drag. Drum brakes are self adjust but have to be adjusted manually after changing the shoe whereas disc brakes cannot be adjusted. When adjusting rear drum brakes, raise the car, take out the rubber plug, use the adjusting screw to increase the expansion of the shoes until they drag then take out the starwheel so that they can have freedom of movement. Do the same to the other side, making sure that there is equal adjustment to avoid pull to the brake, and the road test is only done when the brakes are safe and working.
Related Mazda B2200 Parts
 Mazda B2200 Brake Booster
 Mazda B2200 ABS Control Module
 Mazda B2200 ABS Sensor
 Mazda B2200 Axle Shaft Seal
 Mazda B2200 Brake Dust Shields
 Mazda B2200 Brake Master Cylinder
 Mazda B2200 Brake Pads
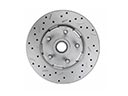 Mazda B2200 Brake Rotor
 Mazda B2200 Hydraulic Hose
 Mazda B2200 Parking Brake Cable
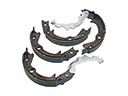 Mazda B2200 Parking Brake Shoes
 Mazda B2200 Wheel Cylinder