×
- Hello
- Login or Register
- Quick Links
- Live Chat
- Track Order
- Parts Availability
- RMA
- Help Center
- Contact Us
- Shop for
- Mazda Parts
My Garage
My Account
Cart
Genuine Mazda B2200 Engine Mount
Engine Motor Mount- Select Vehicle by Model
- Select Vehicle by VIN
Select Vehicle by Model
orMake
Model
Year
Select Vehicle by VIN
For the most accurate results, select vehicle by your VIN (Vehicle Identification Number).
3 Engine Mounts found

Mazda B2200 Motor Mount Part Number: UB39-39-040C
$46.05 MSRP: $61.41You Save: $15.36 (26%)Ships in 1-2 Business Days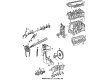
Mazda B2200 Rear Mount Part Number: 0437-39-340A
Mazda B2200 Transmission Mount Part Number: UB39-39-340A
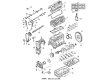
Mazda B2200 Engine Mount
Looking for Engine Mount with proven quality? Choose OEM Engine Mount. Mazda designs and builds them to strict factory specs. Every piece goes through rigorous quality checks. You'll get parts that fit right and work like new. Shop our huge inventory of OEM Mazda B2200 parts. Enjoy the highly competitive prices online. Our site is your one-stop shop. Each genuine B2200 part includes a manufacturer's warranty. Buy with confidence. Our return policy is simple and hassle-free. In a rush? Choose expedited delivery at checkout. You'll love the streamlined experience from search to checkout to receiving your order.
Mazda B2200 Engine Mount Parts and Q&A
- Q: What essential steps and precautions should be taken when removing and reinstalling an engine mount on Mazda B2200?A:When performing the engine removal, you will be faced with numerous activities which include disconnection of individual parts or systems and these systems include the exhaust system, Radiator and others. There are many combinations of model and engine so it is necessary to apply great caution and common sense when repairing. To make it easier to remove and install, drain the fluids in any appropriate container, label the wires and hoses before taking them out, and place retainers of the parts in their own containers to eliminate confusion. Make sure that the transmission is well supported once it is unbolt and in case the air conditioning system has to be disconnected, it has to be done by a qualified technician. In removing engine mounts, the engine should be supported and the lifting hooks used should it have any. Slowly lift the engine and ensure that all the connections are removed and put the engine on a stand or work bench when it is clear. Start with the process of defueling the system, disconnection of the battery, marking the location of the hood, lifting the vehicle, emptying fluids and removing the needed parts such as starter, transmission, exhaust system, and radiator. Unscrew fuel lines, electricity connectors, and hoses, and take out any other parts that are necessary. To install, one needs to oil the bolts, and the engine should be put in place properly and correctly aligned with the transmission and exhaust. Screw engine mounts firmly in place, tighten screws and undo the procedures in order to install it back. Add oil to crankcase, and check all connections and make the required adjustments and install the air intake duct and the battery. Lastly, fill and bleed the cooling system, turn on the engine and inspect that it has no leaks and put the hood back on, making sure that it fits well. Have A/C system serviced by a certified person, where necessary.


