×
- Hello
- Login or Register
- Quick Links
- Live Chat
- Track Order
- Parts Availability
- RMA
- Help Center
- Contact Us
- Shop for
- Mazda Parts
My Garage
My Account
Cart
Genuine Mazda B2200 Rocker Arm
Engine Rocker Arm- Select Vehicle by Model
- Select Vehicle by VIN
Select Vehicle by Model
orMake
Model
Year
Select Vehicle by VIN
For the most accurate results, select vehicle by your VIN (Vehicle Identification Number).
2 Rocker Arms found

Mazda B2200 Rocker Arms Part Number: F240-12-150C
$82.14 MSRP: $109.53You Save: $27.39 (26%)Ships in 1-2 Business DaysMazda B2200 Rocker Arms Part Number: F240-12-130C
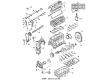
Mazda B2200 Rocker Arm
Looking for Rocker Arm with proven quality? Choose OEM Rocker Arm. Mazda designs and builds them to strict factory specs. Every piece goes through rigorous quality checks. You'll get parts that fit right and work like new. Shop our huge inventory of OEM Mazda B2200 parts. Enjoy the highly competitive prices online. Our site is your one-stop shop. Each genuine B2200 part includes a manufacturer's warranty. Buy with confidence. Our return policy is simple and hassle-free. In a rush? Choose expedited delivery at checkout. You'll love the streamlined experience from search to checkout to receiving your order.
Mazda B2200 Rocker Arm Parts and Q&A
- Q: How to remove and reinstall the rocker arm/shaft assembly on Mazda B2200?A:Removing the rocker arm/shaft assembly of a 2.2L engine requires first unscrewing the negative battery cable, then unscrewing the air cleaner assembly/air intake hose (as required) and finally unscrewing the rocker arm cover. Install the rocker arm/shaft assembly mounting bolts in 2-3 steps and in the proper order then remove the assembly with the bolts. In case disassembly is needed, mark the location of every component in replacing it later, and inspect the contact surfaces to determine whether they are worn or damaged, replacing them accordingly. The inner diameter of the rocker arm (0.6300-0.6310 in.) and the shaft diameter of the rocker arm (0.6286-0.6293 in.), and compute the oil clearance, ought to be not less than 0.0006-0.0024 in and no more than 0.004 in. Installation requires applying clean engine oil to the rocker arm shafts and rocker arms, assembling in reverse order, making sure that oil holes line up, and using silicone sealant on the surfaces of the cylinder head and camshaft caps. Attach the bolts of the rocker arm / shaft assembly sequentially up to a maximum of 13-20 ft. lbs. and secure the rocker arm cover followed by tightening the bolts to 26-35 inch lbs. Lastly, install the air cleaner assembly or air intake tube, re-connect the negative battery cable, and start the engine, and look at the leaks and functioning. In the case of the 2.6L engine (19871988), repeat the steps with some differences, making sure to use a hydraulic lash adjuster holder tool when dismantling, and the measurement of rocker arm inner and shaft diameter (0.7435-0.7440 in.) and rocker arm clearance specifications (0.0005-0.0017 in.). The inner diameter of 1989-93 models should be 0.8268-0.8281 in., and the shaft diameter is 0.8252-0.8260 in., the clearance being 0.0008-0.0029 in. Dismantle the required parts in the 3.0L engine to reach the rocker arm/shaft assembly, examine it against wear, and measure the inner diameter (0.7480-0.7493 in.) and shaft diameter (0.7464-0.7472 in.) and the oil clearance (0.0008-0.0029 in.). In the case of the 4.0L engine, the battery should be disconnected and the intake shield and air intake tube should be removed, then the right rocker arm/shaft assembly should be removed, and different parts must be tagged and disconnected, as necessary. Once the rocker arm shafts are removed, check and replace all the gasket mating parts, and add and tighten support bolts evenly at 46-52 ft. lbs., lubricate all the gasket mating surfaces with silicone sealant, replace gasket to rocker arm cover with a new one and tighten the bolts in a criss-cross pattern. Lastly, put everything back in place, re-attach the battery, engage the engine, and inspect against leakages and functionality.
- Q: How to safely remove and install rocker arms on Mazda B2200?A:To install and remove components, it is important to start up by ensuring that safety measures are observed particularly in fuel injected models where it is important to release the fuel pressure before unscrewing lines. In the case of 2.2L engine, this can be done by disconnecting the choke and air bypass valve cables, removing air cleaner or cross over vent, disconnecting the PCV valve, and removing the cam cover, cleaning all gasket surfaces, and then installing new gaskets and tightening bolts up to appropriate torque. In the case of the 2.6L 1987-88, the negative battery cable should be disconnected, the air cleaner assembly, and hoses removed and then the rocker cover is unbolted and removed using RTV sealant and then installed and screwed back on again. In the 1989-93 model, disassemble the battery ground cable and accelerator cable, disassemble the air intake pipe, and wipe down of mating surfaces and fit the rocker cover with a gasket or RTV sealant. In the case of the 3.0L engine, it is necessary to disconnect air bypass valve cable and PCV valve, remove cam cover, and fit with new gaskets and tighten the bolts accordingly. In the 4.0L, looseness battery cable, de-pressurize fuel system, and strip required parts to gain access to rocker cover with due caution of draining coolant. Once all the surfaces are cleared, put the rocker cover back in place with a new gasket, put the bolts back to the required torque, and reconnect the battery and make sure the engine has no leaks before starting.
Related Mazda B2200 Parts
 Mazda B2200 Cylinder Head Gasket
 Mazda B2200 Engine Cover
 Mazda B2200 Exhaust Valve
 Mazda B2200 Intake Valve
 Mazda B2200 Oil Pan
 Mazda B2200 Oil Pan Gasket
 Mazda B2200 Piston
 Mazda B2200 Piston Ring Set
 Mazda B2200 Timing Belt Idler Pulley
 Mazda B2200 Timing Cover
 Mazda B2200 Valve Spring
 Mazda B2200 Valve Spring Retainer Keeper