×
- Hello
- Login or Register
- Quick Links
- Live Chat
- Track Order
- Parts Availability
- RMA
- Help Center
- Contact Us
- Shop for
- Mazda Parts
My Garage
My Account
Cart
Genuine Mazda MX-5 Miata CV Joint
CV Joint Axle- Select Vehicle by Model
- Select Vehicle by VIN
Select Vehicle by Model
orMake
Model
Year
Select Vehicle by VIN
For the most accurate results, select vehicle by your VIN (Vehicle Identification Number).
2 CV Joints found

Mazda MX-5 Miata Inner CV Joint Part Number: MA04-22-520A
$334.71 MSRP: $446.37You Save: $111.66 (26%)Ships in 1-2 Business Days
Mazda MX-5 Miata Inner Joint Assembly Part Number: RTC3-22-520
$373.38 MSRP: $497.94You Save: $124.56 (26%)Ships in 1-2 Business Days
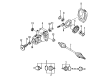
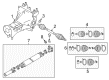
Mazda MX-5 Miata CV Joint
Looking for CV Joint with proven quality? Choose OEM CV Joint. Mazda designs and builds them to strict factory specs. Every piece goes through rigorous quality checks. You'll get parts that fit right and work like new. Shop our huge inventory of OEM Mazda MX-5 Miata parts. Enjoy the highly competitive prices online. Our site is your one-stop shop. Each genuine MX-5 Miata part includes a manufacturer's warranty. Buy with confidence. Our return policy is simple and hassle-free. In a rush? Choose expedited delivery at checkout. You'll love the streamlined experience from search to checkout to receiving your order.
Mazda MX-5 Miata CV Joint Parts and Q&A
- Q: What factors should you consider when overhauling the CV Joint and CV Joint Boot on Mazda MX-5 Miata?A:In case the CV joints need an overhaul, which is usually as a result of torn boots, it is advisable to look at all the options available before getting into the job. Complete rebuilt CV joints may be bought on exchange basis saving a lot of time and effort. No matter the procedure used, check the prices and availability of components before dismantling the car. The first step involves taking off the CV joint and holding it in a vise with jaws lined with wood to avoid breaking. Inspect the CV joint in terms of excess radial movement and scrutinize it in the softness of its movement at its entire extent of movement. In case of torn boot, dismantle the joint, wash up the parts and check whether the boot has been damaged due to loss of lubrication or contamination. Unscrew the boot clamp pins by pushing the clamps off the boot and pushing the boot back over the Axle Shaft and removing the wire ring ball retainer off the outer race. Identify the outer race to the axleshaft and remove it off the inner bearing assembly making sure to mark the inner race, cage and axleshaft end to be properly fitted back. Unscrew the snap-ring on the axle shaft groove, and push the inner bearing assembly off. Taking the balls carefully out of the cage so as to leave them undamaged, place the inner race lands in position with the windows to take them out of the cage. Wipe everything with solvent, checking it to see whether there is wear and damage, and it is normal to have shiny spots. To reassemble simply pop the inner race in the cage, pop the balls in the cage windows and tape the axle shaft splines to ensure the boot remains intact during installation. Install the inner race and cage assembly on the axeshaft making sure the larger diameter is facing the end and then install the snap-ring and stuff the outer race and boot with the appropriate CV joint grease. Put the outer race over the inner one and position the marks and install the wire ring retainer. Cleanse the excess grease off the groove of the axle boot, fix one end of the boot and turn the length of the CV joint as necessary. Bring the pressure in the boot even with a dull screwdriver, place the boot clamps and subsequently fit the CV joint. In the case of the outer CV joint, take out the inner CV joint of the axleshaft, disassemble it, take out the outer CV joint boot clamps, and slip off the boot. Clean the inside and outside CV joints using a solvent and blow them dry using compressed air. Bend the outer CV joint housing to view the bearings, inner race and cage; replace the CV joint in case any damage is detected. Install the new outer boot by sliding it onto the CV joint with a strip of vinyl tape around the splines to avoid damaging the boot, and pouring in the recommended amount of grease into the outer joint and boot before sliding the boot onto the CV joint and affixing new clamps. Last but not least, wash and re-fit the inner CV joint and finally, fit the CV joint.

Related Mazda MX-5 Miata Parts
 Mazda MX-5 Miata Axle Shaft
 Mazda MX-5 Miata CV Boot
 Mazda MX-5 Miata CV Joint Companion Flange
 Mazda MX-5 Miata Differential
 Mazda MX-5 Miata Differential Bearing
 Mazda MX-5 Miata Differential Cover
 Mazda MX-5 Miata Differential Seal
 Mazda MX-5 Miata Drive Shaft
 Mazda MX-5 Miata Output Shaft Seal
 Mazda MX-5 Miata Pinion Bearing
 Mazda MX-5 Miata Ring And Pinion