×
- Hello
- Login or Register
- Quick Links
- Live Chat
- Track Order
- Parts Availability
- RMA
- Help Center
- Contact Us
- Shop for
- Mazda Parts
My Garage
My Account
Cart
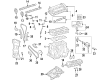
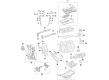
Genuine Mazda MX-5 Miata Piston
Engine Pistons- Select Vehicle by Model
- Select Vehicle by VIN
Select Vehicle by Model
orMake
Model
Year
Select Vehicle by VIN
For the most accurate results, select vehicle by your VIN (Vehicle Identification Number).
4 Pistons found


Mazda MX-5 Miata Piston Part Number: LFY0-11-SA0A
$133.99 MSRP: $178.69You Save: $44.70 (26%)Ships in 1-2 Business Days
Mazda MX-5 Miata Piston Part Number: PEY6-11-SA0
$81.40 MSRP: $108.56You Save: $27.16 (26%)Ships in 1-2 Business Days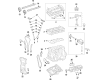
Mazda MX-5 Miata Piston Part Number: PEZ0-11-SA0A
$122.03 MSRP: $162.74You Save: $40.71 (26%)Ships in 1-2 Business DaysMazda MX-5 Miata Piston Part Number: LFYA-11-010
$309.21 MSRP: $412.37You Save: $103.16 (26%)Ships in 1-2 Business Days
Mazda MX-5 Miata Piston
Looking for Piston with proven quality? Choose OEM Piston. Mazda designs and builds them to strict factory specs. Every piece goes through rigorous quality checks. You'll get parts that fit right and work like new. Shop our huge inventory of OEM Mazda MX-5 Miata parts. Enjoy the highly competitive prices online. Our site is your one-stop shop. Each genuine MX-5 Miata part includes a manufacturer's warranty. Buy with confidence. Our return policy is simple and hassle-free. In a rush? Choose expedited delivery at checkout. You'll love the streamlined experience from search to checkout to receiving your order.
Mazda MX-5 Miata Piston Parts and Q&A
- Q: What steps must be taken before removing the piston and connecting rod assemblies on Mazda MX-5 Miata?A:The oil pan and the cylinder head should be removed before the piston and connecting rod assemblies. Test with your fingernail until you find that it reaches its highest limit of ring travel about 1/4 inch below the top of each cylinder; here any ridges that may be caused by carbon deposits or wear at the cylinder extremity must be cleared away with a special tool to avoid piston breakage. Once the cylinder ridges have been removed, position the engine in a manner that the Crankshaft is facing up. Check endplay of the connecting rod with feeler gauges and make certain that the play is not too large, or excessive endplay may be created and new connecting rods might be required. Mark connecting rods, caps on them, and then lose the fasteners of the number one connecting rod cap, then the cap, and bearing insert. Drive out the connecting rod/piston assembly of the engine through the top of the engine, with a dowel of wood, where necessary, and then push out the others. Once removed, replace the connecting rod caps and bearing inserts on respective rods retaining the old bearings to prevent surface damage to the bearings. The butts and connecting rods are now ready to be inspected and overhauled. Checking of the ring end gaps and confirming that the piston ring side clearance is appropriate before fitting up new piston rings. Arrange the piston/ connecting rod assemblies and new ring sets so that it can be matched during installation. After fitting the top ring in the first cylinder in a manner that it is square to the walls of the cylinder and measure the end gap using the feeler gauges. Should the gap be wrong, then it is to be adjusted with great care, by filing the ring ends. Do the same with each ring and be sure that the parts of the oil control rings are installed correctly then the middle ring and the top ring up till the identification marks are facing the right direction. Prior to installation, the walls of the cylinder, the edges chamfered and the crankshaft in position. Clean the bearing components and install new upper bearing insert and make sure it fits well without any lubrication. Installation of piston rings requires positioning of piston ring gaps, lubrication of piston and rings as well as installation with piston ring compressor. Install the piston/connecting rod assembly into the cylinder with the connecting rod directed towards the crankshaft journal. Measure the connecting rod bearing oil clearance with Plastigage and, as required, modify the bearing inserts according to measure. Install the rod cap and fasteners, tighten them to the correct torque when all the parts are clean and lubricated. Do the same with the other assemblies making everything tidy and in the right orientation. Lastly, turn the crankshaft to ensure that there is no binding, and that the endplay of the connecting rod is within specifications, making changes when necessary when new parts were used.
Related Mazda MX-5 Miata Parts
 Mazda MX-5 Miata Camshaft
 Mazda MX-5 Miata Crankshaft Gear
 Mazda MX-5 Miata Cylinder Head Gasket
 Mazda MX-5 Miata Oil Pan
 Mazda MX-5 Miata Oil Pump
 Mazda MX-5 Miata Oil Pump Rotor Set
 Mazda MX-5 Miata Timing Belt Tensioner
 Mazda MX-5 Miata Timing Chain
 Mazda MX-5 Miata Timing Chain Guide
 Mazda MX-5 Miata Valve Cover Gasket
 Mazda MX-5 Miata Valve Spring Retainer
 Mazda MX-5 Miata Valve Stem Seal