×
- Hello
- Login or Register
- Quick Links
- Live Chat
- Track Order
- Parts Availability
- RMA
- Help Center
- Contact Us
- Shop for
- Mazda Parts
My Garage
My Account
Cart
Genuine Mazda MX-6 Axle Shaft
Car Axle Shaft- Select Vehicle by Model
- Select Vehicle by VIN
Select Vehicle by Model
orMake
Model
Year
Select Vehicle by VIN
For the most accurate results, select vehicle by your VIN (Vehicle Identification Number).
13 Axle Shafts found


Mazda MX-6 Shaft Part Number: F047-25-700
$362.99 MSRP: $484.08You Save: $121.09 (26%)Ships in 1-2 Business DaysMazda MX-6 Shaft Part Number: F037-25-700
$374.19 MSRP: $499.01You Save: $124.82 (26%)Ships in 1-2 Business Days
Mazda MX-6 Axle Shaft Assembly Part Number: GT43-25-600A
Mazda MX-6 Shaft Part Number: GA09-25-700C

Mazda MX-6 Drive Axle Part Number: G594-25-600R-0C
Mazda MX-6 Drive Axle Part Number: G594-25-500R-0C
Mazda MX-6 Drive Axle Part Number: G590-25-600R-0B

Mazda MX-6 Shaft Part Number: G579-25-700D
Mazda MX-6 Shaft Part Number: G578-25-700A
Mazda MX-6 Shaft Part Number: G572-25-700B
Mazda MX-6 Shaft Part Number: G562-25-700B
Mazda MX-6 Shaft Part Number: G560-25-700E
Mazda MX-6 Axle Shaft Assembly Part Number: G034-25-60XA
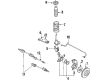
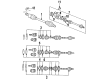
Mazda MX-6 Axle Shaft
Looking for Axle Shaft with proven quality? Choose OEM Axle Shaft. Mazda designs and builds them to strict factory specs. Every piece goes through rigorous quality checks. You'll get parts that fit right and work like new. Shop our huge inventory of OEM Mazda MX-6 parts. Enjoy the highly competitive prices online. Our site is your one-stop shop. Each genuine MX-6 part includes a manufacturer's warranty. Buy with confidence. Our return policy is simple and hassle-free. In a rush? Choose expedited delivery at checkout. You'll love the streamlined experience from search to checkout to receiving your order.
Mazda MX-6 Axle Shaft Parts and Q&A
- Q: How to remove and install the axle shaft and universal joints on Mazda MX-6?A:To change the axle shaft, first lift the front part of the car and firmly rest the part on jackstands before removing the front wheels and splash shields and emptying the transaxle. Screwdriver: Secure the disc of the brakes and remove the hub nut. Unscrew the stabilizer connection, detach the nuts and bolts of balljoint and steering knuckle, and loosen the screw connecting the strut and the balljoint. With great caution, scrape the inner end of the axle off the transaxle or joint shaft with the aid of a chisel in the case of an automatic transaxle, to disengage the axle shaft with the differential. Detach the axle shaft on the hub with a puller; and hold the CV joints suspended and the axle shaft out of the car. Once the right axle shaft has been removed, loosen the fixing bolts, make the joint shaft come out of the transaxle and pull it out of the car, being careful to ensure that the transaxle case is closed over. During removal of both the axle shaft and joint shaft, do not move the gear splines of the transaxle differential side. Installation Check Before installation, insert new clips in the axle shaft and joint shaft grooves and lubricate the splines with transaxle lubricant. Installation of the joint shaft requires one to insert the joint shaft in the transaxle, place the retaining bolts and screw the retaining bolts to the required torque. Install the splined ends into the hub and transaxle raise up the axle shaft with the support of the CV joints. Install the axle shaft into the differential by lightly tapping the axle shaft with a piece of wood and a hammer and installing the steering knuckle and bolts. Install the hub nuts, lock the disc so that it is not able to rotate with a screwdriver or a punch and tighten the hub nut. Install the locknut collar in the groove of the axle shaft by using a hammer and a punch, attaching the stabilizer bar, the splash shields and wheels, filling transaxle with designated fluid and lowering the vehicle.
- Q: How is power transmitted to the front wheels through the Axle Shaft on Mazda MX-6?A:Axle Shafts carry the power out of the transaxle to the front wheels via constant velocity (CV) joints at each end of the axles. The axle shaft is equal in length and has a joint shaft in between the transaxle and the right axle shaft. Rubber boots held by means of straps also cover the CV joints to keep them out of the contamination caused by water and dirt. The boots should be periodically checked to ensure that they are not damaged, leaking lubricant or cut and in that case damaged CV joint boots should be replaced at once to prevent joint damage. The replacement of boots entails the removal of axle shafts. Other typical signs of worn or damaged CV joints other than lubricant leaks, include a clicking sound when turning, there being a clunk when the car is accelerating out of a coasting situation or shaking at highway speeds.

Related Mazda MX-6 Parts


Browse by Year
1997 Axle Shaft
1996 Axle Shaft
1995 Axle Shaft
1994 Axle Shaft
1993 Axle Shaft
1992 Axle Shaft
1991 Axle Shaft
1990 Axle Shaft
1989 Axle Shaft
1988 Axle Shaft