×
- Hello
- Login or Register
- Quick Links
- Live Chat
- Track Order
- Parts Availability
- RMA
- Help Center
- Contact Us
- Shop for
- Mazda Parts
My Garage
My Account
Cart
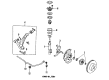
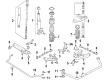
Genuine Mazda RX-7 Coil Springs
Strut Spring- Select Vehicle by Model
- Select Vehicle by VIN
Select Vehicle by Model
orMake
Model
Year
Select Vehicle by VIN
For the most accurate results, select vehicle by your VIN (Vehicle Identification Number).
14 Coil Springs found

Mazda RX-7 Spring Part Number: FB01-34-011B
$145.48 MSRP: $194.00You Save: $48.52 (26%)Ships in 1-2 Business Days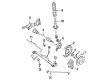
Mazda RX-7 Spring Part Number: FC33-28-011
$146.39 MSRP: $195.22You Save: $48.83 (26%)Ships in 1-2 Business Days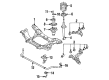
Mazda RX-7 Spring Part Number: FD03-34-011
$160.10 MSRP: $213.51You Save: $53.41 (26%)Ships in 1-2 Business DaysMazda RX-7 Spring Part Number: FD1734011

Mazda RX-7 Spring Part Number: FD15-28-011B
Mazda RX-7 Spring Part Number: FD0328011
Mazda RX-7 Spring Part Number: FB67-34-011
Mazda RX-7 Spring Part Number: FB44-34-021
Mazda RX-7 Spring Part Number: FB01-28-011A
Mazda RX-7 Coil Spring Part Number: FA67-34-011
Mazda RX-7 Coil Spring Part Number: FA66-34-011
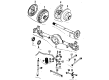
Mazda RX-7 Spring Part Number: FA24-28-011
Mazda RX-7 Coil Spring Part Number: FA01-34-011A
Mazda RX-7 Coil Spring Part Number: F001-34-011A
Mazda RX-7 Coil Springs
Looking for Coil Springs with proven quality? Choose OEM Coil Springs. Mazda designs and builds them to strict factory specs. Every piece goes through rigorous quality checks. You'll get parts that fit right and work like new. Shop our huge inventory of OEM Mazda RX-7 parts. Enjoy the highly competitive prices online. Our site is your one-stop shop. Each genuine RX-7 part includes a manufacturer's warranty. Buy with confidence. Our return policy is simple and hassle-free. In a rush? Choose expedited delivery at checkout. You'll love the streamlined experience from search to checkout to receiving your order.
Mazda RX-7 Coil Springs Parts and Q&A
- Q: How should Coil Springs in the rear suspension be disconnected and reconnected on Mazda RX-7?A:Since some slight tension might exist on the rear suspension parts, when removing them, do not use fingers to push the connecting bolts through the brackets but use a hammer and drift. Laying the matching connecting bolts or nuts onto the suspension part, install the connecting nut and bolt, temporarily on each part of disconnection. Lift the vehicle and hold it using jack stands in the front brackets of the lower links on both sides. Align an adjustable jack with the rear axle casing, and take out the rear wheel(s). Removing the axle housing, take off the lower end of the Shock Absorber by removing it in the bracket and unscrewing the lower connection where it contact the axle housing next to the shock absorber fitting with two wrenches. Loose the upper connection towards the top of the wheel in the same way. In the event that it does have a rear stabilizer bar, disconnect it at the ends. Unconnect the right and left Watts links by having them disconnected on the axle housing brackets and it is preferable to take the center pivoting bell crank out to the maximum. Slowly insert the axle housing using the jack, ensuring it does not hit the brake lines and any other parts. Prior to the removal of the coil spring, marking to identify the top coil and the positioning of the coils in their seats should be done. Lift the coils springs out of socket and inspect the rubber seat on the top and replace when they are worn out. Examine the rubber limiter and the coil spring itself whether it has cracks or not and damages as a drooping at the back would mean that they require replacement. Coil springs are to be always replaced in pairs. Install coil spring in the bottom seat with reference marks to make sure that the coil spring is in right place and then raise the rear axle housing with care so that the coil springs are in right place at the top. Lift up the rear axle housing until the weight of the vehicle ends up on the adjustable jack underneath the axle housing and then lower the adjustable jack until it is shifted back onto the jack stands. Ensure that the springs are in the right position but they are not jostled because they are strained. Install all links and shock absorbers to their places of origin on the axle housings without tightening any lock nuts now. When putting up the high links, remember to have the head of the bolts facing inboard of the vehicle and the nut facing outboard of the bracket, a drift or alignment tool may be used to aid in the alignment of the holes. Install the components on the back of the vehicle with all the bolts and lock nuts in place but not tight, then lower the vehicle to the ground to settle the components then tighten them to the specifications, this is Watts to bracket 47 to 59 ft-lb, upper and lower links to bracket 56 to 76 ft-lb, and rear shock absorber lower end to bracket 47 to 59 ft-lb.
- Q: What precautions should be taken when working with Coil Springs on a front shock absorber on Mazda RX-7?A:The spring of the front Shock Absorber is at a high pressure and one should use a special spring compressor to compress and dis-compress the components securely, one should not attempt to disassemble the components without such compressor, this might cause severe harm to the person. Strut spring compressor is available at Mazda dealers, in most auto parts stores, and can be rented by rental agencies or a few auto parts stores. The first thing to do is to place the shock in a vise with some wooden blocks to pad the claws and not to break them. As per the instructions given by the manufacturer to the particular spring compressor, slightly compress the spring but make sure that the jaws are firmly seated around the coils. Clench the compressor sideways and sideways as the spring seat becomes clear of the upper coil. When the spring is firmly closed, and devoid of its seat, take off the top lock nut and washer, then the mounting block and adjusting plate. Then remove the seat, thrust bearing, spring seat, rubber dust boot and bound bumper over the dust boot. It is better to take all the tension off the spring and take it off the shock absorber by loosening the compressor gradually to an extent that it may be taken out of the shock absorber body since pulling the spring when in compressed position may be hazardous. The spring must be checked on whether it is cracked or deformed particularly when the vehicle was taking a sag on the front hence the need to replace it. With the spring compressor compress the spring some 2 inches, fit the spring-over the main body of the shock absorber, taking care of the lower coil fitting in the spring seat. Install dust boot and bound bumper on shock body, spring seat then. Apply grease to both sides of thrust washer with a thin layer of rubber and attach it to the shaft above spring seat. The second step will be to install the seat, mounting block, and adjusting plate then loosen the lock washer and lock nut on the top of the piston rod and tighten it to the required torque: 47 59 ft-lb. Lastly, gently de-tension the coil spring by loosening the compressor at a slow pace with keeping the top of the spring in the correct location into the spring seat.
Related Mazda RX-7 Parts
 Mazda RX-7 Axle Beam Mount
 Mazda RX-7 Axle Pivot Bushing
 Mazda RX-7 Axle Support Bushings
 Mazda RX-7 Ball Joint
 Mazda RX-7 Control Arm
 Mazda RX-7 Front Cross-Member
 Mazda RX-7 Lateral Link
 Mazda RX-7 Shock Absorber
 Mazda RX-7 Sway Bar Bushing
 Mazda RX-7 Trailing Arm
 Mazda RX-7 Wheel Bearing
 Mazda RX-7 Wheel Seal