×
- Hello
- Login or Register
- Quick Links
- Live Chat
- Track Order
- Parts Availability
- RMA
- Help Center
- Contact Us
- Shop for
- Mazda Parts
My Garage
My Account
Cart
Genuine Mazda RX-7 Tie Rod End
Steering Rod End- Select Vehicle by Model
- Select Vehicle by VIN
Select Vehicle by Model
orMake
Model
Year
Select Vehicle by VIN
For the most accurate results, select vehicle by your VIN (Vehicle Identification Number).
7 Tie Rod Ends found


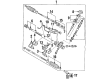
Mazda RX-7 Outer Tie Rod Part Number: 8AB2-32-280
$98.10 MSRP: $130.83You Save: $32.73 (26%)Ships in 1-2 Business Days
Mazda RX-7 Inner Tie Rod Part Number: FB01-32-240A
$85.30 MSRP: $113.76You Save: $28.46 (26%)Ships in 1-2 Business Days
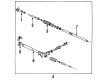
Mazda RX-7 Inner Tie Rod Part Number: H260-32-240A
$94.65 MSRP: $126.22You Save: $31.57 (26%)Ships in 1-2 Business Days
Mazda RX-7 Tie Rod End Part Number: 8021-99-324
$68.26 MSRP: $91.04You Save: $22.78 (26%)Ships in 1-2 Business DaysMazda RX-7 Tie Rod End Part Number: 8531-32-240A
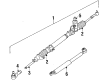
$73.68 MSRP: $98.25You Save: $24.57 (26%)Ships in 1-2 Business Days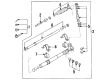
Mazda RX-7 Inner Tie Rod Part Number: FD01-32-240B
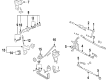
$120.09 MSRP: $160.14You Save: $40.05 (26%)Ships in 1-2 Business DaysMazda RX-7 Inner Tie Rod Part Number: FB02-32-240A
Mazda RX-7 Tie Rod End
Looking for Tie Rod End with proven quality? Choose OEM Tie Rod End. Mazda designs and builds them to strict factory specs. Every piece goes through rigorous quality checks. You'll get parts that fit right and work like new. Shop our huge inventory of OEM Mazda RX-7 parts. Enjoy the highly competitive prices online. Our site is your one-stop shop. Each genuine RX-7 part includes a manufacturer's warranty. Buy with confidence. Our return policy is simple and hassle-free. In a rush? Choose expedited delivery at checkout. You'll love the streamlined experience from search to checkout to receiving your order.
Mazda RX-7 Tie Rod End Parts and Q&A
- Q: How to replace a tie rod end on Mazda RX-7?A:Lift the front portion of the vehicle, and hold the vehicle up using stands after which the front wheel is removed. Take off the tie-rod of the knuckle arm with a puller that may be a usual gear puller. Use the cotter pin to take out and loosen the lock nut until it is sitting on the top of the stud, and is over the threads. Slide the rubber bushing down so that the jaws of the puller can slide in-between the rubber and the knuckle arm and then screw the puller bolt tight until the tie-rod loosens and may need a hammer to loosen it. Bend and loosen the cotter-pin in the locknut, and take the tie-rod end and the lockut. Install: Removal Disconnect the tie-rod to the center link using a gear puller by removing the cotter pin and parting the tie-rod. Raise the tie-rod out of the vehicle. When changing the tie-rod ends, record the length of the tie-rod assembly between the two lock nuts and make a note of the positions of the components as they will be positioned back in place. To loosen the tie-rod ends, loosen the lock nuts at the middle threaded area and unscrew the ends with two wrenches. Install the new tie-rod ends following the previously clearance distances with the new tie-rod end being turned in the same direction as the old ones. Install the tie-rod assembly on the center link and knuckle arm and loosen the lock nuts to a torque of 22 to 33 ft-lb, aligning the cotter pin hole with one of the grooves in the castellated nut and fitting new split pins. Lastly, fit the wheel(s) and lower the car to the ground with the exception of the fact that each time the tie-rod or ball joint is changed, the toe-in should be reset to achieve the correct front alignment geometry.

Related Mazda RX-7 Parts
 Mazda RX-7 Idler Arm
 Mazda RX-7 Ignition Lock Assembly
 Mazda RX-7 Pitman Arm
 Mazda RX-7 Power Steering Cylinder Boot Kit
 Mazda RX-7 Power Steering Filter
 Mazda RX-7 Power Steering Gear Seal
 Mazda RX-7 Power Steering Hose
 Mazda RX-7 Power Steering Pump Seal
 Mazda RX-7 Rack & Pinion Bushing
 Mazda RX-7 Rack And Pinion
 Mazda RX-7 Rack and Pinion Boot
 Mazda RX-7 Tie Rod