×
- Hello
- Login or Register
- Quick Links
- Live Chat
- Track Order
- Parts Availability
- RMA
- Help Center
- Contact Us
- Shop for
- Mazda Parts
My Garage
My Account
Cart
Genuine Mazda Tribute Fender
Wheel Fender- Select Vehicle by Model
- Select Vehicle by VIN
Select Vehicle by Model
orMake
Model
Year
Select Vehicle by VIN
For the most accurate results, select vehicle by your VIN (Vehicle Identification Number).
3 Fenders found

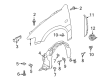
Mazda Tribute Fender Part Number: ZZCA-52-110
$191.46 MSRP: $255.33You Save: $63.87 (26%)Mazda Tribute Fender Part Number: ZZCA-52-210

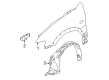
Mazda Tribute Fender Part Number: EF91-52-111
Mazda Tribute Fender
Looking for Fender with proven quality? Choose OEM Fender. Mazda designs and builds them to strict factory specs. Every piece goes through rigorous quality checks. You'll get parts that fit right and work like new. Shop our huge inventory of OEM Mazda Tribute parts. Enjoy the highly competitive prices online. Our site is your one-stop shop. Each genuine Tribute part includes a manufacturer's warranty. Buy with confidence. Our return policy is simple and hassle-free. In a rush? Choose expedited delivery at checkout. You'll love the streamlined experience from search to checkout to receiving your order.
Mazda Tribute Fender Parts and Q&A
- Q: How to remove and install fenders on Mazda Tribute?A:In models up to 2007, start by loosening the lug nut in the front wheel, lifting up the vehicle on jackstands, and loosening the front wheel(s). The second step is to remove the headlight housing and the inner fender splash shield, which are removed with pin-type retainers and mounting screws. Where possible, take off the sidemarker lights and in passenger side fender, take off the radio antenna and in driver side, take off the hood prop rod. In 4WDs, the fender molding and rocker panel molding are removed, but the rocker panel molding has to be detached inside the door panel, which necessitates the removal of the door trim panel and new clips will be required to fit. On all 2007 and older models, first remove lower fender-to-body bolts, upper fender-to-body bolt with front door open, and the rest of the fender mounting bolts and then remove the fender, with assistance recommended to avoid damage. It should be installed in the opposite sequence, making sure that the proper alignment is done with the hood and the door before it is tightened up. On 2008-2012 models, begin by disassembling the front Bumper cover and inner fender splash shield, then disassembling the rocker panel moldings and running boards (where present) and replacing the clips on the rocker molding on installation. When doing the right fender, take off the antenna mast and grommet, then the lower rear edge bolts, the top rear bolt with the door open, the bolts behind the headlight, and the top edge bolts of the engine compartment and then the fender can be removed over the antenna base carefully. Again installation is the opposite with checking first and tightening afterwards. To fit 2013 and subsequent models, unscrew the cowl panel cover and fenderwell splash shield fasteners and fold the splash shield when necessary. Take out the front bumper cover and rocker panel trim, open the door and pry off the body trim panel and remove the exposed bolt. Then remove the lower rear edge bolts, the plastic baffle and inner bolt attached to the inside of the fender, the bolts below the headlight housing, and the horn bracket assembly then the top edge bolts in the engine compartment and then the fender is carefully removed. Installation process is the opposite of removing and it is done to ensure that it is well aligned, then tightened.

Related Mazda Tribute Parts
 Mazda Tribute Dash Panel
 Mazda Tribute Door Screws
 Mazda Tribute Floor Pan
 Mazda Tribute Liftgate Lift Support
 Mazda Tribute Liftgates
 Mazda Tribute Radiator Support
 Mazda Tribute Seat Heater Switch
 Mazda Tribute Wheelhouse
 Mazda Tribute Window Run
 Mazda Tribute Windshield
 Mazda Tribute Windshield Washer Pump
 Mazda Tribute Wiper Motor