×
- Hello
- Login or Register
- Quick Links
- Live Chat
- Track Order
- Parts Availability
- RMA
- Help Center
- Contact Us
- Shop for
- Mazda Parts
My Garage
My Account
Cart
Genuine 2008 Mazda Tribute Shock Absorber
Suspension Shock Absorber- Select Vehicle by Model
- Select Vehicle by VIN
Select Vehicle by Model
orMake
Model
Year
Select Vehicle by VIN
For the most accurate results, select vehicle by your VIN (Vehicle Identification Number).
2 Shock Absorbers found

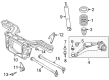
2008 Mazda Tribute Shock Part Number: ZZC2-28-700
$42.05 MSRP: $56.08You Save: $14.03 (26%)Product Specifications- Other Name: Damper, Rear; Shock Absorber
- Item Weight: 5.50 Pounds
- Condition: New
- Fitment Type: Direct Replacement
- SKU: ZZC2-28-700
- Warranty: This genuine part is guaranteed by Mazda's factory warranty.


2008 Mazda Tribute Shock Part Number: ZZC3-28-700
Product Specifications- Other Name: Damper, Rear; Shock Absorber
- Item Weight: 6.00 Pounds
- Condition: New
- Fitment Type: Direct Replacement
- SKU: ZZC3-28-700
- Warranty: This genuine part is guaranteed by Mazda's factory warranty.
2008 Mazda Tribute Shock Absorber Parts and Q&A
- Q: How to remove and install a front shock absorber on 2008 Mazda Tribute?A: In the event of removing the strut, the wheel lug nuts must be loosened, the vehicle raised and jackstands must be placed under the vehicle so that the wheel can be removed. Unattach the brake hose bracket of the strut, and the brake hose has ABS; detach the speed sensor wiring harness. Then removal of the stabilizer bar link on the strut bracket, and 2012 and earlier models, the strut-to-knuckle nuts and knocking out the bolts with a hammer and punch. To remove steering knuckle and cowl cover, 2013 and later models. Slowly detach the strut and steering knuckle taking care not to overstretch the inner CV joint or cause the steering knuckle to come out of position. On 2012 and earlier models, the position of one of the outer upper mounting studs to the strut tower is marked, followed by the removal of the upper mounting nuts or bolts when supporting the strut and spring assembly. Examine the strut body regarding leaks, dents or cracks and inspect the coil spring regarding chips or cracks and spring seat regarding deterioration. In case any problems are identified, then disassemble the strut. To install, insert the strut assembly into the fenderwell and align the matchmarks on 2012 and earlier models or the bolt holes on 2013 and later models and fasten using nuts or bolts. On 2012 and other earlier models, insert the steering knuckle into the strut flange and tighten the nuts, and on 2013 and later models, reconnect the steering knuckle and cowl cover, and all fasteners are to be tightened to the correct torque. Install the brake hose and speed sensor wiring harness as needed, and install the stabilizer bar connection and screw in the nut. Lastly, put on the wheel and lug nuts, drop the vehicle, screw up the lug nuts to the required specification and put on the upper mounting nuts. Check and adjust front end alignment (as needed).
Related 2008 Mazda Tribute Parts
 2008 Mazda Tribute Coolant Reservoir
 2008 Mazda Tribute Automatic Transmission Seal
 2008 Mazda Tribute Door Lock
 2008 Mazda Tribute HVAC Heater Blend Door Actuator
 2008 Mazda Tribute Oxygen Sensor
 2008 Mazda Tribute Steering Knuckle
 2008 Mazda Tribute Wheel Hub